Showing posts with label CTMH Geometric Thoughts. Show all posts

Monday, July 09, 2012

The cutest snail stamp ever!

I've been a stamper for over 10 years and have gotten pretty jaded about the stamping world. It's hard for me to get excited about most stamps these days. But there are occasions when I get that old thrill coming over me when I see a new stamp or set of stamps that just have that special something about them. Well I found some of those stamps recently when visiting Marilyn's Flickr pics and ran across these 3 cards of hers. I knew that I had to have those stamps! But I did hold back for a little while, wondering if I should spend the money. But heck, I've been so good not buying any stamping stuff for so long that I thought I'd go ahead and splurge.

Sooooo, I bought them and I love them! They are sold by Purple Onion Designs using Stacey Yacula's adorable images. Oh. my. goodness. These are just the sweetest, most whimsical images I've seen in a long time! I hope Stacey continues to allow her adorable characters and images to be made into stamps. I will surely buy them! And Purple Onion Designs makes the images nice and deep and crisp. The images look splendid when you stamp them.

Here is a card I made over the weekend using the Toadstool stamp and Tucker the snail from Stacey's The Sweetest Day set.
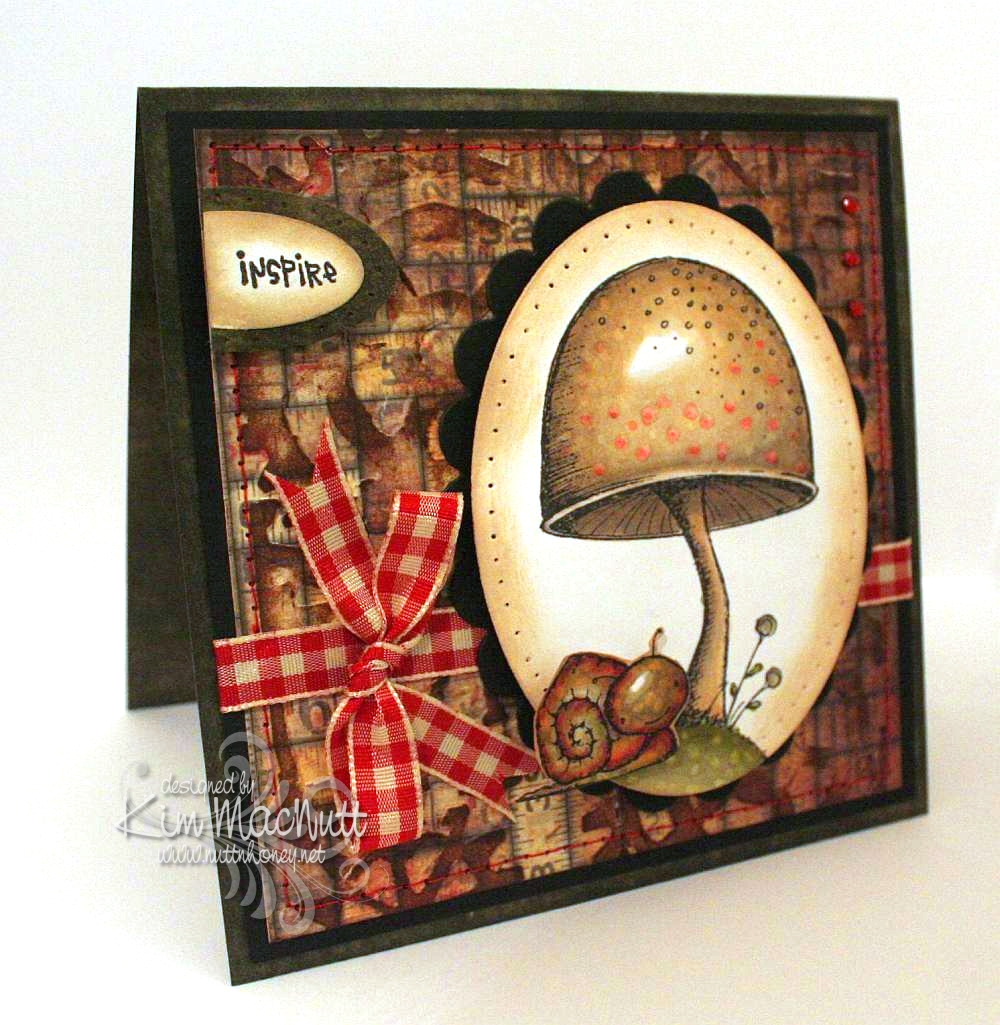


Oh, were these fun to color! A Copic lover's dream come true. Do you buy stamps only if they can be colored with Copics? I've been thinking that way meself ever since I first got into Copics.

I did direct to paper on SU Always Artichoke cardstock with the Always Artichoke ink pad and set it aside to dry.

I had already colored the images, so my colors were already chosen for the card. I looked through my pad of Tim Holtz's Paper Stash - Lost and Found papers for a background paper and picked the medium-sized piece with tape measures all over it. No significance to that; just thought it went well with the stamps. Then I ran the paper through the Cuttlebug using Tim Holtz's Steampunk embossing folder made by Sizzix. And then I did direct to paper over that with Antique Linen Distress Ink. Boy, this is turning into a Tim Holtz card, isn't it?? The reason I did the dtp on the TH paper was actually to fix some tears in the paper that occurred during the embossing. But I love the look and do this all the time on my cards for this same reason. Sometimes a fix turns into a preference.

I sewed around the edge with red thread to tie it in later with the red gingham bow and the red in the images.

I did some paper piercing around the main image and the Inspire piece and sponged Antique Linen ink around the edges with a sponge dauber. I used some tiny red gems in the upper right corner.

I can't even begin to tell you how I got this translucent look for Tucker's head. All I remember is using a LOT of Copics on him. I used colors you would not expect, like lavender, reds, purples and pinks. I used some yellow and lots of muted greens. I just played around and did a lot of blending. I also used some warm grays. Somehow it came out that way. Then I used the colorless marker to get the speckled look.


I've got another card in the works with Stacey's stamps. Will post that once it's finished.

Have a lovely Monday evening!

Recipe:

Stamps: Purple Onion Design The Sweetest Day by Stacey Yacula - Tucker the snail and Toadstool, CTMH Geometric Thoughts word stamp

CS: SU Always Artichoke, black, Tim Holtz Idea-ology Paper Stash: Lost and Found, white

Inks: Memento Tuxedo Black, Versafine Onyx Black, SU Always Artichoke, Antique Linen Distress Ink

Other: Tim Holtz (by Sizzix) Steampunk embossing folder, Nestabilities oval and scalloped oval dies, SU oval punches, sewing machine (red thread), paper piercer, red gingham ribbon, Copic markers, red mini gems, pop dots, sponge dauber

Tuesday, February 07, 2012

Hedgie friendship


Isn't this image adorable? Can Penny Black's hedgies be out-cuted? I don't think so! I love these images for coloring. They're great fun. I only wish they were bigger so I could color them longer.

Here's a peek inside. I added the ribbon as an afterthought, so it's not neatly tucked away. But I tried to make it look attractive anyway.

I love gatefold cards!


Cute little hedgie. This card was almost a St. Valentine's Day card as I almost used the Hugs and Kisses stamp from All Year Cheer, an old Stampin' Up! set. Instead, I took the friendship stamp from Close to My Heart's Geometric Thoughts.


Well, howdy-doo, I stamped, people! Throw a party! lol

Wednesday, April 28, 2010

Dream


Hello! We are getting such beautiful weather lately! Sunny and cool and windy! Doesn't feel like NE Georgia in April a-tall! Is it unusually cool where you are?

This card was inspired by the artwork of Alina at simcards. She does these adorable circle flower thingies which inspired my distressed circle "flower" and she does an awesome job coloring her images and adding touches of white here and there. She also recently used the spiral punch, so that inspired me to pull mine out and use it.

The placement of the clear gems was inspired by sweet Donna at 3 Umbrellas. She does such whimsical things with gems and pearls!

I used the Forest Branches embossing folder on the main image. I'm iffy about that one, but I think it kinda works. Think "wind".

I used Stampin' Pastels (chalks) to color the sky and around the girl. So much softer and easier to apply than markers.

Well, I just realized that I can't give you my Copics color list because I put them away and didn't take note of which ones I had used! Oops! Sorry about that!

The main image was one of those I mentioned having colored a few days back. I hope to get another card made with another one I am happy with. I had a couple of duds that will likely end up in the trash, though!

Hope you have a lovely week! Thanks for coming by! Happy coloring!

Stamps: Pure Innocence 006 digi by Heather Ellis, word stamp from CTMH Geometric Thoughts

CS: PTI white, black, Basic Grey Recess (retired), Basic Grey Obscure (retired), and Basic Grey Lemonade 6X6' pads

Ink: Computer and Memento Tuxedo Black, various Copics

Other: Cuttlebug Forest Branches and Stylized Flowers embossing folders, spiral punch, Nestabilities Classic Oval Large, Classic Oval Scallops Large, paper piercing tool, circle punches, small and large oval punches, gems, Stampin' Pastels, kneaded eraser, 3D-Dots, black gingham ribbon, thin black grosgrain ribbon

Saturday, September 20, 2008

Dream Baby


This card ended up so very different from what it started out to be. I had planned on making another fall card and it kind of took on a mind of its own. Ah well, I'm very happy with the outcome, nonetheless.

I began by using the Gate Fold to create this card. I had planned on mostly using the SU Lovely Leaves set again for the two front panels and leaving their backgrounds white. But I went a little nuts with the sponging and ended up taking things in a very different direction.

I decided to use the Cuttlebug Textile embossing folder. More sponging ensued. Then some direct to paper inking went on and before you know it it had an Old West look. Well, I loved it!
I used the corner punch on the corners and had planned on using mini brads in the open corners on the black cs, but realized it would mar the inside look. So I canned the idea.


I thought this little girl's face would be perfect against the Textile background. So I stamped her in Basic Black ink and sponged away and did some direct to paper inking around the edges with the Distress Ink and finished her off with some More Mustard and Ruby Red. I sponged a bit of black over one eye to add some mystery to her look. Then I whited in one eye to make it stand out. I added the "Dream" image from CTMH's Geometric Thoughts using Basic Black. I cut the corners with a corner punch and added silver mini brads. I used Dimensionals to pop up the image against the black cs. Then I mounted it onto the main card piece using mono multi to make sure it didn't come off later. I didn't think the mono adhesive would hold up to the weight of the piece.


The plaid ribbon was an afterthought. I threaded it under the cs inside the card and tied it to where the bow was just above the girl piece to accent it.


For the insides I used white cs cut in 3 panels to match the 3 inner sections and sponged each around the edges and did direct to paper inking with the Distress Ink. Then I sponged a bit in the middles to give them an overall vintage look. I used a thumb tack to punch the holes and used the Mat Pack cushion underneath while punching. The tack made much bigger holes, which was the look I was going for. I mounted the pieces on the inside with Dimensionals to "oomph" them up some more.


At the end I decided to distress the edges on the front of the card, so I rubbed the edge of a scissors blade across them. It added a nice "old" look. I also added a tiny Velcro tab to help keep the card closed.


I'm really pleased with how this card turned out. I hope you are, too!

Stamps: Rubber Cottage "Girl Face, Lg.", "Dream" from CTMH Geometric Thoughts, SU Lovely Leaves, Stampendous Summer Leaves

CS: Black, White

Inks: Basic Black, Tim Holtz Distress Ink "Vintage Photo", Chocolate Chip, Ruby Red, More Mustard, Old Olive

Other: Cuttlebug "Textile" embossing folder, Corner punch, 1/16" hole punch, Silver mini brads, Plaid ribbon, Dimensionals, Sponges, Mat Pack cushion, Tack (for holes inside), White gel pen, Scissors for distressing, Velcro tab for closing card

Monday, July 07, 2008

House Mouse is in the house!


I have always wanted a House Mouse stamp collection, but being the cheapy I am I could never plunk down the money for one, knowing I wouldn't use it often enough to justify the cost. But while I was in Hobby Lobby the other day, lo and behold, there was a House Mouse stamp on clearance for 1/2 off! How could I pass up such a deal?

Yesterday I played with it and used the Gamsol/Prismacolor method for coloring the scene. What fun! I stuck with very muted tones to keep with the hot cocoa theme. I colored the mice dark gray in honor of our newest pet rat, George, who happens to be that color and who has big ears and an inquisitive little face (he's a baby rat).

I used Chocolate Chip cs as the base and layered it with black and Sage Shadow, attaching the muted plaid ribbon to the black and Sage cs first. But first, the Sage Shadow cs was stamped in Sage Shadow ink using the SU Canvas background stamp. Then I ran it through the Cuttlebug using the Swiss Dots embossing folder. After coloring the main piece, it was run through the Cuttlebug using the Tiny Bubbles embossing folder (natch!) and adhered to black cs. I used Dimensionals to pop it up over the ribboned part.


For the sentiment, I stamped the SU Canvas stamp on white cs in Sage Shadow ink. Then I stamped 2 words from the Geometric Thoughts set by CTMH. I sponged More Mustard ink over that and punched it out with a circle punch (turning the punch upside down to see where to punch). Then I punched out a bigger circle of black cs and adhered them together with a Dimensional. I punched a 1/8" hole in them and tied the tag to the bow with black hemp cord. I used a Dimensional to position the tag on the card so it would float, but not move.

The main image was colored with Prismacolor pencils and Gamsol was used to blend the colors. I used mainly greens and browns. The mice are a blend of black and white with 2 peach colors for their exposed body parts.

This was a fun card to make. I hope you enjoy it! Thanks for looking!

Stamps: House Mouse "Hot Cocoa 02", SU Canvas, CTMH Geometric Thoughts

CS: Chocolate Chip, Black, Sage Shadow, White

Inks: Sage Shadow, Basic Black, More Mustard

Other: Cuttlebug "Swiss Dots" and "Tiny Bubbles" embossing folders, Prismacolor pencils, Gamsol, blending stump, Dimensionals, 2 circle punches (1" and 1.25"), 1/8" hole punch, sponge, plaid ribbon, black hemp cord