Showing posts with label SU Upsy Daisy. Show all posts

Wednesday, February 09, 2011

More frogs!


These frogs are not altered much. I actually did them before playing around with the frogs for the last card.

For the stamped background I used SU Shapes & Shadows, doing the Double Time technique by overlapping complementary images and leaving some white space, then cutting a piece for my card. Then I ran it through the Cuttlebug with the D'Vine Swirls embossing folder.

I used the Swiss Dots folder on the frog pieces and the Forest Branches folder on the yellow cs. Almost everything is textured!

I colored the frogs with Copics. I just can't seem to use anything else as the Copics are so gentle and smooth on the paper.

Thanks for looking! Today is my birthday and I'm meeting a friend for lunch. This card will be for her. I hope you enjoy it!

Recipe:

Stamps: SU Unfrogettable, SU Shapes & Shadows, SU Upsy Daisy

CS: Pixie Pink, Black, Summer Sun, White

Inks: Versafine Onyx Black, Pixie Pink, Certainly Celery, Summer Sun

Other: Copics, Cuttlebug D'Vine Swirls, Forest Branches and Swiss Dots embossing folders, Nestabilities circle, inverted scallop circle and rectangle and scalloped rectangle dies, black organdy ribbon, foam tape

Wednesday, March 24, 2010

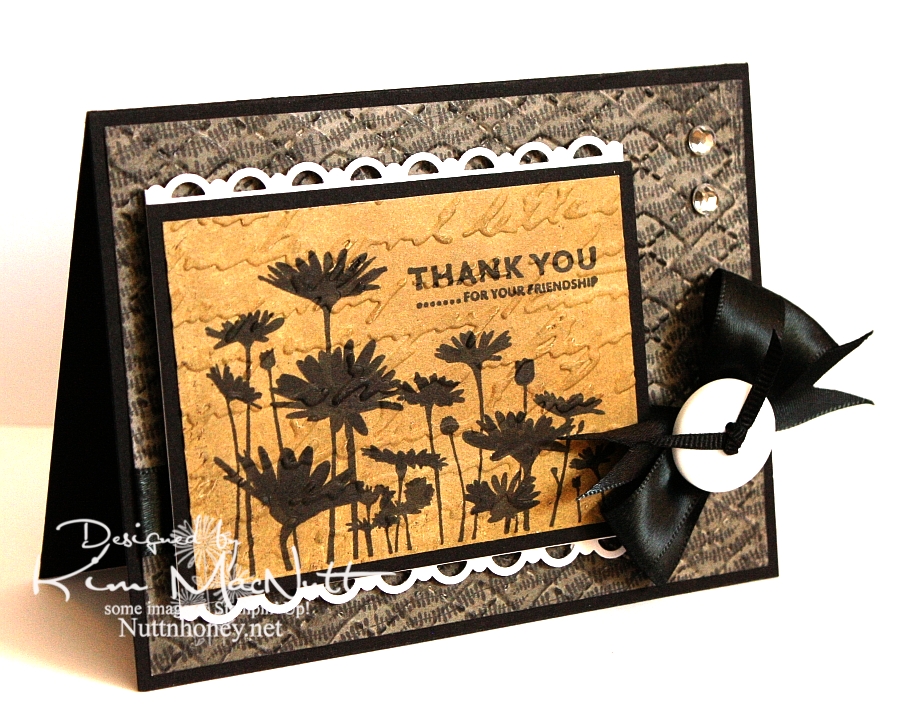
Thank you for your friendship


I just recently got a Stampin' Up! order in, so I used a few things from that order on this card: the stamps, the punch, and a marker.

I haven't done a strictly Stampin' Up! card in a long time! One set I've liked since I first saw it is Upsy Daisy. It's just one image and 3 sentiments, but that one image really has impact. I'm a sucker for really nice flower stamps and silhouette flowers really grab me.

I wanted to do a card in monochromatic tones. That suits my mood right now. I wanted something elegant. And I really wanted to stamp that flower field in black to maximize its silhouette effect. So that's how this card got started.

After running the Basic Grey Granola paper through the Cuttlebug using the Argyle embossing folder, I sponged black ink over it. After stamping and coloring in the flower image (I didn't get as good ink coverage as I had hoped and had to fix it with my SU Basic Black marker), I ran it through the Cuttlebug using the Script folder and then sponged Antique Linen Distress Ink over it.

I used my new SU Scallop Trim border punch to create a lace effect on top and bottom of the focal piece. I have to say that I love this punch! It cuts beautifully! I think EK Success makes it, and I am thinking that I need more of their punches now! I wish Martha Stewart would give her punch business to them. I love how the punch locks closed for easier storage.

I once again made the bow using my homemade Bow Easy. It's a double bow and unfortunately, I didn't check its position before snapping this shot. I took way too many pics of this card trying to get the lighting right to bring out the natural colors, so I'm not up to a retake just now.

Have a lovely day and thanks for looking!

Stamps: SU Upsy Daisy

CS: Black, Basic Grey Granola designer papers, PTI white

Inks: Versafine Onyx Black, Antique Linen Distress Ink

Other: SU Scallop Trim border punch, Cuttlebug Script and Argyle embossing folders, black satin ribbon, thin, black grosgrain ribbon, homemade Bow Easy, clear gems, white button
(Basic Grey), SU Basic Black marker, Stamp-a-ma-jig, 3D-Dots, foam mounting tape, sponge daubers

Monday, March 22, 2010

You're on my mind


It's been hard for me to feel creative lately with the weight of this horrid health care reform bill pressing on my mind. But yesterday I got some organizing done in my stamping area and that helped. So after I organized, I colored.

I hope you're not tired of the Pure Innocence images. I just love them. They're so simple, so pleasing to the eye, so carefree, so fun to color.

I went simple on the colors and used the warm gray Copics to add shadows. Some of the coloring was done with Copics, some with SU markers. My Copic collection needs some blues and purples!

Here are the Copics I used:


I used the white gel pen to put a shine on the girl's shoes. I also added glitter to the dress, heart barrette, and the butterfly.

The red piece of card stock was cut in the center with one of the Nestabilities large pinking circle dies. Then I "stitched" around the edge with a white gel pen. I used foam mounting tape to adhere it to the black cs. It's slightly raised and the circle with the scene on it is adhered to the black below it, creating a window effect.

I decided to be a bit out of the box and set the scene catty-corner. I don't know, I just liked it!

I distressed the edges of the black and red cs with a scissors blade. On the purple cs, I drew a freeform wavy line along the edge with a light pencil and then paper pierced it. I erased the line with a kneaded eraser.

The sentiment is from the Upsy Daisy Stampin' Up! set I just got in the mail today. Will hopefully be playing with that set soon!

Thanks for looking! Making this card cheered me up a bit. I hope it cheers you up, too.

Stamps: SU Upsy Daisy, Pure Innocence 023 digital stamp by Heather Ellis

CS: Lovely Lilac, black, Real Red, PTI Stamper's Select White

Ink: Versafine Onyx Black

Copic markers: W3, W5, 110, R00, R29, R30, B0000, YG13, YG63, Y21, YR23, E35

SU markers: Lovely Lilac, Almost Amethyst

Other: Nestabilities Large Pinking Circles and Standard Circles Small dies, paper piercing tool, sponge mat, Inkssentials opaque white gel pen, black polka dot ribbon, thin black satin ribbon, white button (Basic Grey), foam mounting tape, Crystal Snow fine white glitter, glue pen