Showing posts with label SU So Very. Show all posts

Tuesday, October 27, 2009

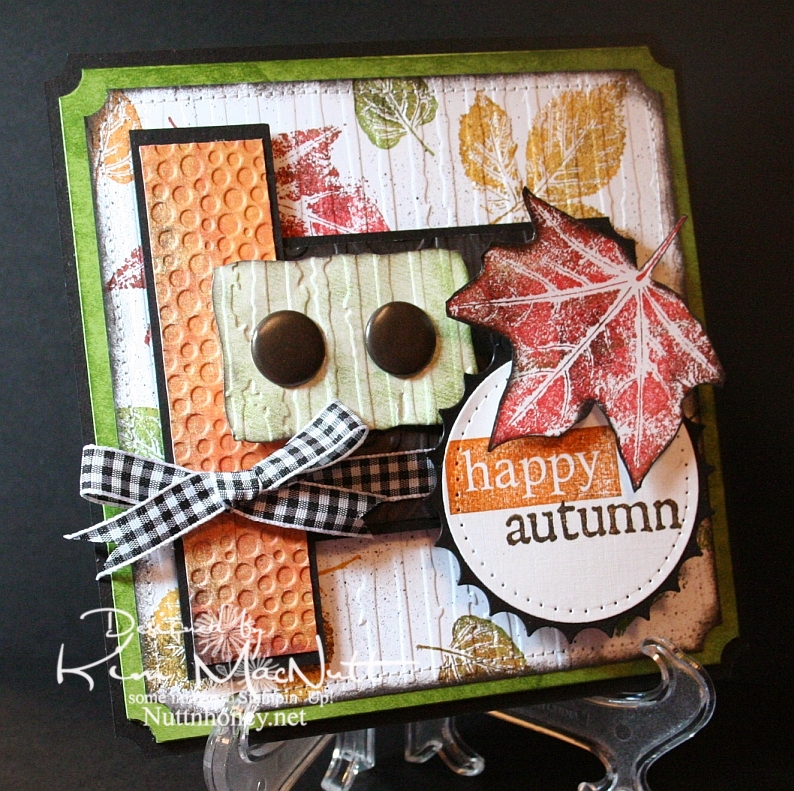
Happy Autumn!


This card was made using this week's Mojo Monday sketch.

I couldn't let autumn go by without pulling out my favorite autumn stamp set. It wouldn't be right. SU Lovely Leaves is a classic and I was surprised and disappointed when Stampin' Up! retired it. Maybe they weren't aware of its versatility.

Real fall leaves don't have just one color in them. They're a symphony of colors. So when I use my Lovely Leaves set I generally stamp them in a main color (largely from the Earth Elements color group) and then sponge other colors, including black for a little character, right on the stamp. Then I huff warm air on them and stamp. It produces a lovely effect.

That's what I did on the white background of this card. Then I finished it off using a Basic Black marker in an Inkworx Air Art gun to get a splattered effect. Once that was done I ran it through the Cuttlebug with the Distressed Stripes embossing folder and then clipped the corners with the ticket corner punch and then sponged black ink around the edges using a sponge dauber. Then I sewed around the edges. I really did a number on that poor old white piece of cardstock, didn't I?

It's not easily visible, but I used the D'Vine Swirls embossing folder on that dark piece of paper in the center. The dark paper has the pattern of tree bark on it from the Basic Grey Granola collection. I sponged it with black ink after running it through the Cuttlebug. A lot of work for something you can barely see! lol

For the words, I stamped the "happy" stamp from SU So Very in Pumpkin Pie ink and then lightly sponged it with black ink to burnish its appearance. I stamped the "autumn" stamp from the Purple Onion Designs' 4 Seasons set in Pumpkin Pie and then stamped it in black ink very lightly. Unfortunately, you can't see the cool, subtle effect that it produced in this pic.

I pressed the Old Olive cardstock behind the white piece onto the SU Just Jeans background stamp which was inked up with Old Olive ink. It gave a nice patterned but not too distinct appearance. I did the same on the greenish piece under the jumbo brads before running it through the Cuttlebug.

I always enjoy making cards with Lovely Leaves. It's one of my favorite sets.

Thanks for coming by for a look! Have a blessed day!

Recipe

Stamps: SU Lovely Leaves, SU So Very, SU Just Jeans, Purple Onion Designs "4 Seasons"

CS: Black, Old Olive, white, Basic Grey Archaic, Basic Grey Granola

Inks: Ruby Red, Old Olive, More Mustard, Pumpkin Pie, Versafine Onyx Black

Other: Nestabilities Standard Circle Large, Large Classic Inverted Scalloped Circles, Curved Rectangles, ticket corner punch, Cuttlebug Distressed Stripes, Tiny Bubbles and D'Vine Swirls embossing folders; sewing machine, paper piercing tool, sponge mat, sponges, sponge dauber, jumbo brads, 3D-Dots, Sticky Doos, Basic Black marker, Inkworx air art gun, Black gingham ribbon

Tuesday, September 23, 2008

So Autumn


Had to do another gate fold card. And of course I had to use the Cuttlebug to emboss the front panels!

This card started as so many others do with a different idea that morphs along the way. Rarely does a card stand completed in my mind. I wish! I usually will get a yearning to play with a certain color, or I'll just have a general aha moment when I see 2 colors together, or I'll just happen upon something that works and then go with it. That's kind of what this one was like.

I knew I wanted to do the gate fold again and I knew I wanted to use some autumn colors again. Looking through my cardstock stash I happened to run across a CTMH cs called Autumn Terracotta that was perfect. It was a nice pumpkin-y color.

I had planned to use the SU Doodle This set exclusively for the images with the biggest flower in the center. But I thought it would be too bland that way. Maybe I'll try it again later. I used the Doodle This doodles as a background on the front Terracotta panels, stamping them in Basic Black. Then I did direct to paper using Pumpkin Pie and Cranberry Crisp inks. I loved the way they worked together to add depth to the paper.

Then once the ink was a bit dry I ran the panels through the Cuttlebug using the Script embossing folder. Boy, did I like that! Then I did direct to paper with the Cranberry Crisp ink pad over the embossed parts. WOW! That thrilled me!


(Those little black dots you see are self-adhesive Velcro I punched out using my Crop-a-dile, used for keeping the card closed.)
This time I used a corner punch on not only the panels, but the black cs base as well. I think it looks more finished that way, don't you?

For the center piece I cut the scalloped circle (black cs) and then the plain circle (white cs) using my Nestabilities. I poked holes around the edges of both pieces using the Mat Pack cushion and a pin. Then I went over the white piece with the More Mustard ink pad (direct to paper) and worked it in a little extra around the edges. I'll admit that I stamped the words first. But if I were to do it over I'd stamp last to prevent any smearing. The word "SO" is from the SU So Very set. The "autumn" stamp is from Purple Onion Designs' "4 Seasons" set. I used the Stamp-a-ma-jig to line up the words properly on the circle. I only inked up the "SO" on the "SO Very" stamp. It was pretty easy to do since it's a big stamp.


For the rose I stamped the biggest rose image from the SU Roses in Winter set 3 times, first in Pumpkin Pie and then lightly in Cranberry Crisp inks on white cs. I stamped the middle rose once. I cut the rose pieces out and then mashed them some more on the ink pads to get more color saturation. Then I sponged Basic Black ink along the edges to make them stand out. I assembled the layers using big Sticky Doos to stack them up and a small one for the top piece. I curled the edges of the petals around a pencil.

For the leaves I stamped the bigger RIW leaf stamp 3 times using Old Olive ink. Then I stamped the smaller leaf over them using Always Artichoke ink and then rolling the stamp's edges in Basic Black. I did an extra 3 of the smaller leaf to pop up on the bigger leaves. Then I did direct to paper over them with More Mustard ink. Then I cut them out and attached the smaller to the bigger with pieces of Dimensionals.


The inside of the card was done using Autumn Terracotta cs which I direct to papered with Pumpkin Pie and Cranberry Crisp inks. Then I cut the corners using the corner punch and then paper pierced the edges. I attached the pieces with Sticky Doos to pop them out.

Hope you enjoy this card! I enjoyed making it!

Stamps: SU Roses in Winter, SU So Very, SU Doodle This, Purple Onion Designs "4 Seasons"

CS: Black, CTMH Autumn Terracotta, White

Inks: Pumpkin Pie, Cranberry Crisp, More Mustard, Basic Black, Old Olive, Always Artichoke

Other: Cuttlebug Script embossing folder, Nestabilities, Corner punch, Dimensionals, (The Paper Studio) Sticky Doos, Stamp-a-ma-jig, Sponge, Mat Pack cushion, pin, Pencil (for rolling), Velcro dots for closing card, Crop-a-dile (for making Velcro stickies)

Monday, March 12, 2007

Orange watercolored whale card


Recipe:

Stamps: Silly Sealife, Amazing to Zany, So Very

Paper: Not Quite Navy, Pumpkin Pie, Black, White glossy

Ink: Pumpkin Pie, Basic Black; Markers: Pumpkin Pie, Summer Sun, More Mustard, Close to Cocoa, Not Quite Navy, Bordering Blue

Accessories: Dimensionals, sm. oval punch, zigzag ribbon, water brush, Cuttlebug D'Vine embossing folder, Stamp-a-ma-jig

Techniques: Watercoloring

Yes, more watercoloring. It's so much fun. I can't help myself! And yes, I snuck black in this one, too, even though I tried to hold back. I just love the contrast against the black. What can I say?

I had actually intended this card to be yellow and orange. I was in a down mood from some real life issues and needed some cheering up and was using some orange and yellow gingham as a jumping-off point. Then I turned left and went for the zigzag instead. Despite the black and dark colors, I did find this card to be quite cheerful. How can it not be with that cute little whale? Now, if I could just learn to photograph well! Urgh! (Fixed it - just need to photograph in the early part of the day, NOT at night!)

I love the Silly Sealife set. It's just so precious! I need to pull out the Fishy Friends stamps so they can all make friends with each other, eh?