Showing posts with label SU Lovely Leaves. Show all posts

Tuesday, October 08, 2013

I never, ever tire of using Lovely Leaves

This is the perfect time of year to pull out an old favorite like Lovely Leaves, isn't it? I needed a birthday card for my oldest daughter and I haven't played with this set in a long time. I did the leaves by stamping on different colored ink pads with some inks overlapping. This is a bit risky, and I usually color the stamps with markers and then lightly touch the edges with a little black or other dark ink. It's better with the markers, but the ink pads really do some neat things. So I sometimes risk it. I always go light to dark when overlapping colors.


There's an interesting little story behind those dotted holes. I was doing a single row around the oval and I goofed them up. Rather than start all over I just kept adding holes and ended up with a pleasing result.


I did some matching panels on the inside as well as the outside, running the panels through the Cuttlebug after stamping them.


I'm very pleased with my leaves. This set is so amazing!


For the inside sentiment I stamped part of it in one color and part in another. Then I ran a bit of it over some black ink.


The main colors in my card are Pumpkin Pie and Brocade Blue. Does SU even sell those anymore?

Thanks for looking! I hope you enjoyed my little ode to Autumn!

Tuesday, October 27, 2009

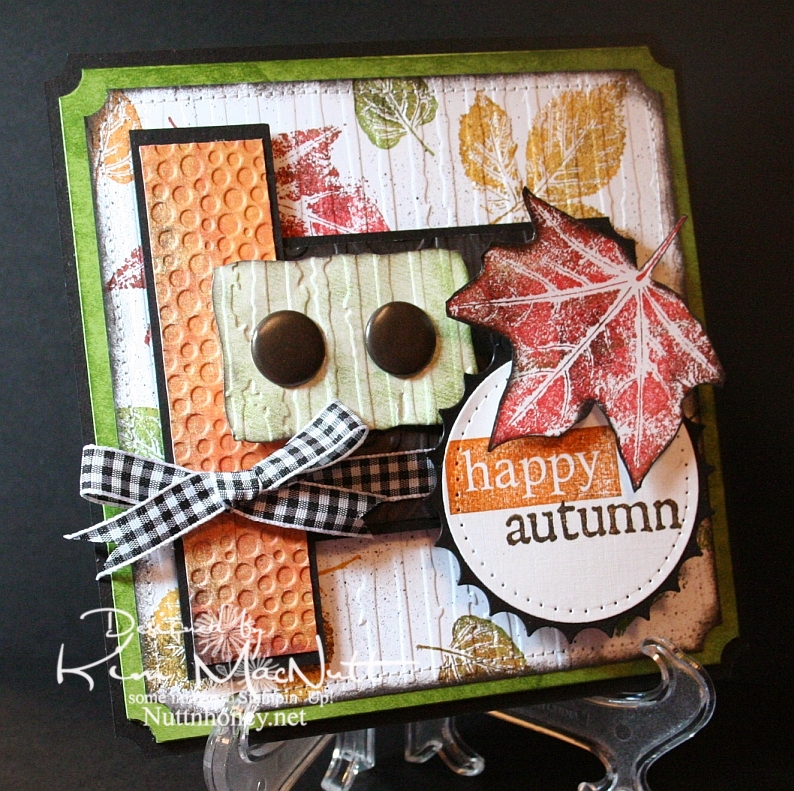
Happy Autumn!


This card was made using this week's Mojo Monday sketch.

I couldn't let autumn go by without pulling out my favorite autumn stamp set. It wouldn't be right. SU Lovely Leaves is a classic and I was surprised and disappointed when Stampin' Up! retired it. Maybe they weren't aware of its versatility.

Real fall leaves don't have just one color in them. They're a symphony of colors. So when I use my Lovely Leaves set I generally stamp them in a main color (largely from the Earth Elements color group) and then sponge other colors, including black for a little character, right on the stamp. Then I huff warm air on them and stamp. It produces a lovely effect.

That's what I did on the white background of this card. Then I finished it off using a Basic Black marker in an Inkworx Air Art gun to get a splattered effect. Once that was done I ran it through the Cuttlebug with the Distressed Stripes embossing folder and then clipped the corners with the ticket corner punch and then sponged black ink around the edges using a sponge dauber. Then I sewed around the edges. I really did a number on that poor old white piece of cardstock, didn't I?

It's not easily visible, but I used the D'Vine Swirls embossing folder on that dark piece of paper in the center. The dark paper has the pattern of tree bark on it from the Basic Grey Granola collection. I sponged it with black ink after running it through the Cuttlebug. A lot of work for something you can barely see! lol

For the words, I stamped the "happy" stamp from SU So Very in Pumpkin Pie ink and then lightly sponged it with black ink to burnish its appearance. I stamped the "autumn" stamp from the Purple Onion Designs' 4 Seasons set in Pumpkin Pie and then stamped it in black ink very lightly. Unfortunately, you can't see the cool, subtle effect that it produced in this pic.

I pressed the Old Olive cardstock behind the white piece onto the SU Just Jeans background stamp which was inked up with Old Olive ink. It gave a nice patterned but not too distinct appearance. I did the same on the greenish piece under the jumbo brads before running it through the Cuttlebug.

I always enjoy making cards with Lovely Leaves. It's one of my favorite sets.

Thanks for coming by for a look! Have a blessed day!

Recipe

Stamps: SU Lovely Leaves, SU So Very, SU Just Jeans, Purple Onion Designs "4 Seasons"

CS: Black, Old Olive, white, Basic Grey Archaic, Basic Grey Granola

Inks: Ruby Red, Old Olive, More Mustard, Pumpkin Pie, Versafine Onyx Black

Other: Nestabilities Standard Circle Large, Large Classic Inverted Scalloped Circles, Curved Rectangles, ticket corner punch, Cuttlebug Distressed Stripes, Tiny Bubbles and D'Vine Swirls embossing folders; sewing machine, paper piercing tool, sponge mat, sponges, sponge dauber, jumbo brads, 3D-Dots, Sticky Doos, Basic Black marker, Inkworx air art gun, Black gingham ribbon

Saturday, September 20, 2008

Dream Baby


This card ended up so very different from what it started out to be. I had planned on making another fall card and it kind of took on a mind of its own. Ah well, I'm very happy with the outcome, nonetheless.

I began by using the Gate Fold to create this card. I had planned on mostly using the SU Lovely Leaves set again for the two front panels and leaving their backgrounds white. But I went a little nuts with the sponging and ended up taking things in a very different direction.

I decided to use the Cuttlebug Textile embossing folder. More sponging ensued. Then some direct to paper inking went on and before you know it it had an Old West look. Well, I loved it!
I used the corner punch on the corners and had planned on using mini brads in the open corners on the black cs, but realized it would mar the inside look. So I canned the idea.


I thought this little girl's face would be perfect against the Textile background. So I stamped her in Basic Black ink and sponged away and did some direct to paper inking around the edges with the Distress Ink and finished her off with some More Mustard and Ruby Red. I sponged a bit of black over one eye to add some mystery to her look. Then I whited in one eye to make it stand out. I added the "Dream" image from CTMH's Geometric Thoughts using Basic Black. I cut the corners with a corner punch and added silver mini brads. I used Dimensionals to pop up the image against the black cs. Then I mounted it onto the main card piece using mono multi to make sure it didn't come off later. I didn't think the mono adhesive would hold up to the weight of the piece.


The plaid ribbon was an afterthought. I threaded it under the cs inside the card and tied it to where the bow was just above the girl piece to accent it.


For the insides I used white cs cut in 3 panels to match the 3 inner sections and sponged each around the edges and did direct to paper inking with the Distress Ink. Then I sponged a bit in the middles to give them an overall vintage look. I used a thumb tack to punch the holes and used the Mat Pack cushion underneath while punching. The tack made much bigger holes, which was the look I was going for. I mounted the pieces on the inside with Dimensionals to "oomph" them up some more.


At the end I decided to distress the edges on the front of the card, so I rubbed the edge of a scissors blade across them. It added a nice "old" look. I also added a tiny Velcro tab to help keep the card closed.


I'm really pleased with how this card turned out. I hope you are, too!

Stamps: Rubber Cottage "Girl Face, Lg.", "Dream" from CTMH Geometric Thoughts, SU Lovely Leaves, Stampendous Summer Leaves

CS: Black, White

Inks: Basic Black, Tim Holtz Distress Ink "Vintage Photo", Chocolate Chip, Ruby Red, More Mustard, Old Olive

Other: Cuttlebug "Textile" embossing folder, Corner punch, 1/16" hole punch, Silver mini brads, Plaid ribbon, Dimensionals, Sponges, Mat Pack cushion, Tack (for holes inside), White gel pen, Scissors for distressing, Velcro tab for closing card

Saturday, September 13, 2008

Autumn Thank You


More Fall for ya! I love bringing out the Lovely Leaves set at this time of year. (I'm a little anxious for Fall to get here. Summer has worn out its welcome with all these hurricanes, don't you think?) This card represents the colors I think of when I think of Autumn.

I began with a black base. I put Ruby Red cs on top of that. But first I stamped it in Really Rust using the SU Canvas background stamp. Then I ran it twice (due to size) through the Cuttlebug using the Script folder. Then I sponged over it with Ruby Red ink to pop it out.


For the main piece with the leaves I started with white cs. I stamped the maple leaf in Old Olive, then lightly in Really Rust. Then I sponged Basic Black on parts of the leaf. I huffed on the stamp and stamped on the white cs. I stamped the red leaf in Ruby Red first, then Really Rust. I sponged the leaf with Basic Black here and there and huffed and stamped it on the white cs also. The little leaf was stamped in Old Olive. Another small leaf (hard to see) was stamped in Really Rust.

Then I used Basic Black ink and stamped the outline stamps from Lovely Leaves randomly around the scene. I ran the piece through the Cuttlebug using the Tiny Bubbles embossing folder and then sponged More Mustard and a tiny bit of Ruby Red over the white parts, but tried to avoid the leaves.

I used the corner punch and mounted the white piece to black. I punched 1/16" holes in the corners and added silver mini brads. I added the ribbon and the sentiment piece (details below) and mounted the whole thing on the Ruby Red using Dimensionals. I used Dimensionals to pop the sentiment up as well.

For the sentiment piece I stamped the Canvas stamp in Creamy Caramel on Old Olive cs and then stamped the sentiment from Savvy Stamps in Basic Black over it. Then I punched it out with the small oval punch, holding it upside down to see precisely where I needed to punch it. I then punched a bigger oval in black. I adhered them together with Dimensionals and stuck the sentiment piece on the ribbon with more Dimensionals.


I put that whole piece on the Ruby Red with Dimensionals and used a white gel pen to add dots around several of the black edges a la Faith.

For the inside of the card I took 2 pieces of Ruby Red and sponged them with Ruby Red ink. Then I used the corner punch and took off the corners. Then I used the white gel pen around the edges. I also stamped the outline stamps from Lovely Leaves in 2 corners using Basic Black ink.


Phew! That was a job to explain! I hope you enjoy this card. Thanks for looking!

Stamps: SU Canvas, SU Lovely Leaves, sentiment by Savvy Stamps

CS: Black, Ruby Red, White, Old Olive

Inks: Ruby Red, Basic Black, Old Olive, More Mustard, Really Rust, Creamy Caramel

Other: Cuttlebug Script and Tiny Bubbles embossing folders, Corner punch, 1/16" hole punch, Sponges, White gel pen, Dimensionals, Lg. oval punch, Sm. oval punch, Black zigzag ribbon, Silver mini brads

Thursday, September 11, 2008

Autumn Morning


Are you ready for Autumn to get here?? I sure am! To me, the quintessential Autumn stamp set is SU's Lovely Leaves. I was honestly shocked when Stampin' Up retired it. I couldn't believe they'd get rid of such a classic set so quickly. I mean good grief, they still have Lovely As a Tree!!! This set surely is as good, I say. I hope to bring it out to play with numerous times over the next couple of months. So I hope you like it, too. You can see samples of cards done using that set here and here. As you can see, a very versatile set.

To make this card I began by creating a black base. I used Pumpkin Pie as the card's main color. I stamped several leaves from Lovely Leaves in Basic Black and the leaf outline stamps from the set with Ruby Red. I ran it through the Cuttlebug (twice, due to size) using the Mesh embossing folder. Then I rubbed Vintage Photo distress ink all over it.

For the sentiment area I stamped the Wordsworth "O Good" stamp in Basic Black. After it thoroughly dried, I sponged and rubbed various inks (listed below) over it. (Clarification: I actually rubbed some of the ink pads themselves right on the cs - also, I forgot to mention that the sentiment cs piece was white cs. Sorry for the omission.) I adhered it to the black cs after I did the edge of the black with the Martha Stewart Embossed Zigzag punch.


To get it to fit right I made sure the sides of the black were right with the sentiment piece and made the length longer than I needed it to be. Then I used the punch. I positioned the sentiment piece on the black near the punched edge and marked on the top (above the sentiment) where to cut. Then I trimmed it and adhered the sentiment to it. I added antique brass eyelets using the Crop-a-Dile. Once I did all of that I used a straight pin and the Mat Pack cushion and added holes around the sentiment on the black.

I added the zigzag ribbon and then adhered the sentiment using Dimensionals to pop it up.

Inside the card I cut 2 pieces of Pumpkin Pie cs to fit each panel and paper-pierced the edges with the straight pin and did some fancy paper piercing in the corners. I stamped a leaf from Lovely Leaves in Pumpkin Pie ink on the panels. I accidentally got a bit of black ink smudged on one panel, so I sponged both with Basic Black a bit to blend in my mistake. You'd never know I goofed! ;)


I wanted to mention something that worked for me in trying to line up my holes neatly when paper piercing. I just tried this so it's a new idea to me. You all may have already figured it out:

To keep the lines straight (I have the Mat Pack template, but find it hard to work with until I get a proper piercing tool - on my list!) I used the edge of one of my Stamp-a-ma-jig sheets and held it in place while I paper pierced freehand along its edge. It worked very well, I must say. A good "get by" tip for those who've not bought the Mat Pack from SU or a proper piercing tool.

So...my first Autumn card of 2008. Hope you enjoy it. Thanks for looking!

Stamps: SU Lovely Leaves, "O Good" by Wordsworth

CS: Black, Pumpkin Pie, White

Inks: Basic Black, Ruby Red, Pumpkin Pie, Real Red, More Mustard, Summer Sun, Tim Holtz Vintage Photo distress ink

Other: Cuttlebug Mesh embossing folder, Martha Stewart Embossed Zigzag punch, Sponges, Antique brass eyelets, Crop-a-Dile (for eyelets), Straight pin, Mat pack cushion, Dimensionals, Zigzag ribbon