Showing posts with label TAC. Show all posts

Wednesday, November 13, 2024

Wishing You a Wonderful Birthday

I went a bit wild with textures on this one (as usual 😄). I just love all the movement that textures add, both visual and tactile. I want to make cards people want to touch as well as look at. Paper is a fun thing to work with!


I used the Hero Arts set Woodland Creatures which had a cute smiling mushroom and a sweet little ladybug. The mushroom was more of a "he" until I gave it some luxuriant lashes and some glittery lips.💃 After coloring Miss Mushroom, I added Stickles Fruit Punch glitter gel to the circles on her cap, let it dry, and then added clear dimensional medium, and let it dry. I also added the dimensional medium to the 2 ladybugs to pop them out. See the second one climbing up the side of the upper circle? 


I used a black Copic marker (110) to ink the edges of the ladybugs after cutting them out, although I avoided the foot area. I sponged a bit of More Mustard ink and some Vintage Photo ink around the main image area. I stamped the word saying on the designer paper before running it through the Cuttlebug with the embossing folder. That is all. Take care. 🐞

Recipe:

Stamps: Hero Arts Woodland Creatures, The Angel Company "Wishing You a Wonderful Birthday"

CS: White, Basic Grey Recess, Basic Grey Archaic, Black

Inks: Memento Tuxedo Black, Stampin' Up! More Mustard, Tim Holtz Distress Inks Vintage Photo

Copics: R22, R24, R29, YR23, W3, 110 

Other: Park Lane Paperie Woodgrain embossing folder, Cuttlebug Argyle embossing folder, Nestabilities Large Pinking Circle, Standard Large Circle and Standard Small Circle, Black Pigma Micron 005 (for eyelashes), Stickles Fruit Punch glitter gel, Inkssentials Glossy Accents clear dimensional medium, Gold organza ribbon, foam tape, hole punch tool

Saturday, May 22, 2021

Snappy Birthday - Seaside/Beach Theme

Happy Saturday! This card is a bit old school. I actually stamped everything on it (no relying on digital images or designer paper), and no use of Copic markers. I used actual ink pads and regular Stampin' Up! markers like in the olden days. It was a lot of fun. And I'm sorry, but I couldn't help myself and used the Cuttlebug Tiny Bubbles embossing folder AGAIN. I love that thing too much, I'm afraid. Maybe I should try doing some cards without relying on my embossing folders for once? I just love the textures they create. It's an addiction. A very hard habit to break.


So this card used the retired Stampin' Up! Crab & Company set which I purchased awhile back on eBay, but had never used. I saw some really cute cards made with it on Pinterest which made me want to own it. Such a fun set! I also used another old Stampin' Up! set called Beautiful Batik. Anyone remember that one? I hardly ever used it, but I thought it would go well with my seaside/beach theme, especially using beachy colors. I colored the stamps with SU markers and then huffed on the stamps to moisten the ink and stamped different images from the set all over the white cardstock. I also used some of the smaller images from Crab & Company here and there around them. And last, but not least, I took one of the splatter stamps from ye olde SU Itty Bitty Backgrounds and stamped it here and there to fill in.

I used no die cuts either. Rebel me! I just did what I used to do (before die-cutting took the stamping world by storm) and cut the rectangles with my paper trimmer. I did use a hole punch to get the oval shape around the outside sentiment.


I have to say that I enjoyed doing things mostly old school for a change. I don't own any die cuts that have the dotted borders. Someday I'll get around to buying some. Until then I'll just punch my own holes, uneven though they may be. It's actually very therapeutic doing it by hand and is one of my favorite ways to embellish my cards. 

One last stamp set I used was Stampendous Sushi Bowl Party. I stamped the tiny swimming fish stamps from the set using Versamark clear embossing ink on the turquoise background to imitate them swimming in the ocean in schools. They're so cute!


Inside, I used a sentiment from an old The Angel Company set that I don't know the name of. You can get a better look at the cardstock I used on the front of the card inside where nothing is laying over it.


This was a fun card to make using so many old school ways. I do need to lay off the embossing folders a bit, I think. I have so many of them that I don't even use. I keep grabbing my favorites. This must change.

Thanks for coming by for a look! Have a great day!

Stamps: SU Crab & Company, SU Beautiful Batik, SU Itty Bitty Backgrounds, Stampendous Sushi Bowl Party, inside sentiment by The Angel Company

CS: SU Tempting Turquoise, SU Yoyo Yellow, White, Black

Inks: SU Tempting Turquoise pad and marker, SU Yoyo Yellow pad and marker, SU Glorious Green marker, SU Certainly Celery pad and marker, Versamark clear embossing ink, Versafine Onyx Black

Other: Cuttlebug Tiny Bubbles embossing folder, water brush, yellow zigzag ribbon, turquoise gems, foam tape, jumbo oval punch, hole punching tool, googly eyes

Tuesday, May 18, 2021

Another Mother's Day Card - Iris Flower

Hello! I have another Mother's Day card to share. I know it's a bit late, but I'm getting it up here, nonetheless. 


I started with some pretty lavender polka-dotted paper I've had for eons and did my usual texturizing to it using the Cuttlebug Distressed Stripes embossing folder. Then I mounted it on black cardstock. I kept the card fairly simple otherwise.

I used the gatefold technique, which is one of my favorite card styles. I nipped all the corners with a corner punch, except for the center backs, which I cut out in half circles with a 1/2" circle punch.

You can't see it, but I used a black Velcro self-adhesive circle to help keep the card closed. I usually glue the Velcro halves on the cardstock even though the Velcro adhesive is very strong. That way it won't come loose or rip the cardstock after it has been opened a few times. I usually put both halves together on one side (usually behind the main decorative element), gluing the parts that touch the cardstock with Tombow Mono Multi glue, and then close the card and leave it overnight to dry. 

I added a bit of  black gingham ribbon inside to jazz it up a bit, and I did use a sentiment inside, but I hadn't added it yet when I took the pics. I seem to be doing that a lot lately for some reason.


I stamped the iris image from The Angel Company (long since retired) in Memento Tuxedo Black on white cardstock and colored with Copics. I added some lavender, yellow, and lime green Stickles glitter gels here and there.


I mounted the outside saying with foam tape. What would I do without my foam tape, I wonder?


I hope you enjoyed this card. Thanks for coming by!

Stamps: Iris from The Angel Company, saying from Hero Arts

CS: Black, lavender (interior), lavender polka dot (exterior), White

Inks: Memento Tuxedo Black, Versafine Onyx Black (saying), Copics for coloring

Other: Cuttlebug Distressed Stripes, Nestabilities Lacey Ovals and Classic Ovals Small, black gingham ribbon, corner punch, 1/2" circle punch, foam tape, black Velcro self-adhesive circles, lavender, yellow, and lime green Stickles glitter gel, Tombow Mono Multi glue

Thursday, May 10, 2018

You're a Classic

My son is an avid classic car guy. He owns 2 old pickup trucks that he is restoring. So for his birthday I thought I'd pull out the old Stampin' Up! set Classic Pickups to make his card.


I sponged different inks on the tags before stamping the truck image. I also stamped the saying before dry-embossing the paper:


I did a double version of the truck image to pop it out. And I popped out the tags as well (all with foam tape).


I did a pitiful job on setting the big eyelets inside the card. Even with the Crop-o-Dile it's hard for me. I'm probably not using it properly. Maybe I should use my trusty old eyelet setter.


Thanks for looking! Have a great day!

Stamps: SU! Classic Pickups, SU! Birthday Greetings, The Angel Company (inside center saying)

CS: Black, White, Basic Grey Granola papers, white tags

Inks: Tim Holtz Distress Inks in Antique Linen, Vintage, and Black Soot; Memento Tuxedo Black, Stampin' Up! Night of Navy

Other: Cuttlebug Tiny Bubbles embossing folder, Sponge for direct to paper inking, Crop-o-Dile, large, brown eyelets, brown mini-brads, foam tape, brown leather string

Tuesday, March 06, 2018

Birthday Watercolors

I took inspiration from another card I made (also seen in my current blog header) to create this one. I love the papers from the Memory Box Poppyfinch Collection. A pity they no longer offer it.


Recipe:

Stamps: Stampin' Up! More Petal Prints,"Happy Happy Birthday" sentiment by The Angel Company (TAC)

CS: Black, Memory Box Poppyfinch Collection, White

Inks: Versafine Onyx Black

Markers: SU! Old Olive, CTMH Topiary, CTMH Breeze, SU! Sage Shadow, SU! Basic Black

Other: Cuttlebug Textile embossing folder, Ornare Decorative Corners piercing template, piercing tool, sponge mat, Pigma Micron .01 pen, olive green organdy ribbon, black gingham ribbon, clear gems, water spritzer, Inkworx air art gun, foam tape

Sunday, January 28, 2018

Happy Happy Birthday


Recipe:

Stamps: Hero Arts Woodland Creatures, Penny Black Critter Party, "Happy Happy Birthday" sentiment by The Angel Company (TAC)

Inks: Memento Tuxedo Black, Distress Oxide Fired Brick

Cardstock: White, Teresa Collins Fabrications designer papers

Other: Cuttlebug D'Vine Swirls and Birds and Swirls embossing Folders, Martha Stewart Arched Lattice border punch, cream ribbon, stitching, foam tape

Wednesday, January 01, 2014

Christmas wedding card

I have never made a wedding card with a Christmas theme before, so this is my first time trying to combine the two. My daughter's fiance's aunt (got that?) asked me to make her a card with this in mind. So here's what I came up with:


I had a whimsical saying stamp from The Angel Company that went perfectly with the wedding cake from SU Sweet Treats. All I had to do was use green and red and make it a bit festive and it would work. The tricky part was the inside sentiment. I didn't have one in a similar font, and had I been more together I probably could've hunted down the font and made my own sentiment. Oh, well. As it was I was in a hurry to make this card in the midst of all the painting I was doing. Which is now why I'm only posting this in January, weeks after making the card.

To festive it up I used gems. They always jazz up a card. And I have them in my stash.


Another way I jazzed it up was to use a glimmer spray on the cake itself. I blocked the red ribbon and the flowers so it would only go on the cake. I did this by making a copy of the image and cutting out the parts I wanted to get glimmer spray on, leaving the rest to cover the other parts.


For the inside sentiment I used the I Corinthians 13 stamp from Our Daily Bread Designs because every married couple needs to know what love truly is.


I also carried some of the elements from the front to the inside.

I enjoyed sharing this card with you. I hope you have a marvelous new year filled with many blessings!

Stamps: SU Sweet Treats, TAC wedding saying, Our Daily Bread Designs I Corinthians 13 sentiment (inside)

CS: White, Red, SU Old Olive, Black0

Inks: Brilliance Graphite Black, SU Real Red

Other: Cuttlebug Polka Dots and Birds and Swirls embossing folders, Nestabilities Scallop oval, and regular oval dies, SU Scallop Trim border punch, various Copic markers, glimmer spray, red gingham ribbon, clear ep, foam tape, gems, 1/8" hole punch

Saturday, October 26, 2013

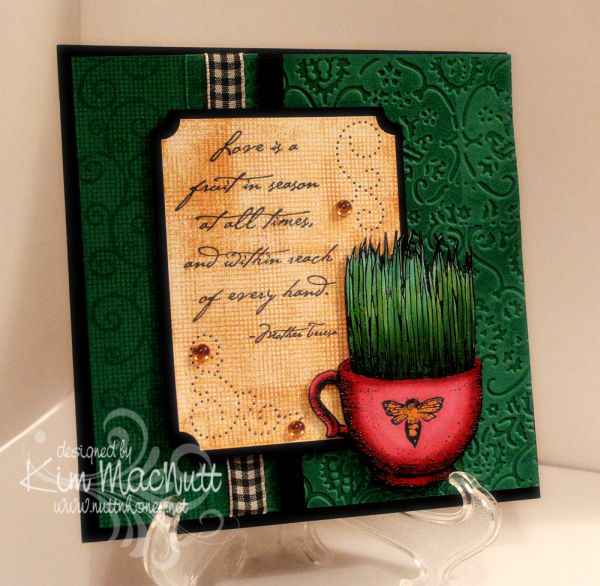
Love is a fruit in season...

Howdy, ladies! Still very much enjoying stamping again and this card proves it! I made it for the sheer pleasure of it.

I loved that TAC grass cup image (that sounded odd!) so much that I wanted to use it again. Really, it was the coloring of it I enjoyed the most. Playing with different green Copics was very satisfying and relaxing. I heat embossed the image first. My favorite heat-embossing duo is Brilliance Graphite Black ink and clear ep. My second favorite is Versamark ink and Judikins Detail Black ep, but I'm going to try Ranger's Super Fine Black to see if I like it. Probably will.


Do you watch movies while you stamp? I keep a small tv and dvd player in my stamping area and find it a good time to review movies for my family, or just plain enjoy a movie I've seen tons of times. I watched The Spirit of St. Louis starring Jimmy Stewart and a couple of Katherine Hepburn movies whilst working on this and my mother's card. I highly recommend the Jimmy Stewart movie! So interesting and accurate to the story of Charles Lindbergh's historic non-stop flight from New York to Paris. It had my attention the whole time!


I did a lot of stamping on this card. First I tried something I don't think I've done before. I inked one side of the Textile embossing folder with VersaMark ink and ran it through the Cuttlebug. This produced a watermark effect of the design of the folder. It went down into the grooves of the design. The folder was easy to clean afterwards with a little Simple Green (my stamp cleaner for most colors).

I only did part of the front with the embossing and did some over-stamping on the left side. I stamped first with SU Canvas (one of my all-time favorite background stamps...ever). Then I rolled the SU Swirl Style wheel over it. Both were done with VersaMark ink.

I kept the Canvas theme going in the word sentiment area by stamping it in SU More Mustard. I overstamped a bit to add more interest. I used the Ornare paper piercing template to add even more interest and topped it all off with some yellow-gold gems.

Well, I think that's everything I wanted to mention about the card. I so appreciate you spending time visiting my blog and commenting. Thanks for encouraging me and letting me know that you're here!

Stamps: SU Canvas, SU Swirl Style Wheel, TAC image (name unknown), Stampabilities Mother Teresa quote

CS: SU Taken with Teal, Black, White

Inks: VersaMark, SU More Mustard, Brilliance Graphite Black, various Copic markers

Other: Cuttlebug Textile embossing folder, SU Ticket Corner Punch, Ornare paper piercing template, various ribbons, clear ep, foam mounting tape, gems

Friday, October 18, 2013

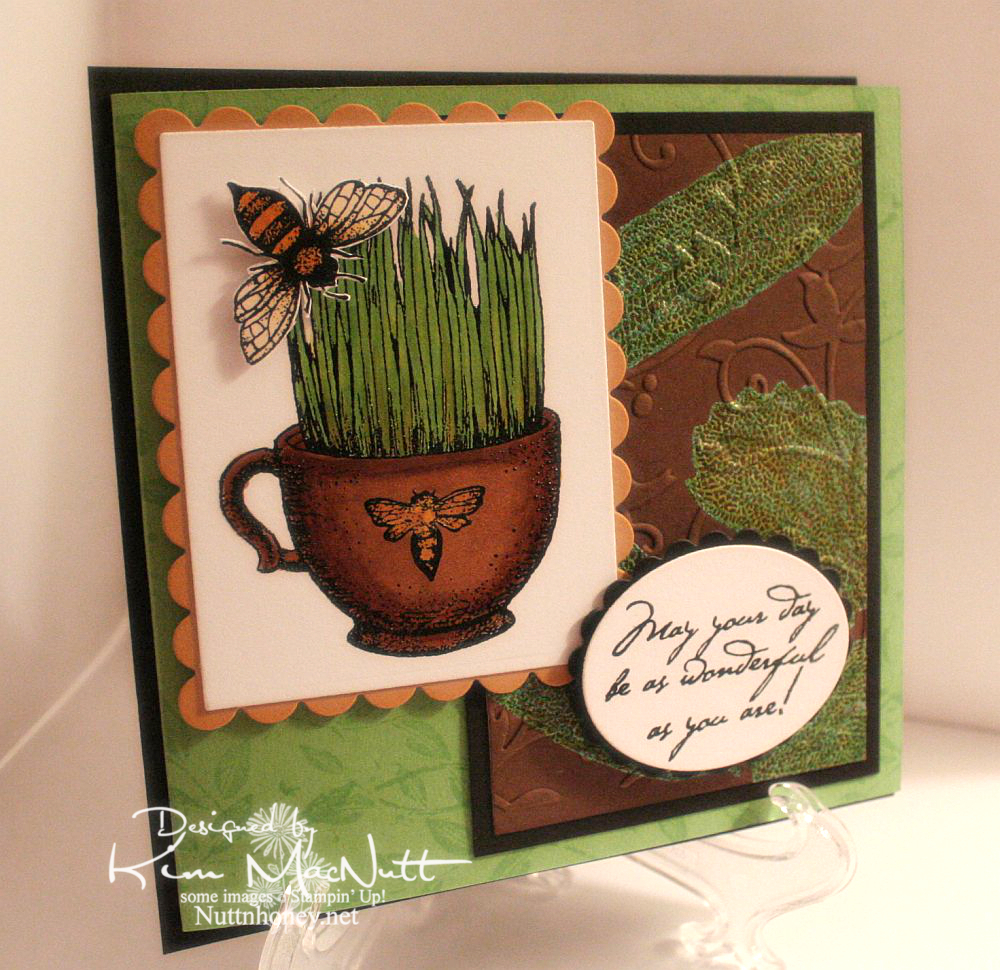
May Your Day Be As Wonderful As You Are!

This is the most stamping and playing with ink I've done in a long time! I heat-embossed so much on this card, y'all! I am loving all this playtime! This card is for my mother's birthday.

For the brown background piece I first did direct to paper with the Antique Linen Distress Ink pad. Then I stamped the leaves from SU Autumn in VersaMark ink and heat embossed with SU Vintage Verdigris EP. Then I went over it with DI Vintage Photo and lastly with SU Basic Brown. So now it just looks brown. But that's how I got there! lol Then I rubbed a light green Copic marker over the leaves and wiped them off. I'm not sure, but I think embossing powder might react with Copics and soften. Just be careful if you try this.


I hope you can see that I heat-embossed the grass image and the bee. It made for some enjoyable coloring with Copics afterwards. The bee is popped up with foam tape.


On the inside I wanted to create a sort of dancing bee scenario. I stamped them all in Brilliance Graphite Black and heat-embossed them with clear EP. Then, once cooled, I ran the edges through the Cuttlebug using the D'Vine Swirls embossing folder. To hide the folder edge and keep with the black lines image, I used some grosgrain ribbon. I rolled both inside and outside edges of the Green Galore CS with the Leaf Prints wheel and VersaMark ink. Busy, busy, buzzy!


The white paper collapsed a bit from the Cuttlebug embossing. A thin extra layer in the sandwich probably would've fixed that. Ah, well.


I hope you liked my imperfect, but happily-created card, and thanks for looking!

Stamps: The Angel Company (TAC) - not sure of stamp set names, but the image is from one and the saying is from another; SU Autumn, SU Leaf Prints wheel, SU Birthday Greetings

CS: Black, SU Green Galore, SU More Mustard, White

Inks: VersaMark, Copic Markers, Brilliance Graphite Black (for heat embossing), Tim Holtz Distress Ink Vintage Photo and Antique Linen, SU Basic Brown

Other: Cuttlebug Birds and Swirls and D'Vine Swirls embossing folders, Nestabilities oval, rectangle, and scalloped dies; Clear heat embossing powder, SU Vintage Verdigris embossing powder, foam tape

Saturday, July 11, 2009

Hello Friend


Not much stamping this week. We had some home repairs done and my time wasn't so free. But I did whip this card up yesterday after the work was completed. The doggy stamp was calling to me. ;)

I haven't done much background stamping lately so I thought I'd use one for this card. I thought this old SU Chicken Wire stamp was just the right touch.

There is laundry waiting for me and a kitchen to clean up. And I think I need to shoo some kids off the Wii, so I better run.

I'm really enjoying all this offline time! It gives me time to ponder and pray. But I do miss being able to blog hop more.

Hope your day is a lovely one!

Recipe

Stamps: Penny Black Critter Party, Stampin' Up! Chicken Wire (retired), saying from a TAC set I have forgotten the name of.

CS: White, Bordering Blue, Memory Box Rhubarb Tart, black

Ink: Versafine Onyx Black

Markers: Creamy Caramel, So Saffron, Barely Banana, Summer Sun, Bordering Blue, Old Olive, C1 Cool Gray Copic

Other: Nestabilities Blossom and Standard Circle Small dies, Prima Daisy Dreams daisy, Sticky Doos, spiral punch, Stamp-a-ma-jig, black gingham ribbon, Diamond Glaze (for dog's nose), yellow Stickles