Showing posts with label SU Sweet Herbs. Show all posts

Wednesday, May 30, 2012

More Sweet Herbs

I'm just finishing up the last of the cards I made for my columbine seed recipients. I'm sorry it's taken me so long, but I hope the wait was worth it. I wanted to give each seed recipient a card, so I started looking through my stash and, as usual, took the long way round about doing things. Instead of picking already-made cards, I decided to make some new ones. I did use one I already had, but the rest are new. I just can't help myself. ;-P

This is one I finished last night. It kind of came together at the last minute and it was a bold move that actually gave me the inspiration. I had colored the Sweet Herbs stamp and was going absolutely nowhere with it when I started sponging Vintage Photo Distress Ink on the edges. Then I messed up and just covered the whole image in Vintage Photo ink! Well, that got me going and I went wild with Vintage Photo sponging all over the card! I hadn't even intended on using it on the Sweet Herbs piece, but once I did I was thrilled with its vintage-y look and then couldn't stop.
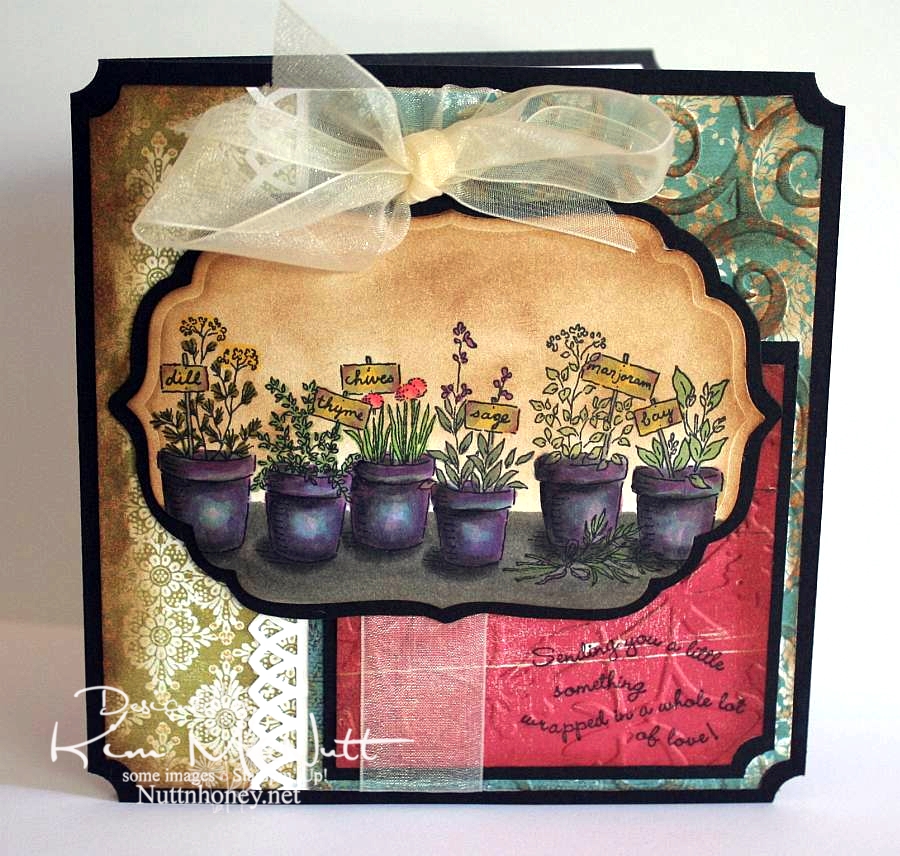


What I thought was the coolest thing ever was the aqua blue paper done with Cuttlebug's D'Vine Swirls embossing folder and then sponged with Vintage Photo ink on the raised parts. Bam! Zow! I was happy! Gotta do more of that!

And wouldn't you say I've gotten my money's worth out of that Stampin' Up! Ticket Corner punch? I am addicted to using that thing! Isn't it funny how we keep grabbing the same things for almost every card we make, or am I the only one?

So, I think I need to get back to sponging. I love the look and it unifies the whole card.

Btw, have you seen the movie, Her Majesty, Mrs. Brown with Dame Judi Dench and Billy Connolly?


Wow! Loved that film! It's on Netflix streaming if you have it. Both actors were amazing! I always love Judi Dench in anything she does, but I had no idea Billy Connolly was so good at serious acting. I knew he was a comedian, but that's all.) This is a great story about a man's loyalty to his queen. (As an aside, there is some male nudity in one scene where Billy and his brother are rushing out in the water to swim - just an fyi.)

Thanks for looking, and seed recipients be watching your mail!

Recipe:

Stamps: SU Sweet Herbs, SU Curvy Verses

CS: Black, White, various deco papers

Inks: Memento Tuxedo Black, Versafine Onyx Black, Tim Holtz Vintage Photo Distress Ink

Other: Cuttlebug D'Vine Swirls and Floral Screen embossing folders, Martha Stewart Arch Lattice border punch, SU Ticket Corner punch, Nestabilities Labels Four die, sponge dauber, various Copic markers, dimensional stickers, cream organdy ribbon

Friday, May 18, 2012

Sweet Herbs

I got the urge to make a card and Sweet Herbs was calling my name. If there's one stamp I love to color it's the potted herbs stamp from Sweet Herbs.


For this image I used a lot of the Copic Warm Grays to give it a shadowy look. I very lightly used a little Special Black 110 to give the darkest shadows on the pots, then blended it with the darker grays.

For the pots I started with a light warm brown and added an light orangy color over it. Then some more brown, then more orange, then I worked on it with the warm grays. Fun stuff!

For the plants I stayed in the grayer, more muted greens and tried to mimic the natural colors of the flowers.


Inside, I couldn't think of a word stamp to use so I've left it blank for now. You wouldn't believe how much trouble those corners were!

It's not really visible in my pics, but I used the Cuttlebug Polka Dots embossing folder on all the designer papers except the one under the front word phrase.


I might use this stamp again soon because I just need to color some more! Thanks for looking!

Recipe:

Stamps: SU Sweet Herbs

CS: Black, K&Company K-ology Hannah 6"x6" designer paper, White

Inks: Memento Tuxedo Black, SU Old Olive, Tim Holtz Distress Inks Antique Linen and Vintage Photo, Versafine Onyx Black

Other: Cuttlebug Polka Dots embossing folder; Nestabilities Long Classic Rectangles, Long Scalloped Rectangles, Standard Circle Large, Blossom, and Large Pinking Circle dies; Copic markers, dark yellow gems, beige satin ribbon, foam tape, sponge dauber

Tuesday, April 06, 2010

Nature is the art of God


Oh, my allergies! One not-so-nice thing about our Bassets is that they go outside quite often during the day and pick up lots of pollen on their coats and bring it inside. Ugh! I usually don't suffer this early, but I'd better get used to it. It's the new norm for me.

Between sneezing, blowing my nose, doing school with the kids, and keeping up with the dishes and laundry, and feeling utterly exhausted, I snuck in a little card-making time today. I wasn't up to being too elaborate with the design, so I kept it relatively simple. I colored the herbs yesterday when I had some free time. Today, after making this card, I colored an image from SU Seaside Sketches that I will need to make into a card soon.

My absolute favoritest Copics so far are the Warm Grays. I use them to shadow almost everything I color. They are so versatile!

Now that I have a wide array of green Copics it was even more fun to color this image. I don't know that the colors are true to life, but I'm happy with them.

Hope you have a great week and the pollen isn't getting to you yet! The trees are exploding with it here in North Georgia. But all this green shor is perty!

Stamps: SU Sweet Herbs, Saying by Jody Poesy (no longer making stamps)

CS: Black, Basic Grey Recess designer paper, PTI white

Inks: Memento Tuxedo Black (image), Versafine Onyx Black (saying)

Copics: E33, E35, E41, E44, YG13, YG17, YG63, YG91, YG93, YG95, W3, W5, W7, R02, R24, Y21

SU markers: Almost Amethyst, Orchid Opulence, Going Gray

CTMH marker: Orchid Bouquet

Other: Nestabilities Long Classic Rectangles Large, Cuttlebug Floral Screen, ticket corner punch, narrow black grosgrain ribbon, black gingham ribbon, 3D-Dots, Stamp-a-ma-jig

Saturday, August 01, 2009

Sweet Pots of Herbs

Good Saturday to you! And good August!

I have gardening on the brain these days. And I love it! I wish it wasn't so hot and muggy, especially muggy. But that's the price we pay for rain. And I want rain! I was born in a deserty state (southern California), but I'm not happy unless I am surrounded by green. Must have green.


I pulled out the Stampin' Up! Sweet Herbs set (retired) because I love the big image in the set for coloring. And this time I educated myself on what colors the flowers on the herbs I'm not familiar with (bay and marjoram) are supposed to be. The rest I have grown myself, so I know what colors they are. Interestingly, both bay and marjoram have white flowers. Marjoram and oregano are very similar. In fact, oregano is sometimes called "wild marjoram", so that will help me remember its color. I'd love to grow my own bay leaves! Imagine fresh ones at one's disposal!

One thing I love about using markers on watercolor paper is that the ink is almost always removable. You wet the spot you want to remove ink from and dab with a rag. It makes coloring all the more fun!

What I did was draw a line around the inner edges of the pots with Really Rust ink. Then I used the water brush to pull the color inward. Then I used a bit of Close to Cocoa and did the same thing, taking care to leave some areas only lightly touched by ink. I used water and a rag to dab away color here and there.

On the signs I used Mellow Moss, Pale Plum and Creamy Caramel in a splotchy pattern, going over the whole thing with Creamy Caramel to finish.

For the saying, I used the Stamp-a-ma-jig and made it into 2 long lines rather than 5 short ones.

For the white flowers I used an opaque white gel pen to make them stand out a bit and used the Bordering Blue marker, watercolored, around the plants to also set off the white flowers.

I popped out some of the pots and signs just for fun.


You know, it's not until I take pictures that I see all the flaws! Ugh! Try not to notice them!

Hope your weekend is going well! We cleaned out the freezers today and inventoried all that was in them. I have some meal planning to do!

Be well!

Recipe

Stamps: SU Sweet Herbs

CS: Black, Basic Grey Lemonade paper, Carson watercolor paper

Ink: Versafine Onyx Black

Markers: Really Rust, Close to Cocoa, Sage Shadow, Old Olive, Mellow Moss, Garden Green, Pale Plum, So Saffron, Pretty in Pink, Lavender Lace, CTMH Dutch Blue, Summer Sun, Bordering Blue

Other: Spellbinders Nestabilities Long Classic Rectangles Large die, Martha Stewart Embossed Zigzag border punch, Stamp-a-ma-jig, 3D-Dots, opaque white gel pen, water brush, rag to dab away color

Saturday, April 12, 2008

Card using Stampin' Up! Sweet Herbs set for a friend's challenge and a Mojo Monday design challenge

This card uses a design challenge I saw on Amy Westerman's blog.


I wanted to stamp some more so I asked Teresa to challenge me with her choice of stamp set. She chose Sweet Herbs (retired Stampin' Up!) as her first choice. I'll admit that as much as I like this set, I find it a challenge to use creatively. But I like a challenge and decided to give it a more current look. Designer papers are all the rage in the stamping world, and I have plenty to play with even though my collection is minuscule compared with some stampers. So you might recognize these papers (from the Blitzen Collection by Basic Grey). I've used them many times before. They're very versatile. I stamp right on the papers and they take the ink very well.

I used the Cuttlebug and the Script embossing folder for the strip across the bottom of the card. Cuttlebugging always adds a nice touch, don't you think?

I made a little mini purse by punching out 2 squares of designer paper and punching holes in a symmetrical pattern around 3 of the edges. Then I used 3 strands of dark brown embroidering floss and a cross stitching needle and sewed around the edges. Nothing fancy, but I like the contrast. I made a handle for the purse with another 3-strand piece of embroidery floss, tied it to the top holes and left a little fringe. I tucked a smaller punched square of vellum that I stamped (before punching), and then adhered it with a couple of Dimensionals so it would stay put and "float".


In fact, I used a lot of Dimensionals on this card. It's popping out all over the place, just the way I like it. :) Hope you like it, too.

Recipe:

Stamps: SU Sweet Herbs (retired), SU Amazing to Zany
CS: Black, Designer papers from Basic Grey's Blitzen Collection, Vellum
Ink: StazOn Jet Black
Other: Cuttlebug and Cuttlebug "Script" embossing folder, Black mini-brads, Stamp-a-Ma-Jig, Square punch, 1/16"hole punch, Brown embroidery floss, Cross stitching needle, Dimensionals

Monday, April 02, 2007

Prismacolor herbs card


Recipe:

Stamps: Sweet Herbs, Simply Circles

Paper: Black, Pumpkin Pie, White

Ink: Basic Black

Accessories: Prismacolor pencils, Gamsol, Blending sticks, Cuttlebug “Tiny Bubbles” embossing folder, orange/yellow gingham ribbon, Dimensionals, Diamond Glaze, Basic Black marker, ruler

Techniques: Prismacolor & Gamsol, Cuttlebug

I made this card while watching My Fair Lady, so I’ll probably always associate the two. :) I keep thinking of the part where Eliza Doolittle is at the horse races and is “how do you do”ing everyone and is speaking cockney with perfect poise. lol What an actress!

I’ve had the retired Sweet Herbs set for many years and had never made a serious attempt to use the set until I got in this Prismacolor/Gamsol groove I’ve been in lately.The main stamp of potted herbs seems perfect for coloring. I can still hear Rex Harrison singing even as I type. Is he a hoot or what!

Okay, on to the card. I stamped the image with Basic Black ink on white cardstock. Then I colored the image with Prismacolor pencils and Gamsol. The pots and the plants were pretty straightforward to color. No pink pots for me, just yet. ;) The little plant stakes were my choice, and I chose a sunny yellow to offset the reds and greens. I really ought to do my kitchen in these colors. I go to them so often in so much of what I do. They’re just so relaxing.

Close-up:


I used a ruler to mark a horizon and drew the thin black line with the Basic Black marker to ground the image. Then I colored the “table/counter” with Prismacolors in the yellow range to mirror the plant stakes color.

I stamped the “Hello” stamp from Simply Circles onto Pumpkin Pie cs. As I’ve usually been doing ever since I got my Cuttlebug, *grin* I cuttlebugged the Pumpkin Pie cs using the Tiny Bubbles embossing folder. I mounted that to black cs and added some orange/yellow gingham ribbon. Then I mounted the herb image on black and adhered it to the Pumpkin Pie cs with Dimensionals dabbed with a bit of Diamond Glaze (Crystal Effects) to make a firm bond.