Showing posts with label Cuttlebug - Textile. Show all posts

Tuesday, March 06, 2018

Birthday Watercolors

I took inspiration from another card I made (also seen in my current blog header) to create this one. I love the papers from the Memory Box Poppyfinch Collection. A pity they no longer offer it.


Recipe:

Stamps: Stampin' Up! More Petal Prints,"Happy Happy Birthday" sentiment by The Angel Company (TAC)

CS: Black, Memory Box Poppyfinch Collection, White

Inks: Versafine Onyx Black

Markers: SU! Old Olive, CTMH Topiary, CTMH Breeze, SU! Sage Shadow, SU! Basic Black

Other: Cuttlebug Textile embossing folder, Ornare Decorative Corners piercing template, piercing tool, sponge mat, Pigma Micron .01 pen, olive green organdy ribbon, black gingham ribbon, clear gems, water spritzer, Inkworx air art gun, foam tape

Saturday, October 26, 2013

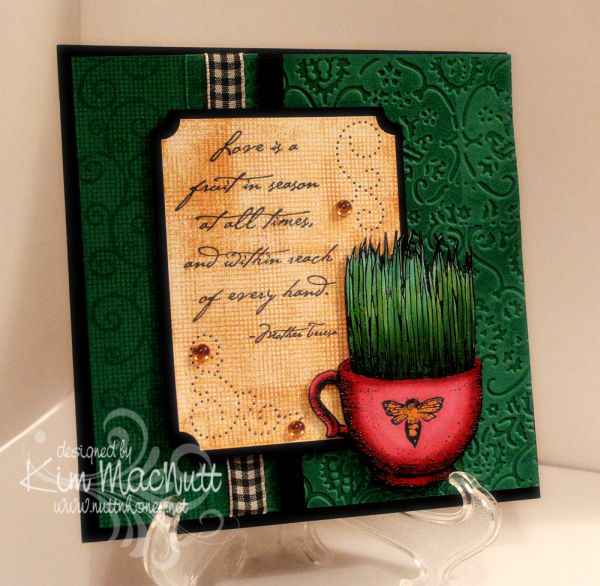
Love is a fruit in season...

Howdy, ladies! Still very much enjoying stamping again and this card proves it! I made it for the sheer pleasure of it.

I loved that TAC grass cup image (that sounded odd!) so much that I wanted to use it again. Really, it was the coloring of it I enjoyed the most. Playing with different green Copics was very satisfying and relaxing. I heat embossed the image first. My favorite heat-embossing duo is Brilliance Graphite Black ink and clear ep. My second favorite is Versamark ink and Judikins Detail Black ep, but I'm going to try Ranger's Super Fine Black to see if I like it. Probably will.


Do you watch movies while you stamp? I keep a small tv and dvd player in my stamping area and find it a good time to review movies for my family, or just plain enjoy a movie I've seen tons of times. I watched The Spirit of St. Louis starring Jimmy Stewart and a couple of Katherine Hepburn movies whilst working on this and my mother's card. I highly recommend the Jimmy Stewart movie! So interesting and accurate to the story of Charles Lindbergh's historic non-stop flight from New York to Paris. It had my attention the whole time!


I did a lot of stamping on this card. First I tried something I don't think I've done before. I inked one side of the Textile embossing folder with VersaMark ink and ran it through the Cuttlebug. This produced a watermark effect of the design of the folder. It went down into the grooves of the design. The folder was easy to clean afterwards with a little Simple Green (my stamp cleaner for most colors).

I only did part of the front with the embossing and did some over-stamping on the left side. I stamped first with SU Canvas (one of my all-time favorite background stamps...ever). Then I rolled the SU Swirl Style wheel over it. Both were done with VersaMark ink.

I kept the Canvas theme going in the word sentiment area by stamping it in SU More Mustard. I overstamped a bit to add more interest. I used the Ornare paper piercing template to add even more interest and topped it all off with some yellow-gold gems.

Well, I think that's everything I wanted to mention about the card. I so appreciate you spending time visiting my blog and commenting. Thanks for encouraging me and letting me know that you're here!

Stamps: SU Canvas, SU Swirl Style Wheel, TAC image (name unknown), Stampabilities Mother Teresa quote

CS: SU Taken with Teal, Black, White

Inks: VersaMark, SU More Mustard, Brilliance Graphite Black, various Copic markers

Other: Cuttlebug Textile embossing folder, SU Ticket Corner Punch, Ornare paper piercing template, various ribbons, clear ep, foam mounting tape, gems

Saturday, May 09, 2009

For my mother


To make my mother's card I went with a card sketch at the Mojo Monday blog. This one is from Sketch 81.

I just love the girl image from the retired SU set Friendship's Journey. It's so versatile. I like versatile stamps. Stamps can be so expensive. If they're not versatile they're wasting money no matter how cute they are.

One set I have not used much at all, but need to is SU Travels Abroad (also retired). I used the Arc de Triomphe stamp from that set to visually balance the girl image.

The "Mother" image is from a Hero Arts stamp that I blocked. It actually says "Happy Mother's Day", but I blocked out everything but "Mother".

I used the Cuttlebug Textile embossing folder on both front panels of Basic Grey Porcelain paper. The buttons are also from the Porcelain collection. I tied embroidery floss to them and glued them down.

I'm recovering from some minor surgery I had yesterday, so please forgive me for not putting in more details on this post. I'm in a bit of a Lortab fog. TFL!

Stamps: SU Friendship's Journey, SU Travels Abroad, Hero Arts Happy Mother's Day (C1402)

CS: Mellow Moss, Basic Grey Porcelain collection, Cameo Coral, Chocolate Chip, Ivory

Inks: Mellow Moss, Cameo Coral, Chocolate Chip, Basic Brown, Creamy Caramel

Other: Cuttlebug Textile embossing folder, Nestabilities Labels One, Classic Scalloped Rectangles Large, Classic Rectangles Small, Standard Circle Large and Classic Scalloped Circle Small; Ornare Decorative Corners piercing template, Tsukineko sponge daubers, 3D-Dots, Sticky Doos, paper piercer, sponge mat, buttons from Basic Grey Porcelain Collection, embroidery floss, moss organdy ribbon, sewing machine, Post-It notes for blocking, Stamp-a-ma-jig

Tuesday, April 21, 2009

Welcome Little Baby! ODBD


I had intended this card to be for a recent Mojo Monday challenge and an SCS color challenge. But I ended up combining 2 MMs, sorta, and goofing on one of the colors (mentioned below). So, hmm. Such is life for me lately. Does it count? I don't know. My perfectionism says no, but my laid-back side says yes. Who should I listen to?

No babies being born in our family right now, but I wanted to make a baby card anyway. This card is made with stamps from Our Daily Bread Designs' Children of God set.

For the Jesus image I stamped in Memento Tuxedo Black on white cs and colored with Prismacolor pencils.

I used 2 Nestabilities Classic Oval dies to set it off, kind of like a cameo. I tied a black gingham ribbon on the side and embellished it with a large clear gem. I had a really hard time trying to decide how to decorate this card. I tried so many things, colored gems, pearls, punched cs. But the clear gems struck me as being just right.

The designer paper is Basic Grey Stella Ruby (Tea with Jane). It's so lovely! I bought a single sheet of it, but looking at the whole collection, I think I need to buy it! Wow! Gorgeous with a capital G!

I stamped the outside word phrase using Brilliance Graphite Black ink and then cuttlebugged the paper using the Script embossing folder. I mounted it on black cs which was punched using the 'Diamond' border punch by Fiskars.

For the Rose Red area I stamped the SU Print Pattern background stamp in Rose Red ink. Then I cuttlebugged it using the Textile embossing folder.

On the green area I stamped the SU Canvas background stamp in Old Olive ink on what I thought was Always Artichoke cs, because that's the cs folder I found it in. But when I went to get some for the inside I suddenly realized that I had put the wrong cs in my AA folder at some point when tidying up! In fact, I think it's a CTMH cs because it looks white along the edges (their paper has a white core). So I can't say technically, that this is Always Artichoke, but it's AA-like.

For the inside I used more of the Stella Ruby paper. I added a few clear gems and the black stitching to keep the theme going from the outside, in.


Well, thanks for looking! Have a lovely day!

Stamps: Our Daily Bread Designs Children of God, SU Print Pattern, SU Canvas

CS: Black, white, CTMH Olive, SU Rose Red, Basic Grey Stella Ruby (Tea with Jane)

Inks: Brilliance Graphite Black, Memento Tuxedo Black, Rose Red, Old Olive

Other: Cuttlebug Textile and Script embossing folders, Fiskars Diamond border punch, Nestabilities Classic Ovals, ticket corner punch, clear gems, black gingham ribbon, 3D-Dots, sewing machine, Prismacolor pencils

Sunday, February 15, 2009

Happy Thoughts Froggie


I fell in love with a certain little froggie after seeing Jenn Biederman work her magic on him. See here, here, here and here. So when I received some birthday money I knew I needed to make a trip to Archiver's and get that set. I had some time to play today and this is my first creation with Sir Froggie. I love this little guy! He's cute whether he has ink eyes or googly eyes.

For this card I did something I thought turned out pretty cool. I used my Scor-Pal to run diagonal lines in two directions, creating a latticework design. Then I did direct-to-paper with Chocolate Chip dye ink. It really popped out the design and gave it a leathery look.

For the main background I used 2 Basic Grey papers called Stella Ruby 'Ladies' Book Club' (stripes) and Mellow 'Deciduous' (trees). I stamped the sentiment from Hero Arts' Sending Happy Thoughts set (CL 305) in Brilliance Graphite Black ink (letting it dry thoroughly) and ran the tree paper through the Cuttlebug using the Textile folder. I used the Mesh folder for the stripes. Then I did direct-to-paper to both using Creamy Caramel ink to pop out the design. I put those on a black background and added antique brass brads. I used 1/16" 3D-Dots by EK Success to pop that whole scene out from the brown background.

I stamped the frog using Brilliance Graphite Black ink and then blocked it to add the mushrooms, giving them the effect of being behind the frog. For that, all I do is stamp the frog image on a sticky note, cut it out, and place it over the frog (I always try to stamp on the part of the note where there is the stickiness so I can stick it over the image securely) and stamp the mushrooms where I want them.

I colored the scene with Prismacolor pencils and put a touch of yellow Stickles glitter glue on the tops of the mushrooms. Then glued the googly eyes on with a Sakura Quickie Glue pen. But first I ran the scene through the Cuttlebug using an oval Nestie and then I sponged Creamy Caramel around the edges. I adhered it to a black scalloped oval (also from a Nestie) and added it to the background.

I added the black polka dot bow as an afterthought using Diamond Glaze as a glue.

I carried the theme to the inside of the card, including doing the direct-to-paper inside.


This was a fun set to play with and I hope to play with it more in the near future.

Stamps: Hero Arts Sending Happy Thoughts (CL 305)

CS: Chocolate Chip, Black, Basic Grey Stella Ruby 'Ladies' Book Club' , Basic Grey Mellow 'Deciduous', White

Inks: Brilliance Graphite Black, Chocolate Chip, Creamy Caramel

Other: Cuttlebug 'Textile' and 'Mesh' embossing folders, Oval Nestie, Scalloped oval Nestie, Scor-Pal, Prismacolor pencils, Yellow Stickles, Antique brass mini brads, googly eyes, Black polka dot ribbon, Sponge, Sakura Quickie Glue pen, 1/16" 3D-Dots by EK Success

Saturday, September 20, 2008

Dream Baby


This card ended up so very different from what it started out to be. I had planned on making another fall card and it kind of took on a mind of its own. Ah well, I'm very happy with the outcome, nonetheless.

I began by using the Gate Fold to create this card. I had planned on mostly using the SU Lovely Leaves set again for the two front panels and leaving their backgrounds white. But I went a little nuts with the sponging and ended up taking things in a very different direction.

I decided to use the Cuttlebug Textile embossing folder. More sponging ensued. Then some direct to paper inking went on and before you know it it had an Old West look. Well, I loved it!
I used the corner punch on the corners and had planned on using mini brads in the open corners on the black cs, but realized it would mar the inside look. So I canned the idea.


I thought this little girl's face would be perfect against the Textile background. So I stamped her in Basic Black ink and sponged away and did some direct to paper inking around the edges with the Distress Ink and finished her off with some More Mustard and Ruby Red. I sponged a bit of black over one eye to add some mystery to her look. Then I whited in one eye to make it stand out. I added the "Dream" image from CTMH's Geometric Thoughts using Basic Black. I cut the corners with a corner punch and added silver mini brads. I used Dimensionals to pop up the image against the black cs. Then I mounted it onto the main card piece using mono multi to make sure it didn't come off later. I didn't think the mono adhesive would hold up to the weight of the piece.


The plaid ribbon was an afterthought. I threaded it under the cs inside the card and tied it to where the bow was just above the girl piece to accent it.


For the insides I used white cs cut in 3 panels to match the 3 inner sections and sponged each around the edges and did direct to paper inking with the Distress Ink. Then I sponged a bit in the middles to give them an overall vintage look. I used a thumb tack to punch the holes and used the Mat Pack cushion underneath while punching. The tack made much bigger holes, which was the look I was going for. I mounted the pieces on the inside with Dimensionals to "oomph" them up some more.


At the end I decided to distress the edges on the front of the card, so I rubbed the edge of a scissors blade across them. It added a nice "old" look. I also added a tiny Velcro tab to help keep the card closed.


I'm really pleased with how this card turned out. I hope you are, too!

Stamps: Rubber Cottage "Girl Face, Lg.", "Dream" from CTMH Geometric Thoughts, SU Lovely Leaves, Stampendous Summer Leaves

CS: Black, White

Inks: Basic Black, Tim Holtz Distress Ink "Vintage Photo", Chocolate Chip, Ruby Red, More Mustard, Old Olive

Other: Cuttlebug "Textile" embossing folder, Corner punch, 1/16" hole punch, Silver mini brads, Plaid ribbon, Dimensionals, Sponges, Mat Pack cushion, Tack (for holes inside), White gel pen, Scissors for distressing, Velcro tab for closing card

Monday, July 21, 2008

Paper rose thanks


Well, are you ready for another rose card? I'm binging on them, of late. Just in a rose making mood, I guess. This time I wanted to try some different, non-typical colors. So I went with Bashful Blue and Apricot Appeal.

For the Apricot cs I stamped the SU Filigree background stamp in Apricot Appeal ink. I ran it through the Cuttlebug using the "Swiss Dots" embossing folder. Then I sponged the edges with Basic Black ink. For the Bashful Blue cs I sponged Bashful Blue ink all over the cs and then stamped the SU Canvas background stamp in Bashful Blue ink. Then I ran it through the Cuttlebug using the "Textile" embossing folder and sponged the raised parts with more Bashful Blue.

I cut out the ovals, embossed the white one and used the Stamp-a-ma-jig to properly place the "thanks" stamp. What would I do without my Stamp-a-ma-jig?

For the roses, I stamped one in Apricot Appeal and one in Bashful Blue on white cs. For each rose, I stamped the biggest stamp 3 times, the medium stamp once, and the smallest stamp once. I cut them out and then sponged more ink onto the layers and sponged Basic Black ink on the edges and very lightly on the middle parts. I curled the edges and bent them until I got the look I wanted. Then I assembled them with Dimensionals onto the ovals. I stamped the leaves in Old Olive ink and stamped the smaller leaf stamp in Always Artichoke on top of the Old Olive. Then I cut them out and sponged them with more Old Olive ink and sponged the edges with Basic Black. I added them to the roses and glittered the flowers and leaves with iridescent glitter.

For the plaid ribbon I rubbed it on the Apricot Appeal ink pad thoroughly and let it completely dry before tying it to the polka dot ribbon.

Well, there you have it! Another rose card. Thanks for looking!

Stamps: SU Filigree, SU Canvas, SU Roses in Winter, PSX "Thanks"

CS: Apricot Appeal, Bashful Blue, Black, White

Inks: Apricot Appeal, Bashful Blue, Basic Black, Old Olive, Always Artichoke

Other: Cuttlebug "Textile" and "Swiss Dots" embossing folders, Nestabilities, regular and scalloped ovals, Embossing mat, Stamp-a-ma-jig, Dimensionals, Polka dot ribbon, Plaid ribbon, Iridescent glitter, 2-way glue, Sponge