Showing posts with label SU Roses in Winter. Show all posts

Saturday, April 03, 2010

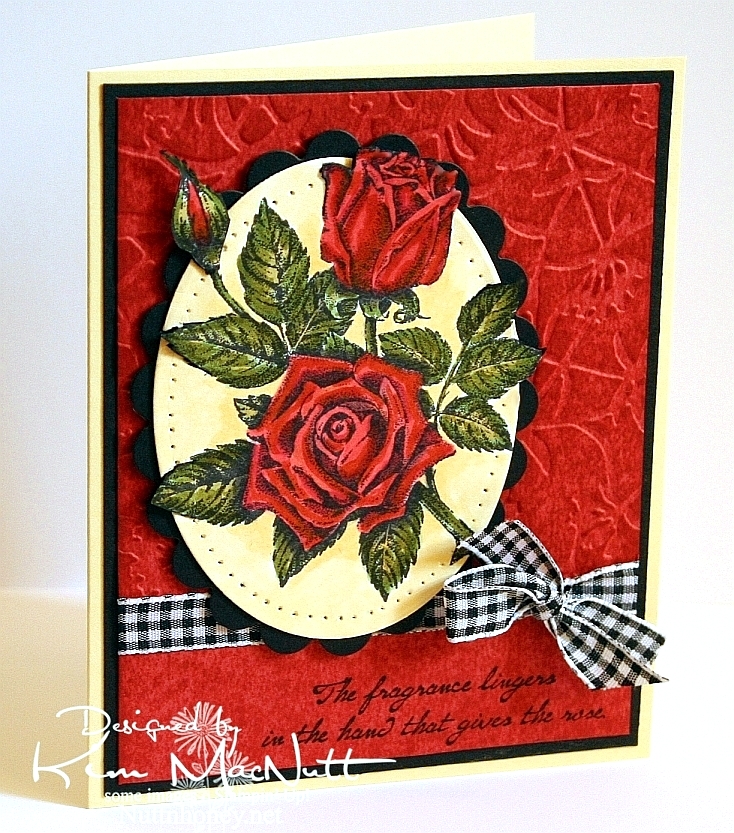
Because I just wanted to color a rose...


...that's why I made this card. I've not felt too good all day, but I managed to get this done. I had wanted to do an Easter card, too, but my energy is not with me. Just too dragged out for some reason.

I used the Out of the Box nestie tutorial again, and made it harder on myself by making several parts of the image overlap outside the oval. A bit tricky, it was, but I like challenging myself, even when I'm not feeling so hot.

For the red background I did direct-to-paper with SU Ruby Red ink over Ruby Red card stock. After it dried, I ran it through the Cuttlebug using the Floral Screen embossing folder. Then I dtp'd over it with more Ruby Red ink and let it dry.

I used both Copics and SU markers because my Copic markers are too light. It worked out just fine.

Well, that's about as much as my brain can muster right now. I pray you have a wonderful Easter celebration tomorrow. Christ is Risen!

Stamps: SU Stipple Rose, SU Roses in Winter

CS: SU Barely Banana, black, SU Ruby Red, PTI white

Inks: Memento Tuxedo Black, Versafine Onyx Black, SU Ruby Red

Copic markers: W7, R24, Y21, YR23, YG63

SU markers: Ruby Red, Old Olive, Basic Black (for edges of image that protrude from oval)

Other: Cuttlebug Floral Screen embossing folder, Nestabilities Classic Oval Scallops Large, Classic Ovals Small, SU paper piercer, Stamp-a-ma-jig, X-Acto knife, black gingham ribbon, 3D-Dots

Monday, January 18, 2010

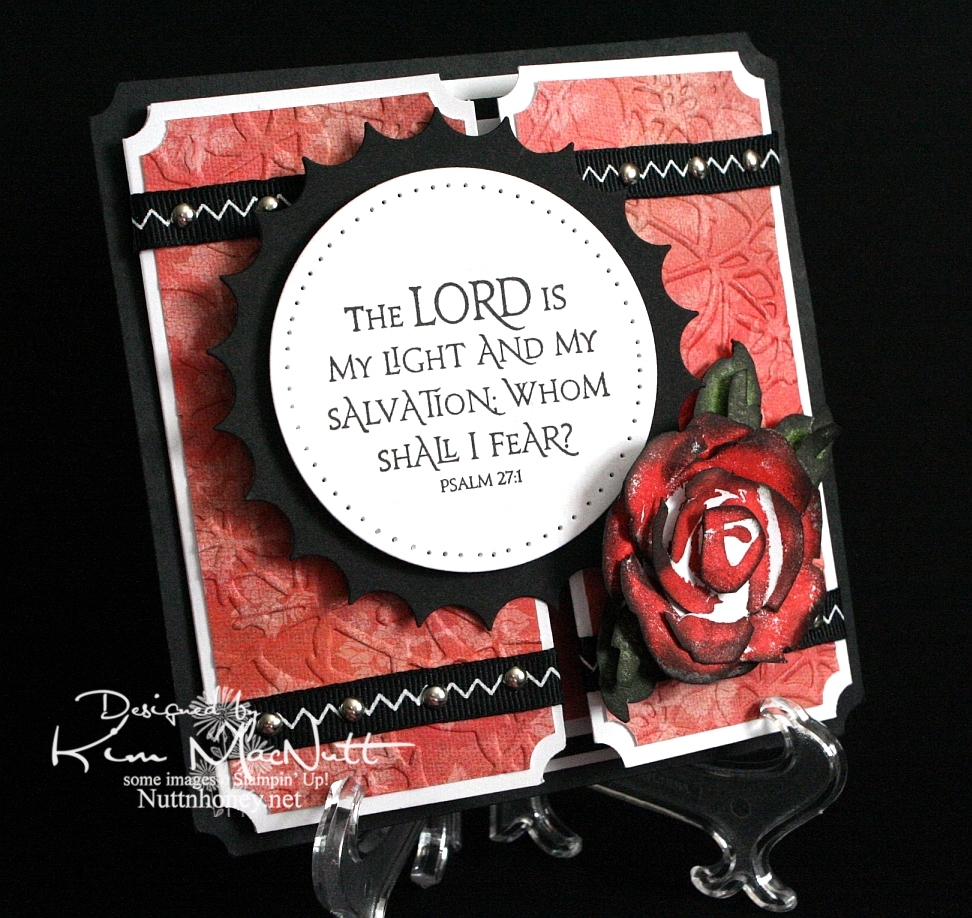
The Lord is my Light


Another rose. Once I start making them it's hard to stop, I love them so. This was my first card using the new PaperTrey Ink Stamper's Select white cs and the ATG 714 adhesive. The fumes were really bothering me at first, but the smell seems to have dissipated a bit. Maybe I should get the regular adhesive (924) instead?

About the PaperTrey Ink card stock, it's niiiiice. Good and stiff and crisp. Very substantial. Took ink very well. I definitely will enjoy using it. The black cs on this card is the True Black from their sampler pack. Very nice. More toward the reddish black than the blue-ish. Closer to SU's.

I tried doing something to keep the designer paper from cracking when I ran it through the Cuttlebug. I added another piece of card stock behind it in the embossing folder. It mostly worked. The imprint isn't as strong, but almost no cracks appeared. It's a trade-off, I guess.

I was a tad sloppy on the ribbon and mini-brad embellishments, mainly because the ribbon pinches when I punch a hole in it. And I didn't even try to line the brads up perfectly. It has a bit more charm that way, right? I like it anyway.

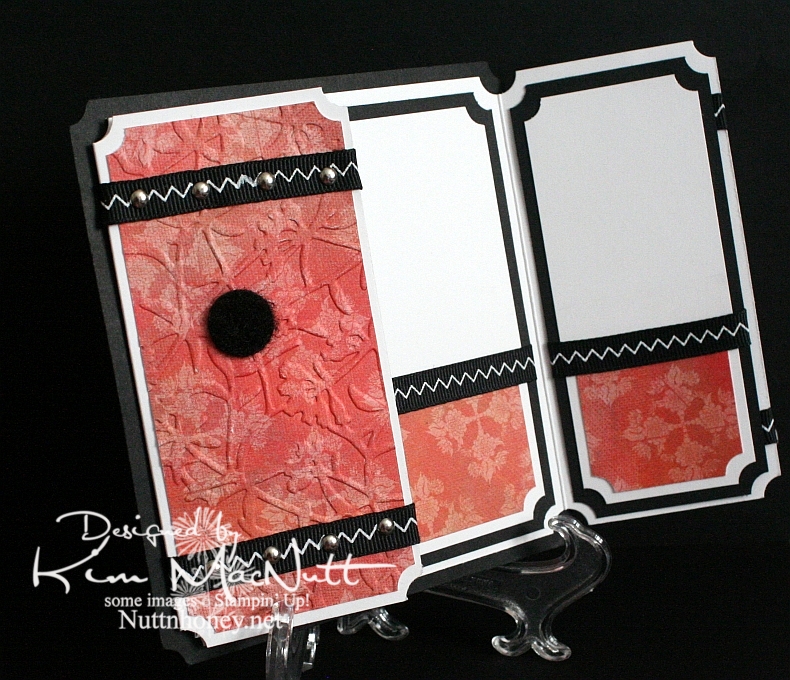
I left the inside blank so I can use it for a generic note of encouragement. I would've cuttlebugged the dp inside, but forgot until after I had glued everything down. This ATG adhesive is good and strong! Really love it despite the fumes.

As you can see, I used a black Velcro dot to help keep the card closed.

Can't think of anything else to add. TFL, and have a lovely day! Pray for Haiti!


Recipe

Stamps: SU Roses in Winter, Our Daily Bread Designs Light of the World

CS: Papertrey Ink True Black, PPI SS White, Memory Box Rhubarb Tart designer paper

Inks: Versafine Onyx Black, SU Ruby Red, SU Old Olive, SU Always Artichoke, Antique Linen Distress Ink

Other: Nestabilities Large Classic Inverted Scalloped Circle, Standard Circle Large, Cuttlebug Floral Screen embossing folder, paper piercing tool, sponge mat, silver mini-brads, black zigzag ribbon, ticket corner punch, Sticky Doos, 3D-Dots, 1/16" hole punch, black Velcro dot

Friday, January 15, 2010

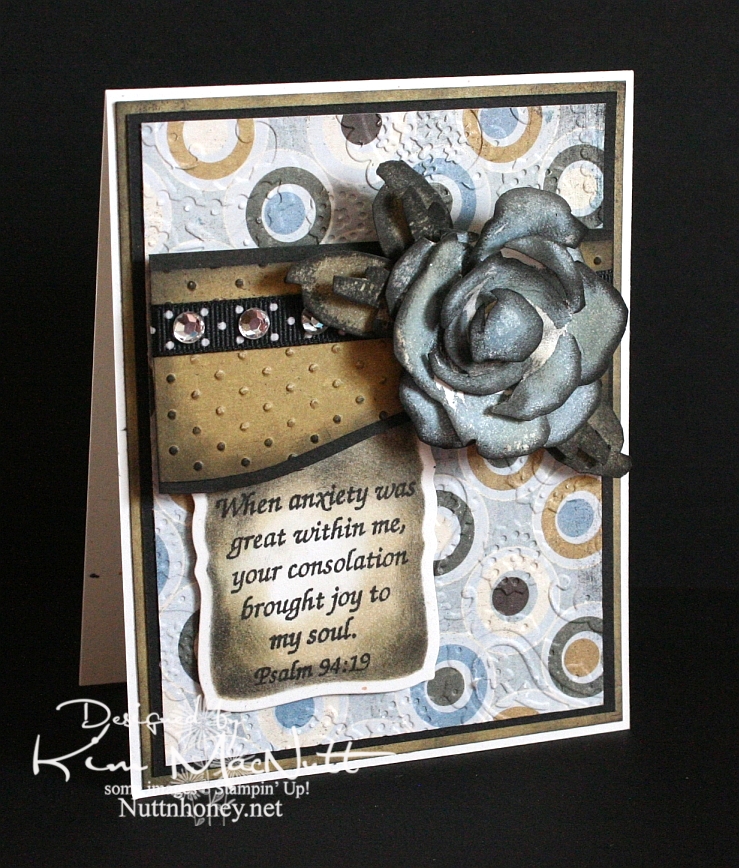
Joyful Consolation


I know we're probably all thinking about and praying for Haiti right now. How could we not when the people there are suffering so much? I know I'm thinking about them nearly every minute of the day.

When I was stamping last night I wanted to use a Scripture stamp and this one from Psalm 94 really stuck out at me. The anxiety in Haiti is great, but those who know Christ there can feel His consolation even in the midst of disaster. He is still with them. He knows suffering.

We were reading in Romans 8 the other night and these words could not have been more timely in helping us understand such a tragedy as this big earthquake:

22 We know that the whole creation has been groaning as in the pains of childbirth right up to the present time. 23 Not only so, but we ourselves, who have the first fruits of the Spirit, groan inwardly as we wait eagerly for our adoption as sons, the redemption of our bodies. 24 For in this hope we were saved. But hope that is seen is no hope at all. Who hopes for what he already has? 25 But if we hope for what we do not yet have, we wait for it patiently.

26 In the same way, the Spirit helps us in our weakness. We do not know what we ought to pray for, but the Spirit himself intercedes for us with groans that words cannot express. 27 And he who searches our hearts knows the mind of the Spirit, because the Spirit intercedes for the saints in accordance with God's will.

The earth groans, waiting for its redemption from the curse God placed on it when Man first sinned. And we who are on this earth suffer along with it. I don't know if Haiti is cursed like Pat Robertson said, but I do know that the Bible says we are all under the curse of sin until we are redeemed from it. And Christ is the Redeemer to deliver us from it. His death on the cross was done to redeem us. The Bible says, "God made him who had no sin to be sin for us, so that in him we might become the righteousness of God." (2 Corinthians 5:21).

He became sin for us. Wow. And we become the righteousness of God through Him. Double Wow.

But even after our redemption from sin we must live in this sin-filled world and live with the consequences that go with it. Suffering comes in many forms, and tragedies like this one are some of the worst. But I believe that God allows this suffering so we will learn to care for one another. Because, really, if everything always went our way and life was super easy, what kind of people would we be? It takes suffering to bring us out of ourselves. Look at how the world is responding to Haiti's misery. It's beautiful to see people all over the world dropping everything to help.

Okay, end of sermon. :)

I got to play with my ATG 714 last night and I love it! The first time I loaded the adhesive in was a bit tricky, but I know that will get easier each time. It's a bit harder to use and get used to, at first, but it definitely sticks well. I'm sure it will get easier the more I use it. Of course, I need to give my card time before I'll really know how well the adhesive holds. I'll report back later. So far, so good, though! It's so nice to make a card and not have messy glue everywhere. To use, you hold the trigger down and roll across your paper. I found that it was easier to keep holding the trigger down and not lifting the applicator up when turning corners on the paper. If I lifted it and then turned, some of the adhesive snapped back. I hope that makes sense.

BTW, I got the PaperTrey Ink order in today and will try to play with the white cs soon. I'll let you know what I think later.

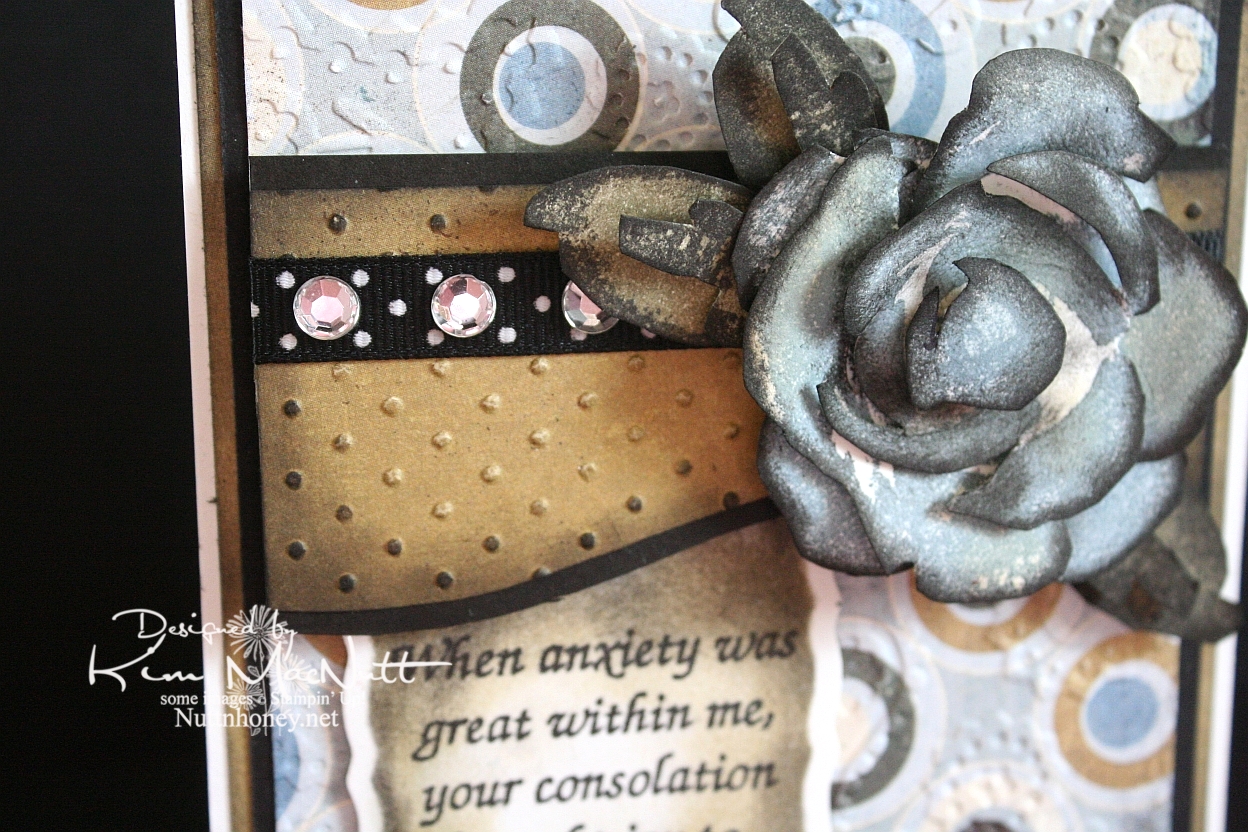
It's been awhile since I did a Roses in Winter 3D rose, and I needed something for this week's Mojo Monday card (Week 121) that would make an impact where the circle would be. The wide, blank area on the left was perfect for a word stamp, so I selected a Scripture, as I mentioned above. I thought the rose would be a nice accent to the Scripture, so I made my dp choices and proceeded to pick the rose color. I went with SU Bordering Blue as it was the closest blue I had to the colors in the dp. I stamped in the blue and then sponged a little Antique Linen Distress Ink over it in places. Then I used a sponge dauber to sponge the edges with black ink. The leaves were done with SU True Thyme (retired) and black to keep the muted theme going. I also sponged True Thyme around the edges of the Scripture piece.

After running the dp section under the rose through the Cuttlebug with the Swiss Dots embossing folder, I sponged the Antique Linen ink over it to cover the white cracks in the embossed part. Then I sponged black lightly around the edges. I added the black polka dot ribbon and clear gems to jazz it up a bit. I also sponged black lightly around the plain dp behind the circled piece to keep the look uniform.


I used the Perfectly Paisley embossing folder on the circle dp. Also used lots of dimensional stickies to pop the rose, the piece behind it and the Scripture section.

Hope you have a blessed day and please keep Haiti in your prayers, as I'm sure you already do.

Recipe

Stamps: Stampin' Up! Roses in Winter, Scripture stamp from Impressions of Faith

CS: White Confetti, Basic Grey Granola collection, black

Inks: Versafine Onyx Black, SU Bordering Blue, Antique Linen Distress Ink, SU True Thyme

Other: Cuttlebug Perfectly Paisley and Swiss Dots embossing folders, Nestabilities Curved Rectangles die, black polka dot ribbon, sponge daubers, 3D-Dots, Sticky Doos, clear gems

Friday, October 17, 2008

Red Roses Happy Birthday


Yes, another rose card. ;) I hope you've not grown tired of them. I haven't, so I hope that means you haven't either. This is for my mother whose birthday is next week.

I used 2 SCS challenges to make this: one was for color challenge CC183, Riding Hood Red (or Real Red, which I used), Green Galore, and Going Gray. The other was for sketch challenge SC198.

I hope you don't mind if I skip all the repetitive explanations. Much of this card is similar, technique-wise, to others I've recently made.

One thing I did on this card that I haven't done in awhile is I used my Inkworx air art gun to spray black ink on the roses. I used to use that thing on almost every card (an old favorite), but I put it away one day and hadn't used it in a long time.

Another thing I did on all but the black cs was to DTP with matching inks. And I sponged the red cs after cuttlebugging it with Baroque Burgundy ink to smoke it up.

For the roses I stamped the roses in Real Red ink on white cs and then DTP'd them with the same. I sponged the edges first with Baroque Burgundy and then with Basic Black. For the leaves I stamped them in Green Galore on white cs and then DTP'd them with the same. I sponged Old Olive ink along the edges and then Basic Black. I curled the edges, assembled with pop dots and spritzed with the black ink. Same with the leaves.

I'm pretty predictable these days in my card making. When I try something and like it I tend to keep doing it until I tire of it. The paper piercing and Cuttlebugging are things I love to do, so I tend to incorporate them into each card I make.

I love cards with lots of depth, so I look for ways to pop things out as much as possible. Sometimes I kind of go overboard, but I try to keep the balance.


The latest thing I've enjoyed adding to my cards is the addition of colored cs inside them with a bit of embellishment to add interest. I haven't gone too far in that direction just yet. I've seen some cards that are so wow-ish inside that you'd think you were getting 2 cards for the "price" of one! Mine are simpler.


Well, I hope you enjoy this rose card!

Stamps: SU Roses in Winter, TAC Happy Birthday stamp, Purple Onion Designs small Girls Are Weird alphas

CS: Black, Real Red, Green Galore, Going Gray, White (for roses)

Inks: Real Red, Baroque Burgundy, Green Galore, Old Olive, Going Gray, Basic Black

Other: Cuttlebug D'Vine Swirls and Swiss Dots embossing folders, Nestabilities dies, Small and large oval punches, Corner punch, 1/2" circle punch, 1/4" circle punch, 1/16" hole punch, Silver mini-brads, pop dots of various kinds, paper piercing tool, cushion from Mat Pack, Inkworx Air Art gun, Basic Black marker, Sponges

Tuesday, September 23, 2008

So Autumn


Had to do another gate fold card. And of course I had to use the Cuttlebug to emboss the front panels!

This card started as so many others do with a different idea that morphs along the way. Rarely does a card stand completed in my mind. I wish! I usually will get a yearning to play with a certain color, or I'll just have a general aha moment when I see 2 colors together, or I'll just happen upon something that works and then go with it. That's kind of what this one was like.

I knew I wanted to do the gate fold again and I knew I wanted to use some autumn colors again. Looking through my cardstock stash I happened to run across a CTMH cs called Autumn Terracotta that was perfect. It was a nice pumpkin-y color.

I had planned to use the SU Doodle This set exclusively for the images with the biggest flower in the center. But I thought it would be too bland that way. Maybe I'll try it again later. I used the Doodle This doodles as a background on the front Terracotta panels, stamping them in Basic Black. Then I did direct to paper using Pumpkin Pie and Cranberry Crisp inks. I loved the way they worked together to add depth to the paper.

Then once the ink was a bit dry I ran the panels through the Cuttlebug using the Script embossing folder. Boy, did I like that! Then I did direct to paper with the Cranberry Crisp ink pad over the embossed parts. WOW! That thrilled me!


(Those little black dots you see are self-adhesive Velcro I punched out using my Crop-a-dile, used for keeping the card closed.)
This time I used a corner punch on not only the panels, but the black cs base as well. I think it looks more finished that way, don't you?

For the center piece I cut the scalloped circle (black cs) and then the plain circle (white cs) using my Nestabilities. I poked holes around the edges of both pieces using the Mat Pack cushion and a pin. Then I went over the white piece with the More Mustard ink pad (direct to paper) and worked it in a little extra around the edges. I'll admit that I stamped the words first. But if I were to do it over I'd stamp last to prevent any smearing. The word "SO" is from the SU So Very set. The "autumn" stamp is from Purple Onion Designs' "4 Seasons" set. I used the Stamp-a-ma-jig to line up the words properly on the circle. I only inked up the "SO" on the "SO Very" stamp. It was pretty easy to do since it's a big stamp.


For the rose I stamped the biggest rose image from the SU Roses in Winter set 3 times, first in Pumpkin Pie and then lightly in Cranberry Crisp inks on white cs. I stamped the middle rose once. I cut the rose pieces out and then mashed them some more on the ink pads to get more color saturation. Then I sponged Basic Black ink along the edges to make them stand out. I assembled the layers using big Sticky Doos to stack them up and a small one for the top piece. I curled the edges of the petals around a pencil.

For the leaves I stamped the bigger RIW leaf stamp 3 times using Old Olive ink. Then I stamped the smaller leaf over them using Always Artichoke ink and then rolling the stamp's edges in Basic Black. I did an extra 3 of the smaller leaf to pop up on the bigger leaves. Then I did direct to paper over them with More Mustard ink. Then I cut them out and attached the smaller to the bigger with pieces of Dimensionals.


The inside of the card was done using Autumn Terracotta cs which I direct to papered with Pumpkin Pie and Cranberry Crisp inks. Then I cut the corners using the corner punch and then paper pierced the edges. I attached the pieces with Sticky Doos to pop them out.

Hope you enjoy this card! I enjoyed making it!

Stamps: SU Roses in Winter, SU So Very, SU Doodle This, Purple Onion Designs "4 Seasons"

CS: Black, CTMH Autumn Terracotta, White

Inks: Pumpkin Pie, Cranberry Crisp, More Mustard, Basic Black, Old Olive, Always Artichoke

Other: Cuttlebug Script embossing folder, Nestabilities, Corner punch, Dimensionals, (The Paper Studio) Sticky Doos, Stamp-a-ma-jig, Sponge, Mat Pack cushion, pin, Pencil (for rolling), Velcro dots for closing card, Crop-a-dile (for making Velcro stickies)

Monday, July 21, 2008

Paper rose thanks


Well, are you ready for another rose card? I'm binging on them, of late. Just in a rose making mood, I guess. This time I wanted to try some different, non-typical colors. So I went with Bashful Blue and Apricot Appeal.

For the Apricot cs I stamped the SU Filigree background stamp in Apricot Appeal ink. I ran it through the Cuttlebug using the "Swiss Dots" embossing folder. Then I sponged the edges with Basic Black ink. For the Bashful Blue cs I sponged Bashful Blue ink all over the cs and then stamped the SU Canvas background stamp in Bashful Blue ink. Then I ran it through the Cuttlebug using the "Textile" embossing folder and sponged the raised parts with more Bashful Blue.

I cut out the ovals, embossed the white one and used the Stamp-a-ma-jig to properly place the "thanks" stamp. What would I do without my Stamp-a-ma-jig?

For the roses, I stamped one in Apricot Appeal and one in Bashful Blue on white cs. For each rose, I stamped the biggest stamp 3 times, the medium stamp once, and the smallest stamp once. I cut them out and then sponged more ink onto the layers and sponged Basic Black ink on the edges and very lightly on the middle parts. I curled the edges and bent them until I got the look I wanted. Then I assembled them with Dimensionals onto the ovals. I stamped the leaves in Old Olive ink and stamped the smaller leaf stamp in Always Artichoke on top of the Old Olive. Then I cut them out and sponged them with more Old Olive ink and sponged the edges with Basic Black. I added them to the roses and glittered the flowers and leaves with iridescent glitter.

For the plaid ribbon I rubbed it on the Apricot Appeal ink pad thoroughly and let it completely dry before tying it to the polka dot ribbon.

Well, there you have it! Another rose card. Thanks for looking!

Stamps: SU Filigree, SU Canvas, SU Roses in Winter, PSX "Thanks"

CS: Apricot Appeal, Bashful Blue, Black, White

Inks: Apricot Appeal, Bashful Blue, Basic Black, Old Olive, Always Artichoke

Other: Cuttlebug "Textile" and "Swiss Dots" embossing folders, Nestabilities, regular and scalloped ovals, Embossing mat, Stamp-a-ma-jig, Dimensionals, Polka dot ribbon, Plaid ribbon, Iridescent glitter, 2-way glue, Sponge

Friday, July 18, 2008

Roses in Winter from the heart


Can you stand this design one more time? Actually, 2 more because I have one more planned. This look just popped into my head and I had to make it. But I am slightly regretting the glitter being used on the rose. I'm not a heavy bling user, but I do like some. I had intended the glitter to be much, much lighter, but it wasn't to be for this card.

I stamped the Always Artichoke cs with Always Artichoke ink using the SU Canvas background stamp. Love that stamp!! For the red cs I did the same thing as on this card. I sponged Rose Red and More Mustard on Purely Pomegranate cs. If only Stampin' Up! would come up with a cs that color! Wow! I'd buy a bunch! I stamped the SU French Script background stamp over that using Baroque Burgundy ink. Loved the look that gave! Then I ran it through the Cuttlebug using the "Traffic Jam" embossing folder and then sponged more Rose Red and More Mustard inks over it to pop the embossing out.

Nothing new to mention about the Always Artichoke part with the "Swiss Dots" embossing folder. Pretty self-explanatory. The ovals, as well. Pretty much like the other 2 cards I described recently except that I used a sentiment (from SU All Year Cheer I) instead of an image. I lined it up using my trusty Stamp-a-ma-jig. The ribbons are also pretty self-explanatory.

The rose was made similarly to this card except that I stamped and cut out parts of another leaf stamp from the Roses in Winter set and Dimensionalled them to the tops of the leaves to add more oomph. I also glittered the edges of the rose with a rose-colored iridescent glitter. Still not sure that was a good idea, but oh well. I used lots of Dimensionals to put the rose together, and the leaves have several Dimensionals stacked on top of each other to keep them in place.

Well, there it is. Thanks for looking! I hope you enjoy this card. I enjoyed making it (except for the glitter part!).

Stamps: SU Roses in Winter, SU All Year Cheer I, SU French Script, SU Canvas

CS: Always Artichoke, Purely Pomegranate (sponged with Rose Red and More Mustard), Black, White

Inks: Basic Black, Rose Red, More Mustard, Baroque Burgundy, Old Olive, Certainly Celery

Other: Cuttlebug "Traffic Jam" and "Swiss Dots" embossing folders, Nestabilities regular and scalloped ovals, Stamp-a-ma-jig, Dimensionals, 2-way glue, Rose-colored iridescent glitter, Sponges, Plaid ribbon, Polka dot ribbon

Sunday, July 13, 2008

Roses in Winter SC184


Oy vey! Was this a hard challenge! I nearly gave up several times, but I am so glad I persevered because I'm pleased with the final result. However, I think trying to photograph this card was as much trouble as trying to design it! That pointed square on the bottom kept the card tilted when standing by itself, so I had to come up with a way to keep it straight. I think I need to get one of those cheapy plate/picture stands for cards like this. For now I had it stuck with Dimensionals to a big square punch. You can see it a little underneath.

Where to start? I originally was going to try doing this color challenge with this sketch challenge. But I got this wild idea to sponge Rose Red and More Mustard on the Purely Pomegranate cs and liked it so much I canned the color challenge (for now).

But first I stamped both the SU Print Pattern and the SU Canvas background stamps in Rose Red ink on the Purely Pomegranate cs. I always love that stamp combo as a background. But I'm not sure how easily you can see it in the pic. Click on it to enlarge and then maybe you can see it...at least a little...maybe. Trust me, it's there.

I wanted to cuttlebug the background (of course) and went with the Diamonds in the Rough embossing folder. Then I sponged it with Rose Red and More Mustard. Wow! What a great color that came out! Kind of an orangy red. Looks really rich in person.

My squares go off the card, unlike in the challenge design. I couldn't see going with a really small square punch, as it would've limited what I could stamp in the squares. And although this card would be a challenge to get into an envelope, I still like the way parts stick out. After I was done with the card, I thought that had I realized before stamping the sentiment and gluing everything down that this card would've looked really cool standing on its short side I would've changed the sentiment around.

For all the green square backgrounds I sponged Old Olive ink along the edges of Certainly Celery cs. For the little squares I stamped scenes from a SU Friendship's Journey stamp and 2 SU Botanicals stamps and a girl's face stamp from Rubber Cottage on white cs. I sponged them with Rose Red and More Mustard to match the background. I mounted them with Dimensionals on the green and then on black.


For the big square I knew I wanted the rose from SU Roses in Winter done in 3-D, so I stamped the biggest part of the rose 3 times and the middle part 1 time. I used Rose Red ink. I cut out 2 of the 3 biggest rose images and the center of the third one. Then I cut out the middle image. I sponged them all with Rose Red and More Mustard and then sponged the edges with Basic Black ink. I stuck the 2 largest rose images together, rotating one a bit to add a swirling effect. I stuck the middle rose image on next and then cut a piece of a Dimensional to stick the smallest piece on. The 3 leaves were stamped in Old Olive squiggled with a bit of Always Artichoke marker right on the rubber. Then I huffed on the stamp and stamped it. Then I sponged the edges with Basic Black ink.

After I stamped the sentiment from SU Happy Harmony I ran the white cs through the Cuttlebug using the Swiss Dots embossing folder. Then I adhered the rose and the leaves using Dimensionals.

Before putting all the squares on the background I added 2 polka dotted ribbons to continue the polka dotted theme of the main piece. I adhered the ribboned background to black cs. Then I added the squares...with Dimensionals. You can see I love Dimensionals a little too much.

Phew! It doesn't sound complicated, but it sure felt that way!

That's about it. Thanks for looking!

Stamps: SU Roses in Winter, SU Print Pattern, SU Canvas, SU Friendship's Journey, SU Botanicals, SU Happy Harmony, Rubber Cottage "Girl Face LG"

CS: Black, Purely Pomegranate, Certainly Celery, White

Inks: Rose Red, More Mustard, Old Olive, Basic Black

Other: Cuttlebug "Swiss Dots" and "Diamonds in the Rough" embossing folders, Big and small square punches, Polka dot ribbon, Always Artichoke marker, Dimensionals, Stamp-a-ma-jig, Sponges

Monday, March 19, 2007

3-D rose scripture card


Recipe:

Stamps: Canvas, Roses in Winter, Scripture stamp (source unknown)

Paper: Baroque Burgundy, Black, Always Artichoke, White

Ink: Basic Black, Baroque Burgundy, True Thyme, Old Olive, Always Artichoke; Markers: Ruby Red, Rose Red, Baroque Burgundy, Real Red, Close to Cocoa, Basic Black

Accessories: Cuttlebug Script embossing folder, Gingham ribbon, Dimensionals, Sponges, Stamp-a-ma-jig, Inkworx air art gun, crochet hook (for curling rose petals), water spritzer

Techniques: Watercolor misting, sponging

Well, how about that! I actually got the Sunday challenge done on a Sunday for a change!

It helped that the idea came into my head pretty quickly after seeing Amy's challenge design. That isn't usually the case.

I decided to dig into my Scripture stamps and find one that would work for this design since Amy used one for hers. I bought this stamp so long ago that I forgot where. Somewhere online. It's unmounted, so no name on the side of a wood block to check.

I enjoyed creating this card. Lots of extra stuff was done to give a sense of depth.

First, I used a piece of Baroque Burgundy for the biggest piece of cs and sponged black around the edges to soften the transition to the black in front of it.

Then, I stamped the Canvas background stamp on Always Artichoke using Baroque Burgundy ink (still haven't switched over to Bravo Burgundy yet). Then I ran it through the Cuttlebug using the Script embossing folder. Then I sponged black and burgundy inks over the embossed areas. After that, I mounted it to the black cs.

Next, I added the gingham ribbon and adhered the Script/black cs to the burgundy cs.

When making the pieces for the rose, I started by squiggling different red markers (Ruby Red, Baroque Burgundy, Real Red, Rose Red) here and there on the biggest rose stamp in the Roses in Winter set. Then I spritzed the stamp with water and stamped it on white cardstock. I actually made 2 of the biggest rose stamp so I could add even more depth. And I stamped the biggest rose yet again so I could use the center for the top of the rose. I varied the colors and even put a little Close to Cocoa on a few spots for variation. I did this with the other rose stamps that are in the set. I used Old Olive and Always Artichoke inks when doing the leaves.

To create the rose, I cut each piece out and layered them with Dimensionals. After putting the rose together, I sponged the edges with black. That really made a difference! Then I curled the edges a bit with whatever was handy (in my case, a crocheting hook). I mounted the leaves just behind the rose with Dimensionals after sponging them also with the black ink. You could say this card is a sponge-a-rama! The sponges touched everything!

Here's a close-up:


Once the rose was on the card, I stamped the Scripture stamp on white cardstock with black ink. Then I stamped the leaf sprig stamp from Roses in Winter in True Thyme, but I stamped off once first as the full color was too intense behind the Scripture. I spritzed it with the Basic Black marker using the Inkworx air art gun. Then I mounted this piece onto the Script piece with, of course, Dimensionals. What would I do without Dimensionals??

So there you have it. Another fun stamping session thanks to Amy!

Sunday, February 25, 2007

Roses friendship card


Recipe:

Stamps: Print Pattern, Roses in Winter, Espress Yourself, Itty Bitty Backgrounds

Paper: Black, Rose Red, glossy white

Ink: Versamark, Rose Red, Always Artichoke, Basic Black

Accessories: Black organdy ribbon, polka dot grosgrain ribbon, small rectangle punch, 1&1/4" square punch, 1&1/4" square punch, Dimensionals, Inkworx art gun, Basic Black marker, Chocolate Chip marker

Here's another card with the triangle feature similar in style to my previous card. On the roses I inked the stamp with Rose Red dye ink, then colored around the edges with the Chocolate Chip marker, huffed on the stamp, and stamped the image onto the glossy white. The darker edges looked pretty cool.