Showing posts with label Fiskars Make a Wish Quotes. Show all posts

Sunday, February 13, 2022

Yukon Masculine Birthday Card

Well, hey! Haven't been doing much stamping until recently, so let me share with you a card I made.

This birthday card is for my grandson who turned 21 last month. He's a quiet, gentle young man, and this noble elk makes me think of him. 


The elk is from the SU! Yukon set, and was chosen as my focal point. 

I wanted to keep to a forest/wilderness theme, so I used the Cuttlebug Forest Branches embossing folder on the grey-green outside panels. But before embossing them, I rubbed them (direct-to-paper) with my SU! True Thyme and SU! Close To Cocoa ink pads to give them more visual texture. Then I stamped the wilderness image from the same set in black ink on the bottom of each panel. The grey-green cardstock is one I've had for a long time. I'm not sure of the color's actual name or its maker. But it fit well with the look I was going for.


I used the gatefold cut to create a center-opening style. It's my favorite card style. To hold the card closed, I used a little bronze lever, held in place by a bronze mini-brad. It was very challenging to work with, so I'm not sure I'll do that again. I used one of the Nestabilities Pinking Circle dies on black cardstock to frame the center design and added foam tape under the white circle to give more dimension. 


I double-stamped the elk image on white cardstock. I cut one out with a circle die and the other one using craft scissors and a detail knife. Then I colored everything with Copics. Cutting out those antlers was a challenge! No die cuts to make it easier! After cutting it out, I lined the edges with a black Copic. Then I adhered it over the other elk image with foam tape to add even more dimension. 


On the inside I carried the forest theme further by using the Taylored Expressions Birch Tree Cutting Plate die, cutting it in half to use as inner side panels. I used the same grey-green cardstock, inked up with True Thyme and Close to Cocoa to texturize it. After the ink dried, I ran the tree pieces through a Xyron 510 sticker maker to apply adhesive to the backs. It was a bit messy because of all the nooks and crannies of the image, but it was fairly easy to clean up with a rubber cement eraser afterwards.


I used a 1/2" circle punch and a corner punch to get the corners and middles of everything a bit fancy. Another of my favorite things to do on my cards.

I used a tree stamp from SU! Lovely As a Tree and the numbers were from SU! Letterpress Numbers. The birthday stamp was from Fiskars Make a Wish Quotes. Everything was stamped in black ink using a Stamp-a-Ma-Jig to align everything properly.

So there you have it. Thanks for coming by for a look! 

Recipe:

Stamps: Stampin' Up! Yukon, Stampin' Up! Lovely As a Tree, Stampin' Up! Letterpress Numbers, Fiskars Make a Wish Quotes

CS: Black, grey green (unknown source), White

Inks: Stampin' Up! True Thyme (2007), Stampin' Up! Close to Cocoa, Memento Tuxedo Black, Versafine Onyx Black

Copics: 110, E33, E35, YG93, YG95, YG97

Other: Taylored Expressions Birch Tree Cutting Plate, Nestabilities Standard Circle Small, Nestabilities Large Pinking Circles, Cuttlebug Forest Branches embossing folder, Xyron 510 sticker maker w/permanent adhesive, rubber cement eraser, Stamp-a-Ma-Jig, Corner punch, 1/2" circle punch, 1/16" hole punch, foam tape, bronze mini-brad, bronze mini lever, craft scissors, Fiskars Fingertip Precision Detail Knife

Tuesday, June 05, 2018

Blingy Monochromatic Birthday

I loved making that monochromatic card so much that I made another one! This time I also added red bling. I gave this one to my daughter who happens to be the mother of my granddaughter (the recipient of the other monochromatic card). So we're keeping it in the family. :)


I stamped several of the retired SU! Doodle This stamps on white cardstock using my favorite go-to black ink, Memento Tuxedo Black. It doesn't smear when used with Copics. I colored it using warm grays and then ran it through the Cuttlebug with the Script embossing folder. 

And then there's the bling! Blingety-bling-bling, I went nuts, didn't I? I just had to put something on all of that monochromishness, so I raided my gem collection to see if I could bring it up a notch. At first, I just did the clear gems. But it just needed something more. So I threw some red gems in and added some red organdy ribbon, and that seemed like just enough.


I used a piece of white cardstock only on half of the inside, and did a cut-out, popped-out piece on the other half since the ribbon would kind of be in the way. I think it works pretty well. I stamped and colored the inside image the same as on the outside and blinged it up, too. The inside saying is from Fiskar's Make a Wish Quotes.

I liked how these clear gems kind of went "outside the box" and spilled into the black base. I dunno, I'm weird.


So there you go! I have one more card to show you and then I need to get busy on my Father's Day cards and I need to make a baby quilt for my 5th grandbaby, due next month!

Thanks for looking and have a great day!

Stamps: SU! Doodle This, SU! Elegant Greetings, Fiskars Make a Wish Quotes

CS: Black, Papertrey Ink Stamper's Select White

Ink: Memento Tuxedo Black

Copics: W1, W3, W5, W7

Other: Nestabilities Standard Circle Large, Classic Scalloped Circle Small, Cuttlebug Script & D'Vine Swirls embossing folders, Red organdy ribbon, Clear and red gems, Foam tape, Paper piercer, Piercing mat

Wednesday, October 16, 2013

Paris in the Spring birthday card

Well howdy there! Yes, it's another card from me! Amazing, I know. I'm feeling such a strong desire to stamp right now. It's wonderful! Almost every day I stamp and create a little. I love it!

This card is more what I normally do, but you'll be seeing me go back to my stamping roots in the near future. I've got another card I'll post soon and I'm almost finished with a third. My mojo is back, y'all, and it's all because I am playing like I used to!

I had actually made parts of this card many months ago, and was re-inspired to finish it whilst going through my cardstock pile and finding pieces of cards I had started. Do you have a cardstock pile that forms every time you make a card? I usually do, and it normally grows with each project, gathering dust in the process. But I got it all put back and now have my cardstock within easy reach so I can put scraps in their proper place. I keep a box like this nearby for smaller scraps so I am more likely to grab them instead of reaching for a new sheet. It works! I feel so good using my scraps up!


I realized how perfect this saying from SU Loads of Love Accessories was with this image from SU Paris in the Spring.

The middle flower and the smallest flower were inked up with a Copic marker. It was so easy to make the white flowers into whatever colors I wanted and was much less messy than pressing the flowers on an ink pad (my old way) which soaks up a lot of ink.


All coloring was done with Copics.


See the wheel stamping I did below? I have totally ignored my lovely wheel stamps for far too long! Btw, you can also see that I started to write in the card before I realized I hadn't photographed it yet. Oops! It went in the mail to my sister today!


More Copic coloring. I did a little doubling and tripling up on the colors to make the images more whimsical.


Tried hard to copy the outside image coloring inside. Considering that the outside image was done months ago, I found it a bit challenging. But the FUN kind of challenging!


Well, I hope you enjoyed this birthday card I made! Thanks for coming by!

Stamps: SU Paris in the Spring, SU Loads of Love Accessories, SU Swirl Style Wheel, Fiskars Make a Wish Quotes

CS: SU True Thyme, Tim Holtz Idea-ology Paper Stash: Lost and Found, White

Inks: Copic markers, Memento Tuxedo Black, Versafine Onyx Black, VersaMark, SU True Thyme

Other: Martha Stewart Arched Lattice border punch, Nestabilities oval die, Cuttlebug D'Vine Swirl and Polka Dot embossing folders, Cloth flowers, Gems, Grosgrain ribbons

Monday, September 10, 2012

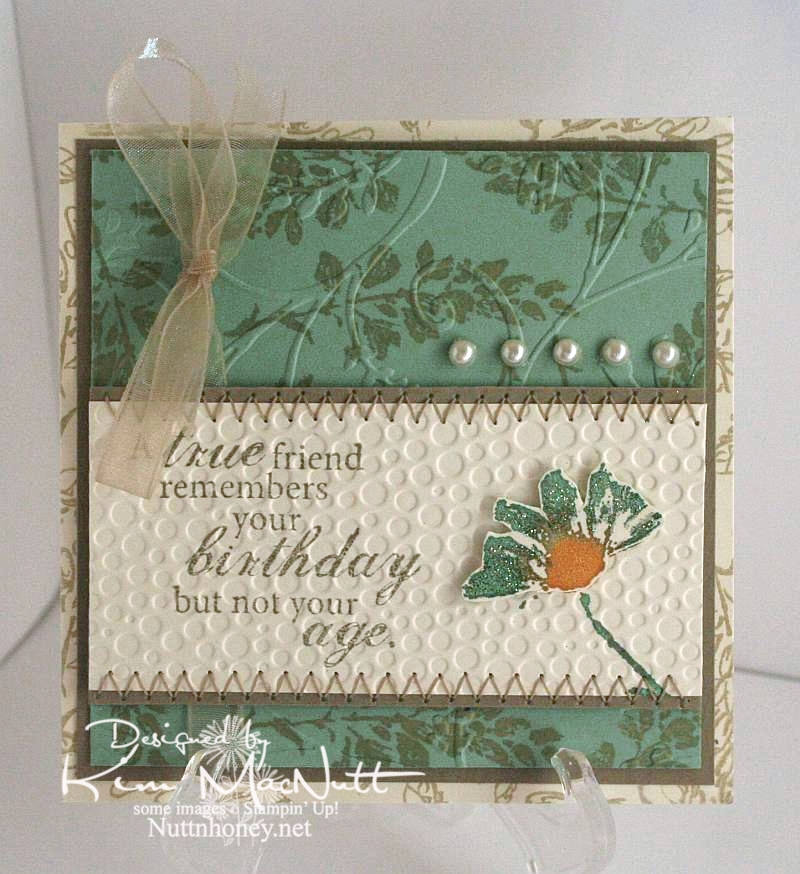
A true friend...


The dear friend I made this card for has never revealed her age to me in the 20 years I've known her. She's determined! But she's given away clues that made me at least get in a good guess. It's not important, though. Just a funny aside to why I chose the saying for her card.

Once again, I used the Petal Prints set. Such a pretty set with such versatility. Any of those shadow stamp type sets are like that. You can draw on them with markers and either huff on them or spritz them with water for different watercolor effects. You can stamp other stamps on them and restamp to create patterned images. So, so versatile.

I stayed completely away from black on this one. A rare thing for me. ;) It was a fun excursion.

I used a cream cardstock rather than white to give a softer appearance to the Sage Shadow green and the Kraft cardstock.

On the cream background piece I used an outline stamp from SU Petal Prints in Encore Gold (just in a gold mood, I guess). I did the same on the Sage Shadow piece. Then on that same piece I cuttlebugged it using the Stylized Flowers embossing folder.

For the main piece I stamped a phrase from the Fiskars set, Make a Wish Quotes, in True Thyme (a retired SU color). I colored the shadow stamp with More Mustard, Sage Shadow and Pale Plum markers, huffed on the stamp and stamped it. Then I did a duplicate of the flower and colored part of it with glitter. I ran the piece through the Cuttlebug using the Tiny Bubbles embossing folder before attaching the dimensional flower. Then I finished it by sewing a zigzag stitch along the edges.The ribbon and pearls were added last.

Thanks for coming by for a look! Have a blessed Monday!

Recipe:

Stamps: SU Petal Prints, Fiskars Make a Wish Quotes

CS: Cream, Sage Shadow, Kraft

Inks: SU True Thyme, Encore Gold

Other:  Cuttlebug Stylized Flowers and Tiny Bubbles embossing folders, sewing, pearl gems, glitter, foam mounting tape, SU More Mustard, Pale Plum and Sage Shadow markers, narrow taupe organdy ribbon

Monday, August 20, 2012

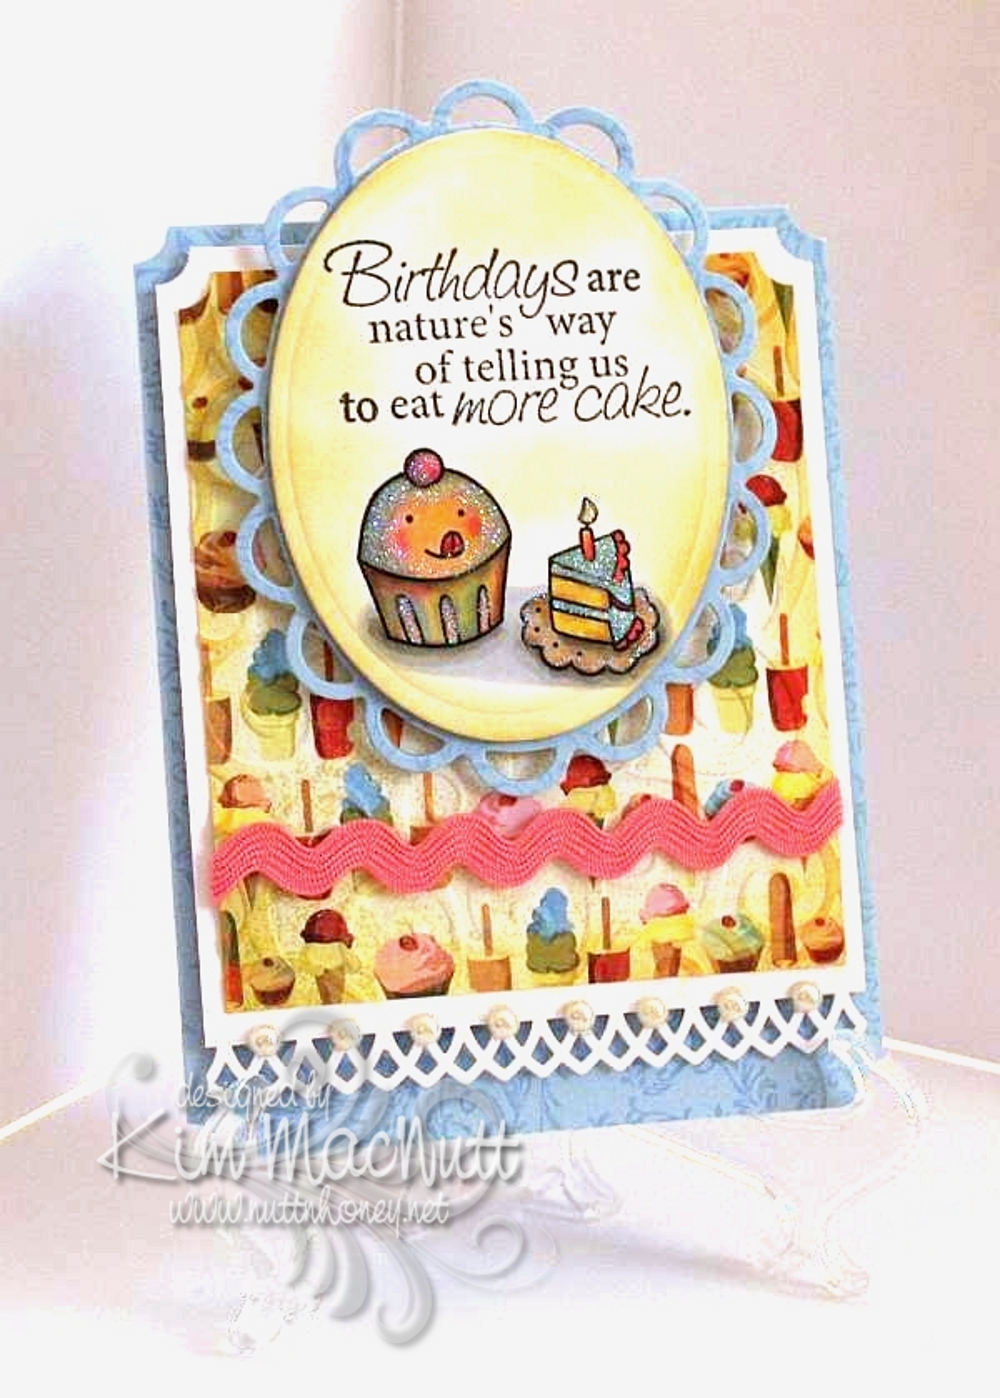
Cuppy birthday card for my littlest


My youngest turns 12 tomorrow and I made her a card rather than buy. She, of all people, loves anything homemade; and especially anything homemade from paper. She's always bringing me things she's created with bits of paper or a painting or drawing she made. This very minute she is standing next to me making a horse with movable legs...out of paper.

Her favorite color is pink, but I realized while putting this card together that blue was speaking to me. So I thought I'd just accent with pink. She'll be happy.

I stamped all the blue cardstock in Versamark ink with the Filigree background stamp long retired from Stampin' Up!. I used the D'Vine Swirls embossing folder on the ice cream and cake paper from Basic Grey Cupcake.

The stamps are from Taylored Expressions Sweet Celebrations and Fiskars Make a Wish Quotes.

The lace edging was done with the Martha Stewart Arch Lattice border punch. I used a Nestabilities die from the Lacey Ovals set under the cuppy scene.

The image was colored with Copics using a lot of mixing of colors to achieve the muted look. I was thinking of the artwork in the If You Give a Mouse a Cookie book as color inspiration.

I used white Art Institute Glitter on the scene to give a general glittery appearance. I sponged Barely Banana ink around both the oval and the Basic Grey paper.

Thanks for having a look! I can't wait to give this card to her. She'll flip over that glitter-covered cuppy!

Recipe:

Stamps: Taylored Expressions Sweet Celebrations, Fiskars Make a Wish Quotes

CS: SU Bashful Blue, White, Basic Grey Cupcake designer paper

Inks: Memento Tuxedo Black, SU Barely Banana, Versamark

Other: Cuttlebug D'Vine Swirls embossing folder, Nestabilities Lacey oval and regular oval dies, Martha Stewart Arch Lattice border punch, SU Ticket Corner punch, pearl gems, white Art Institute glitter, Copics, pink rick-rack ribbon, Stamp-a-ma-jig, sponge dauber, foam mounting tape