Showing posts with label SU Happy Harmony. Show all posts

Monday, October 28, 2013

In Everything, Give Thanks...

Hey, ladies! Hope you are well. I stayed home from church yesterday because of my monthly yuck and felt just a little bit like stamping. But you know how it is when your whole body is miserable and it's hard to think straight. So I went simpler than I usually do. NO Cuttlebugging! Hard to believe I actually resisted the embossing folders! But I wanted to do a card that wouldn't tax me too much and that had an autumn theme. I don't give Halloween or Thanksgiving cards, so this was strictly for pleasure again, and really, to test my newly-made cloud template!!!!!!

I had colored the image the night before while watching The Stratton Story with Jimmy Stewart. Amazon has these 4-pk. sets of old movies for dirt cheap and I had bought one with Jimmy Stewart movies. The Stratton Story is a true story about a famous baseball player who loses his leg in a hunting accident and struggles to persevere and rise above his handicap. A very good and satisfying film with a wonderful ending.

I folded this one like a gatefold card, but turned it on its side. All I did was stamp the SU Pumpkin Pie cardstock with the old SU Flannel Plaid background stamp to go along with a cozy autumn theme. I hope you can see it. I used VersaMark ink so it's very light.
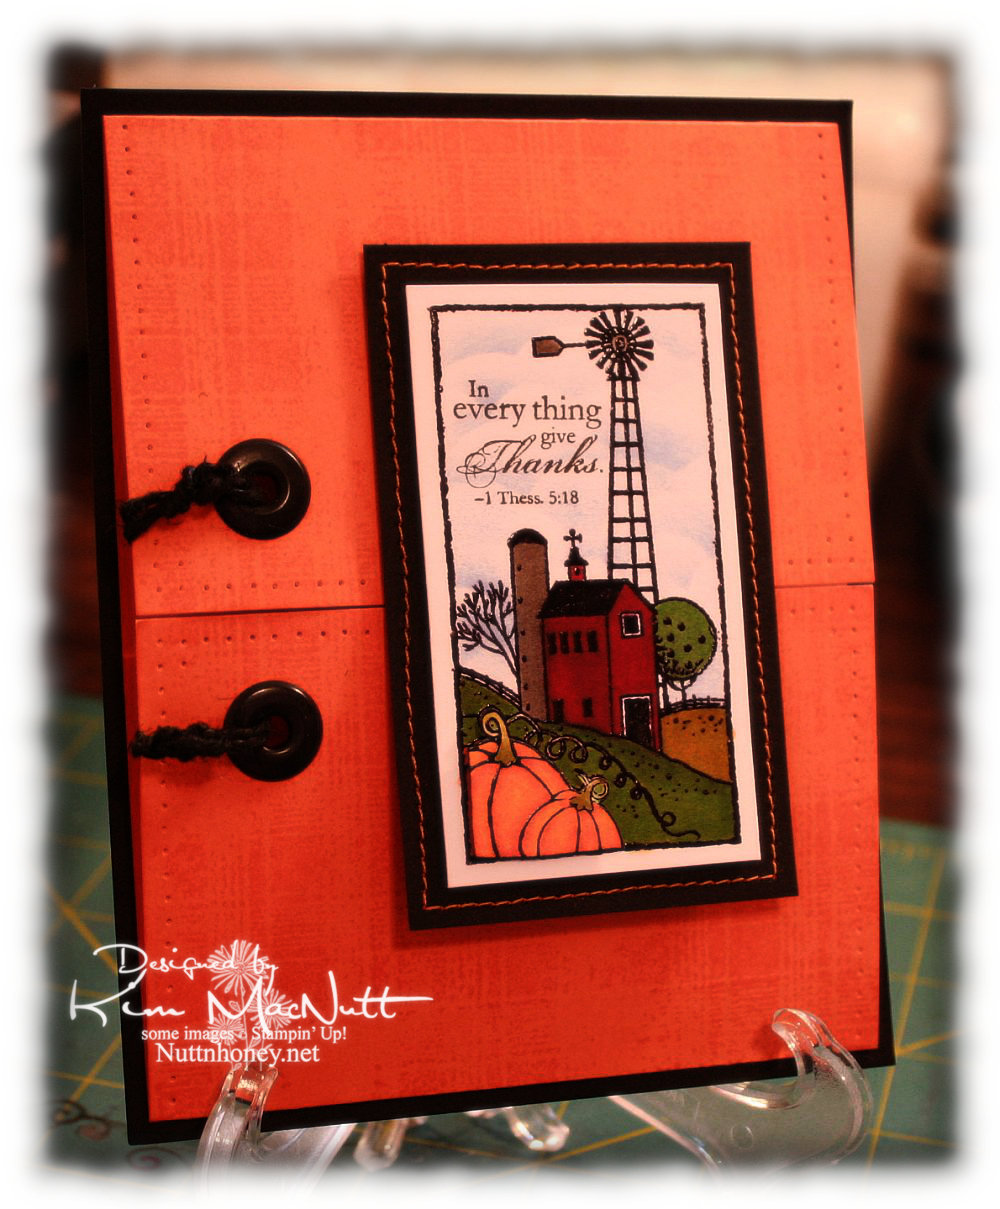


I wanted to do something with jumbo black eyelets, and was going to tie them together with some black hemp twine, but then I thought it would complicate the opening so I turned the twine to the side and wrapped it around to the inside. I did a simple paper piercing design around most of the edges and left the top and bottom plain. I glued all of this onto a piece of black cardstock.

I had a lot of fun coloring the image from the old SU set Country Pleasures. I realized that I did not recall ever doing a card with this set! That's a pity because the images just cry for Copics! I heat-embossed with Brilliance Graphite Black ink and clear ep. I made 2 images and cut out the pumpkins on one and popped them out on the other. I stamped a saying from SU Happy Harmony within the image using Memento Tuxedo Black. It was perfect for the autumn theme I was trying to create. Unfortunately, it stamped just a tad crooked, but I was not about to scrap it and start all over! No, sir!

Btw, the colors are actually truest in the top pic. The bottom pic is more muted than on the real card. It's so hard to get pics right! The lighting is always changing, and certain colors just don't photograph well, especially reds and oranges.


As you can see in the top pic, I did clouds in the sky and used my newly-made cloud template!!


I cut out some cloud-like Nestabilities dies and glued them together in cloud-like formations. The clouds in the scene are actually a bit darker than the top pic shows. But only a bit. I sponged SU Bashful Blue ink for the clouds. They're happy-day clouds.

When I think of all the clouds I've missed out on because I was stuck on the idea that I had to buy a template, well.......I'm just glad that I can now make my own for free! And I can keep changing them!

Thanks for coming by and checking out my latest creation! I'm a happy stamper once again and it feels good to be getting into the stamps and ink! I'm not sure how interested people will be in seeing me use mostly old stuff, but I am finding great contentment in it and will continue to look for new ways to use it. I have so many sets I've hardly or never used! Such a shame!

Stamps: SU Country Pleasures, SU Flannel Plaid, SU Happy Harmony

CS: Black, SU Pumpkin Pie, White

Inks: VersaMark, Brilliance Graphite Black, Memento Tuxedo Black, various Copic markers

Other: Cloud template, black jumbo eyelets, black hemp twine, sewing machine, paper piercing tool, foam tape, sponge, Crop-a-Dile (to cut and set eyelets)

Sunday, August 17, 2008

Happy Harmony Floral


Boy, what a stressful morning it's been! While I've been sitting by the phone waiting for updates, I got some photographing and posting done on this card I made last night.

I used that lovely paper I had gotten at Michael's recently and thought that the flower stamp and sentiment from SU Happy Harmony were just right to go with it. This card is for the Saturday sketch challenge at the OCC blog.

I used Black as my base and Always Artichoke for the green area. For the scalloped edge I punched the red dp out with a 1/2" circle punch, making enough circles to go across the length of the green. I drew a line where I wanted to line up the top edges of the circles and put a strip of mono adhesive just below that for them to stick to. Then I remembered that the red dp will not stick to mono, so I added some mono multi liquid glue to the circles and glued them along my drawn line. They were on the Always Artichoke cs when I ran it through the Cuttlebug using the Swiss Dots folder.

I also ran the Anna Griffin floral paper through the Cuttlebug using the Floral Screen embossing folder this time. I then cut a strip of the red designer paper to put behind it. I glued it on using mono multi. Then I adhered the whole piece to the Always Artichoke and put some red gingham ribbon over the edges to give it a finished look.

I used the Cuttlebug again to cut out the black scallop and the white circle using the circle Nesties. I dry-embossed the edges of the white circle. I used a Stamp-a-ma-jig to line up the flowers and the sentiment for stamping.

First I colored the flower stamp with the following markers: Rose Red, Baroque Burgundy, and Ruby Red for the flowers, and Mellow Moss and Old Olive for the stems. I huffed on the stamp and stamped. I used Basic Black ink to stamp the sentiment.

I used Dimensionals behind the black scallop, the white circle and the Always Artichoke cs to pop them out.

Before putting the AA cs on the black cs I used the corner punch on the corners and added silver mini brads.

I think I covered everything. If you have any questions, please ask.

Thanks for looking!

Stamps: SU Happy Harmony

CS: Black, Always Artichoke, Anna Griffin floral (AG 024), "Starburst Translucent" by The Paper Company, White

Ink: Basic Black

Markers: Rose Red, Ruby Red, Baroque Burgundy, Mellow Moss, Old Olive

Other: Cuttlebug Swiss Dots and Floral Screen embossing folders, Nestabilities circle and scallop circle, Dimensionals, Red gingham ribbon, Stamp-a-ma-jig, Silver mini brads, Corner punch, 1/2" circle punch, 1/16" hole punch (for brads), Mono multi glue

Sunday, July 13, 2008

Roses in Winter SC184


Oy vey! Was this a hard challenge! I nearly gave up several times, but I am so glad I persevered because I'm pleased with the final result. However, I think trying to photograph this card was as much trouble as trying to design it! That pointed square on the bottom kept the card tilted when standing by itself, so I had to come up with a way to keep it straight. I think I need to get one of those cheapy plate/picture stands for cards like this. For now I had it stuck with Dimensionals to a big square punch. You can see it a little underneath.

Where to start? I originally was going to try doing this color challenge with this sketch challenge. But I got this wild idea to sponge Rose Red and More Mustard on the Purely Pomegranate cs and liked it so much I canned the color challenge (for now).

But first I stamped both the SU Print Pattern and the SU Canvas background stamps in Rose Red ink on the Purely Pomegranate cs. I always love that stamp combo as a background. But I'm not sure how easily you can see it in the pic. Click on it to enlarge and then maybe you can see it...at least a little...maybe. Trust me, it's there.

I wanted to cuttlebug the background (of course) and went with the Diamonds in the Rough embossing folder. Then I sponged it with Rose Red and More Mustard. Wow! What a great color that came out! Kind of an orangy red. Looks really rich in person.

My squares go off the card, unlike in the challenge design. I couldn't see going with a really small square punch, as it would've limited what I could stamp in the squares. And although this card would be a challenge to get into an envelope, I still like the way parts stick out. After I was done with the card, I thought that had I realized before stamping the sentiment and gluing everything down that this card would've looked really cool standing on its short side I would've changed the sentiment around.

For all the green square backgrounds I sponged Old Olive ink along the edges of Certainly Celery cs. For the little squares I stamped scenes from a SU Friendship's Journey stamp and 2 SU Botanicals stamps and a girl's face stamp from Rubber Cottage on white cs. I sponged them with Rose Red and More Mustard to match the background. I mounted them with Dimensionals on the green and then on black.


For the big square I knew I wanted the rose from SU Roses in Winter done in 3-D, so I stamped the biggest part of the rose 3 times and the middle part 1 time. I used Rose Red ink. I cut out 2 of the 3 biggest rose images and the center of the third one. Then I cut out the middle image. I sponged them all with Rose Red and More Mustard and then sponged the edges with Basic Black ink. I stuck the 2 largest rose images together, rotating one a bit to add a swirling effect. I stuck the middle rose image on next and then cut a piece of a Dimensional to stick the smallest piece on. The 3 leaves were stamped in Old Olive squiggled with a bit of Always Artichoke marker right on the rubber. Then I huffed on the stamp and stamped it. Then I sponged the edges with Basic Black ink.

After I stamped the sentiment from SU Happy Harmony I ran the white cs through the Cuttlebug using the Swiss Dots embossing folder. Then I adhered the rose and the leaves using Dimensionals.

Before putting all the squares on the background I added 2 polka dotted ribbons to continue the polka dotted theme of the main piece. I adhered the ribboned background to black cs. Then I added the squares...with Dimensionals. You can see I love Dimensionals a little too much.

Phew! It doesn't sound complicated, but it sure felt that way!

That's about it. Thanks for looking!

Stamps: SU Roses in Winter, SU Print Pattern, SU Canvas, SU Friendship's Journey, SU Botanicals, SU Happy Harmony, Rubber Cottage "Girl Face LG"

CS: Black, Purely Pomegranate, Certainly Celery, White

Inks: Rose Red, More Mustard, Old Olive, Basic Black

Other: Cuttlebug "Swiss Dots" and "Diamonds in the Rough" embossing folders, Big and small square punches, Polka dot ribbon, Always Artichoke marker, Dimensionals, Stamp-a-ma-jig, Sponges

Sunday, June 29, 2008

SC182 challenge

As I had hoped, I have been reaching for my new SU Doodle This set over and over again. I'm always happy when I get a lot of use out of a set. I have many sets that see little use, and I always wish I had known I wouldn't have found them as appealing before I had bought them! Plus, I'm looking for ways to use the SU Ginormous Flowers set, which I used with the Doodle This set on the squares.


This card is for sketch challenge SC182. You can see other samples from this challenge here.

I was inspired by this card's use of designer paper. I loved the card over all, but the designer paper was the thing that really caught my eye. I didn't use those colors, but I created my own "designer paper" in a sort of double time method.

I designed the paper using Tempting Turquoise, Apricot Appeal, and Green Galore inks, plus Basic Black for the Doodle This images. Then I punched out the squares by turning the punch upside down so I could see what I was punching and line the design up the way I wanted to each time. Once they were punched out I ran them through the Cuttlebug using my favorite folder, "Tiny Bubbles". Boy, do I use that thing a lot! I hope I don't bore anyone with it. I just love the look!

I then ran the squares through my Xyron Create-a-Sticker (permanent adhesive) to get adhesive over the whole backs of the squares. I adhered them to black cs. Then I adhered that to Green Galore cs.

For the center piece I stamped a sentiment from SU Happy Harmony first using the Stamp-a-ma-jig to make sure it was placed just right. Then I stamped the big flower from Doodle This. I stamped it again on a separate piece of white cs, cut it out, and colored it with the Tempting Turquoise marker. When it was dry, I patted it face down on my VersaMark pad and sprinkled Ultra Thick EP over it, tamped off and heat embossed it. I did this twice to give it a glass-like appearance.

I cuttlebugged the Green Galore cs under the sentiment and glued that to the black. Then I adhered (I need to find a few other words for this!) the sentiment piece to it. I used Mini Pop Dots to adhere the turquoise flower to the center piece. Then I colored the little doohickeys around the flower with the Green Galore marker. At first I just made a second copy of the flower's center, colored it and Pop-Dotted it to the center. Then I had the idea to add the gem. So I glued a large yellow gem to the center of the flower. It added a bit more "wow" than just the flower center popped up.

I used Dimensionals to put the center piece on the card. I *heart* Dimensionals!

This was a fun card to make. I think this design leaves a lot of room for creativity.

Thanks for looking!

Recipe:

Stamps: Ginormous Flowers, Doodle This, Happy Harmony
CS: Green Galore, Black, White
Inks: Tempting Turquoise, Green Galore, Apricot Appeal, Basic Black
Other: Square punch, Cuttlebug embossing folder "Tiny Bubbles", VersaMark ink, Clear ultra-thick embossing powder, Large gem, Mini Pop Dots, Dimensionals, Stamp-a-ma-jig, Xyron Create-a-Sticker (permanent), Tempting Turquoise marker, Green Galore marker

Thursday, June 19, 2008

Published again!

I wanted to wait until I was sure my cards were in the magazine before I said anything. Well, they are! I was published a second time in Rubberstampmadness magazine! The July/August 2008 issue!


They put 2 of my cards in an article called Tools of the Trade mainly because my cards had lots of embellishments. I used the Cuttlebug and embossing folders, mini-brads, vellum, watercoloring, etc.


Before mailing off the cards, I took pictures of them:


It's so much fun to see one's own artwork in print. And the people at Rubberstampmadness are so nice to deal with. Send in your cards and get published!

Wednesday, May 23, 2007

Mother's Day card 2


Recipe:

Stamps: Happy Harmony, Hero Arts "Happy Mother's Day"

Paper: Rose Red, Black, White

Ink: Black; Markers: Rose Red, Baroque Burgundy, Old Olive

Accessories: Cuttlebug D'vine Swirl embossing folder, black polka dot grosgrain ribbon, dark pink, grosgrain ribbon, Dimensionals, Stamp-a-ma-jig, circle cutter, "stamp" deco scissors

This card was very simple to make. I created the circle with a circle cutter and then cut a slightly larger circle and then finished the edge with some "stamp" deco scissors. I used my Stamp-a-ma-jig to line up the flowers and word stamp. Everything else should be self-explanatory.

Vellum wedding card


Recipe:

Stamps: Happy Harmony

Paper: Lavender Lace, Swirl vellum, silver metallic, white

Ink: Encore purple metallic, Encore silver metallic

Accessories: Dimensionals, metallic ribbon

I rarely have a wedding card to do. So I don't have much in the way of wedding images to work with. But Happy Harmony seemed to fit the bill. I learned a few things while working on this card. I learned that vellum tape does not age well. It yellows and looks horrid after 2 years of storage in a dry, air-conditioned location. Hmm. I also learned that Crystal Effects (Diamond Glaze) is not good for holding down vellum, and it yellows over time, as well. It causes buckling. So I next learned that a teensy bit of mono adhesive is good enough to hold down vellum. In fact, if you hide it under something like a square flower feature, like I have, you can put even more on.

The vellum on this card covers the outside of the Lavender Lace cs completely. I dabbed a bit of the mono on the back to hold it and dabbed a larger amount on the front under the flower feature. The ribbon holds it in place, as well.

For the flower feature, I stamped the flowers in purple Encore metallic ink. I stamped the word stamp in silver Encore metallic. I mounted the flowers on silver metallic cs. The ribbon is a good match for the lavender/silver color combo, as it picks up both colors and effects.

Mother's Day card 1


Recipe:

Stamps: Happy Harmony, Hero Arts "Happy Mother's Day"

Paper: Perfect Plum, Black, Pale Plum, white

Ink: Markers: Perfect Plum, Pale Plum, Basic Black, Old Olive

Accessories: Dimensionals, "stamp" deco scissors, moss grosgrain ribbon, black grosgrain ribbon, Cuttlebug Textile Texture embossing folder, Stamp-a-ma-jig, Air art gun

Techniques: watercolor misting

This card is simple to make, but looks harder. I cuttlebugged the Pale Plum cs with the Textile Texture embossing folder. I used the circle cutter to make two circles, one larger than the other. Then I used some "stamp" deco scissors to trim the bigger circle. I used the Stamp-a-ma-jig to position the flowers and the word stamp.

I used the watercolor misting technique on the flowers.

Friday, March 09, 2007

Happy Harmony friend card


Recipe:

Stamps: Canvas, Print Pattern, Happy Harmony, Amazing to Zany

Paper: Black (natch!), True Thyme, Ruby Red, White

Ink: VersaMark, True Thyme; Markers: Black, Always Artichoke, Ruby Red

Accessories: Brown/Black Gingham ribbon, Cuttlebug Script embossing folder, Water spritzer, Small oval punch, Dimensionals

Techniques: Watercolor Misting

Amy Westerman holds a weekly challenge on her blog that I like participating in. This card is from this week's challenge.

For the flowers, I applied the marker inks to the stamp and then very lightly misted it with water and stamped. I love the watercolor-y look it gives.

I love this design Amy challenged us to use! I slightly altered the sentiment location because I couldn't make it work where it was supposed to go on my card. Otherwise, I think I stayed true to the challenge. Thanks again Amy!