Showing posts with label Nestabilities. Show all posts

Friday, September 20, 2024

Botanicals Happy Birthday Friend

Happy Friday! 🌞I am so enjoying getting back into making cards again! It's like Christmas!

This card is for a dear friend whose birthday is this month. I actually have two friends with September birthdays, and I'll share the other card once she has it in her possession.

I post my cards on this blog mainly to inspire MYSELF! 😄 But of course, I hope it inspires others, too! I learn cool techniques and then forget about them. So I often look at what I've done in the past to remind myself of them, to re-learn them, basically. Like stamping on cardstock with watermark ink and then embossing it. Such a cool look! I do that all the time, or used to anyway. But I had forgotten all about it until I started looking at my older cards for inspiration. 

Botanicals is one of the first stamp sets I bought from Stampin' Up! back in the early 2000's. All but the "Happy Birthday" stamp and the background stamp on the green paper are from the Botanicals set. It's a classic set that never grows old. 

One thing I love doing is dimensionalizing my cards. I am in love with foam tape! You can do such cool things with it. I must not be alone because while I was at Michael's the other day I saw a 12-inch wide roll of it! 


I'm not keen on sinking $21 into such a thing, but it made me happy to see that it comes in such vast quantities! I mean, look how cool that stuff is! You can pop out anything you like with it. 


My cards tend to not only be dimensional, but also textured, either visually or physically. It just thrills me to add texture or movement of some kind to my cards. 


On this one I popped out the poppy flower, bud, and pod. To add interest I put some Fruit Punch Stickles on the flowers and Peeled Paint Stickles on the leaves and pod. And I don't know why, but I get a thrill putting holes on my cards. Like the ones on the scalloped piece. They're not perfect. But I find that look more endearing than a perfectly-holed die that cuts them for you. Dies are expensive. My hole puncher is not. And I already own way too many dies as it is. Plus, punching holes is very Zen!


For the inside I used two inks to create a marbled effect on the saying, although I'm not sure it's visible in the picture. I inked the stamp with a lighter red, and then touched it here and there with a darker red. Then I breathed on it to moisten the ink and stamped it.  It gives a cool mottled effect. I used the Stamp-a-Ma-Jig to line up all the stamps inside the card. The bottom collage stamp was stamped twice to get a continuous look. It's not perfect, but it's tricky with such a stamp as this that has so many things to line up.

Well, that's about it! Thanks for coming by for a visit!

Recipe:

Stamps: SU Botanicals, SU Canvas, Savvy Stamps "Happy Birthday"

Papers: Prima Doodle Deux, Swirl Vellum, White, Black, Olive

Inks: Versamark embossing ink, Memento Tuxedo Black, Tim Holtz Black Soot Distress Ink, Papertrey Ink Pure Poppy, Tim Holtz Distressed Ink Abandoned Coral

Copics: 110, R30, R32, R35, YG95

Other: Cuttlebug Argyle embossing folder, Nestabilities Classic Oval Scallops - Large, Classic Ovals - Small, SU Scallop Trim Border punch, large oval punch, small oval punch, black gingham ribbon, Stamp-a-Ma-Jig, hole puncher, foam tape, Stickles (Fruit Punch, Peeled Paint)

Sunday, February 13, 2022

Yukon Masculine Birthday Card

Well, hey! Haven't been doing much stamping until recently, so let me share with you a card I made.

This birthday card is for my grandson who turned 21 last month. He's a quiet, gentle young man, and this noble elk makes me think of him. 


The elk is from the SU! Yukon set, and was chosen as my focal point. 

I wanted to keep to a forest/wilderness theme, so I used the Cuttlebug Forest Branches embossing folder on the grey-green outside panels. But before embossing them, I rubbed them (direct-to-paper) with my SU! True Thyme and SU! Close To Cocoa ink pads to give them more visual texture. Then I stamped the wilderness image from the same set in black ink on the bottom of each panel. The grey-green cardstock is one I've had for a long time. I'm not sure of the color's actual name or its maker. But it fit well with the look I was going for.


I used the gatefold cut to create a center-opening style. It's my favorite card style. To hold the card closed, I used a little bronze lever, held in place by a bronze mini-brad. It was very challenging to work with, so I'm not sure I'll do that again. I used one of the Nestabilities Pinking Circle dies on black cardstock to frame the center design and added foam tape under the white circle to give more dimension. 


I double-stamped the elk image on white cardstock. I cut one out with a circle die and the other one using craft scissors and a detail knife. Then I colored everything with Copics. Cutting out those antlers was a challenge! No die cuts to make it easier! After cutting it out, I lined the edges with a black Copic. Then I adhered it over the other elk image with foam tape to add even more dimension. 


On the inside I carried the forest theme further by using the Taylored Expressions Birch Tree Cutting Plate die, cutting it in half to use as inner side panels. I used the same grey-green cardstock, inked up with True Thyme and Close to Cocoa to texturize it. After the ink dried, I ran the tree pieces through a Xyron 510 sticker maker to apply adhesive to the backs. It was a bit messy because of all the nooks and crannies of the image, but it was fairly easy to clean up with a rubber cement eraser afterwards.


I used a 1/2" circle punch and a corner punch to get the corners and middles of everything a bit fancy. Another of my favorite things to do on my cards.

I used a tree stamp from SU! Lovely As a Tree and the numbers were from SU! Letterpress Numbers. The birthday stamp was from Fiskars Make a Wish Quotes. Everything was stamped in black ink using a Stamp-a-Ma-Jig to align everything properly.

So there you have it. Thanks for coming by for a look! 

Recipe:

Stamps: Stampin' Up! Yukon, Stampin' Up! Lovely As a Tree, Stampin' Up! Letterpress Numbers, Fiskars Make a Wish Quotes

CS: Black, grey green (unknown source), White

Inks: Stampin' Up! True Thyme (2007), Stampin' Up! Close to Cocoa, Memento Tuxedo Black, Versafine Onyx Black

Copics: 110, E33, E35, YG93, YG95, YG97

Other: Taylored Expressions Birch Tree Cutting Plate, Nestabilities Standard Circle Small, Nestabilities Large Pinking Circles, Cuttlebug Forest Branches embossing folder, Xyron 510 sticker maker w/permanent adhesive, rubber cement eraser, Stamp-a-Ma-Jig, Corner punch, 1/2" circle punch, 1/16" hole punch, foam tape, bronze mini-brad, bronze mini lever, craft scissors, Fiskars Fingertip Precision Detail Knife

Wednesday, June 02, 2021

Pure Innocence Hugs and Kisses

Hello, and Happy Wednesday! This little card has lots of holes in it, wouldn't you say? What is it with me and holes? I guess it's just something fun you can do to paper, and I love the zen-ishness of doing it the old-fashioned way, with a piercing tool.


My sewing machine was a bit wonky while I stitched around the edges, but I like the way it turned out. Kind of funky! It was a decorative stitch that maybe wasn't the best choice, but I still think it works, at least for me. The unevenness adds a bit of whimsy.

I used my piercing tool and an Ornare paper piercing template in the corners. Like I said, I love putting holes in paper! 😊 They frame things so nicely.


I used so many Copic markers to mimic the designer papers when coloring the hat and dress. And I'm sorry for not keeping track of which colors I used. I need to be better about that.

Since I love patterns so much, I added black circles with white dots all over the dress to make it more interesting. I wanted it to be loose and free, not too regimented. 

 
I put a tiny gem on the shoe buckle area to mimic a big button. And by using the white gel pen under some of the ink on the shoes, it makes them look like suede.

This card makes me so happy. Don't you love it when you feel that way about something you make? Thanks for coming by and feel free to comment before you leave! I love comments!

Stamps: Pure Innocence 02 digital stamp, Stampin' Up! All Year Cheer I sentiment

CS: White, Teresa Collins Fabrications designer papers

Inks: Computer ink for printout, Copics for coloring, Micron 03 for circles on dress, white gel pen for dots in circles, egg shells, and highlights on hat, and on shoes under Copic ink

Other: Nestabilies Classic Oval Large and Classic Oval Scallops Large dies, large oval punch, small oval punch, Ornare decorative corners piercing template, punching tool, sewing machine, olive-colored gem for shoe, foam tape, cream organdy ribbon

Tuesday, May 25, 2021

Silly Whale Birthday

Hello! Another sea-themed card. This time I'm using my old Stampin' Up! Silly Sealife set. The card sketch I'm using is Mojo Monday 560


I chose two papers from the Basic Grey Archaic collection because they are "wavy" like the sea. And one of them has a "bubbly" look that made me think of being under water. The one behind the sentiment wasn't "wavy" or "bubbly", but I liked how it went with the other two. 

I thought the Stampin' Up! Cheery Chat birthday greeting would go very well with the whole look on the front, and I used the matching birthday saying inside. I love the whimsy of the font.

I used the Nestabilities Labels Three die to frame the sentiment, but I'm not sure it was the best choice. Maybe a tad too wide for the look? I dunno.

And, of course, I gave in to using my Tiny Bubbles embossing folder because this card has a water theme...and...bubbles.


My happy little whale is spouting glittery water. 


It's probably hard to see, but I used the D'Vine Swirls embossing folder to create "waves" on the lower bubbly-looking paper. 

And here's the inside. Aren't those sea creatures adorable? This is such a versatile stamp set, I tell ya!


Close-up of the inside.


So, yet another sea card. I think that's my last one for awhile though. Hope you're having a good week! Take care and thanks for coming by!

Stamps: SU Silly Sealife, SU Cheery Chat

CS: Black, Ivory, SU Chocolate Chip, Basic Grey Archaic designer paper

Inks: Memento Tuxedo Black, Versafine Onyx Black

Copic Markers for whale: B0000, B00, B21, BG11, E11, E13, E15

Other: Cuttlebug Tiny Bubbles and D'Vine Swirls embossing folders, Nestabilities Standard Circle Large and Labels Three dies, hole punching tool, foam tape, large brown eyelets, Frosted Lace Stickles glitter gel

Tuesday, May 18, 2021

Another Mother's Day Card - Iris Flower

Hello! I have another Mother's Day card to share. I know it's a bit late, but I'm getting it up here, nonetheless. 


I started with some pretty lavender polka-dotted paper I've had for eons and did my usual texturizing to it using the Cuttlebug Distressed Stripes embossing folder. Then I mounted it on black cardstock. I kept the card fairly simple otherwise.

I used the gatefold technique, which is one of my favorite card styles. I nipped all the corners with a corner punch, except for the center backs, which I cut out in half circles with a 1/2" circle punch.

You can't see it, but I used a black Velcro self-adhesive circle to help keep the card closed. I usually glue the Velcro halves on the cardstock even though the Velcro adhesive is very strong. That way it won't come loose or rip the cardstock after it has been opened a few times. I usually put both halves together on one side (usually behind the main decorative element), gluing the parts that touch the cardstock with Tombow Mono Multi glue, and then close the card and leave it overnight to dry. 

I added a bit of  black gingham ribbon inside to jazz it up a bit, and I did use a sentiment inside, but I hadn't added it yet when I took the pics. I seem to be doing that a lot lately for some reason.


I stamped the iris image from The Angel Company (long since retired) in Memento Tuxedo Black on white cardstock and colored with Copics. I added some lavender, yellow, and lime green Stickles glitter gels here and there.


I mounted the outside saying with foam tape. What would I do without my foam tape, I wonder?


I hope you enjoyed this card. Thanks for coming by!

Stamps: Iris from The Angel Company, saying from Hero Arts

CS: Black, lavender (interior), lavender polka dot (exterior), White

Inks: Memento Tuxedo Black, Versafine Onyx Black (saying), Copics for coloring

Other: Cuttlebug Distressed Stripes, Nestabilities Lacey Ovals and Classic Ovals Small, black gingham ribbon, corner punch, 1/2" circle punch, foam tape, black Velcro self-adhesive circles, lavender, yellow, and lime green Stickles glitter gel, Tombow Mono Multi glue

Friday, May 14, 2021

My Mom's Mother's Day Card

Good morning! It's a beautiful sunny day here in Georgia. Sunny days just make all the difference, don't they? While I'm sitting here typing this I'm enjoying the birds at my bird feeders, watching them busily flitting about. It's so therapeutic.

I wanted to honor my mother this year with a homemade card. Some years I buy her a card, some years I make one. 

I was seeing a number of cards I liked on Pinterest that were using an old Stampin' Up! set called Garden Collage, so I bought it on eBay. I rarely buy stamps these days, but I bought this set because I thought I would get a lot of use out of it. It really is a pretty set.

Per my usual, I wanted lots of texture on my card. I just think it adds so much visual interest. For the designer papers I went with Basic Grey Wisteria. I used the Cuttlebug Traffic Jam embossing folder. But before embossing the lower piece I stamped the sentiment in Versafine Onyx Black ink using the Purple Onion Designs Girls Are Weird small alpha font set. I wasn't totally happy with that part, but oh, well. One "p" is a bit over-stamped, and a couple others are under-stamped. I didn't have another piece of that paper, so I let it be. I added some pearl bling on one corner and used some ribbon to blend the papers together.


I stamped the main image in Memento Tuxedo Black ink since I was going to color it with Copics. Then after coloring it I dry-embossed it with the Cuttlebug Mesh folder. I made an extra butterfly to add dimension, and used foam tape to pop it out. I used some Orange Peel Stickles glitter gel on the flower center to add more oomph to the look. I mounted it on some black cardstock that was cut using the Nestabilities Blossom die.

Inside the card I carried the theme of the green polka-dotted paper and the Traffic Jam embossing folder. I used another image from Garden Collage and colored it similarly to the outside image. The sentiment is from Penny Black's Bubbly stamp set. I blinged a bit with the pearls inside, as well.


I'm happy to say she loved it. That makes me happy. Take care.

Stamps: Stampin' Up! Garden Collage, Purple Onion Designs Girls Are Weird small alpha, Penny Black Bubbly

CS: SU Eggplant Envy, Papertrey Ink white, Black, Basic Grey Wisteria designer papers

Inks: Memento Tuxedo Black, Versafine Onyx Black, Copic markers

Other: Cuttlebug Traffic Jam and Mesh embossing folders. Nestabilities Blossom and Standard Circle Small dies, foam tape, pearl gems, Stickles Orange Peel glitter gel, black zigzag ribbon

Saturday, May 01, 2021

Under the Bonnet Masculine Birthday Card MM#558

Hello there! Happy Saturday!

My grown son's birthday is coming up soon and he loves to work on cars. When he was a teenager he would buy an old car, fix it up and make it pretty. Then he'd sell it and buy another one. The driveway looked like a used car lot at times! Now he's married with a child and finds he has less free time to tinker. But he really does enjoy it when he can.

I wanted to use a stamp that was car-related that I hadn't already used before, and I found the cutest digital stamp by Lili of the Valley called Under the Bonnet. I found the shop on Etsy and I love their stamps! So adorable! This stamp fit perfectly for the theme I was going for. 

And I just noticed that all throughout May they are running a 50% off sale! Oh my! That's dangerous! 

I also needed some serious stamping mojo. So I went with Julee Tilman's Mojo Monday Sketch Challenge #558. Her sketches always motivate me. 

(Btw, everything on this card except the digital stamp is likely retired by now. I don't buy much new these days. Part of my attempt at being more "minimalish".) 


I chose some Basic Grey Cupcake designer papers from my stash, and an olive green background for the cardstock. I stamped on the olive green edges with a Stampin' Up! Making Tracks wheel. Although you can't really tell, it's the image of tire tracks. 😜

To oomph up the car I used large silver eyelets for the body of the headlights, and I put small clear gems behind them to mimic real glass lamps. I also used tiny clear gems for the lowlights.


You can kind of see the shine I put on the red part of the car and the window. I used Inkssentials clear Glossy Accents for that.


I made the designer cardstock pop by using the Cuttlebug Spots and Dots embossing folder for the biggest piece and the Tiny Bubbles folder for the middle-sized piece.

All coloring was done with Copic markers. 

Well, I hope you enjoyed this card I made for my son, and I thank you for coming by for a visit! Take care!

P.S. I redid the original pics because I had forgotten to put the sentiment on the card. 

Stamp: Lili of the Valley digital stamp "Under the Bonnet", Stampin' Up! Making Tracks wheel (for background edges), Savvy Stamps Happy Birthday image

CS: olive green cardstock by Papertrey Ink , Basic Grey Cupcake designer paper, Black

Inks: Copic markers, VersaMark clear embossing ink

Other: Cuttlebug Spots and Dots and Tiny Bubbles embossing folders, Nestabilities Large Pinking Circles, and Standard Circles Large, corner punch, small oval punch, medium oval punch, paper piecing tool, foam tape, large silver eyelets, tiny clear gems for behind eyelet headlights and lowlights, Inkssentials Glossy Accents clear dimensional medium to add shine to car

Wednesday, February 27, 2019

Patriotic Invitation

Just a simple invitation I made for my daughter's AHG Stars & Stripes Award Ceremony. She colored the flag image on each one. I think she did a lovely job. Please excuse the imperfect parts of the card that I did. These were done in a bit of a hurry.


Stamps: Stampin' Up! Canvas, God Bless America by Our Daily Bread Designs, saying printed off computer

CS: SU Night of Navy, Papertrey Ink Pure Poppy, Papertrey Ink Stamper's Select White

Inks: Versamark, Versafine Onyx Black, black printer ink

Other: Park Lane Star and Cuttlebug Tiny Bubbles embossing folders, Nestabilities Large Pinking Circles die, Nestabilities Classic Circles Small die, Copic markers, red & white ribbon, foam tape

Wednesday, June 06, 2018

Mini Bird Crazy Masculine Birthday Card

This card is nothing like I had envisioned it to be. Have you ever had that happen? 


When I started making it, I had completely different colors and papers in mind. But I ruined them both with bad cuts and general mishaps and had to go with Plan B since I did not have anymore of either. Drat! 

Thankfully, I have pads and pads of masculine paper from Basic Grey. Did Basic Grey stop selling papers? I went to their website and only saw fabric! Wah!! It was one of the best designer paper companies out there with such limitless variety. I'm sad that they won't be making their wonderful papers anymore. It's insane when you do something so well and then you stop and go into something else (fabrics). Can't they do both?

Despite the issues with papers, this bird was definitely part of the plan. He's from Tim Holtz's set Mini Bird Crazy & Things and I love him! My 3rd daughter gave me this set for my birthday this year, and I made her a card with it; and now I've made this one for my son-in-law. Both are funny, nutty people who can appreciate the goofy bird characters in this set. In fact, I made this little guy even goofier by giving him googly eyes. Anytime I can add googly eyes, I'm happy! 

You can see all the layers below on the center piece. I love popping things out. It just jazzes up a card exponentially. What you can't see is my poorly-set eyelets. I'm sorry, but my Crop-O-Dile is just failing me. I have got to find a better way. It is hard to see where to punch the holes for the eyelets, and it is hard to set eyelets that are a harder metal, like these. Nothing I've done recently when trying to set eyelets with that thing has come out well. Maybe it's my eyelets?


I was fairly minimal inside the card because I was short on time and just needed to get it done. Otherwise, I would've filled all 3 panels up with something. One thing you can't see is that I added a black velcro dot on the outside to hold the card closed. I was in a hurry by the time I got this done, and just got bare minimum pictures taken.


Well, I hope you've enjoyed your visit, and please let me know you've come by with a comment. Take care!

Stamps: SU! Birthday Greetings, Mini Bird Crazy & Things

CS: Papertrey Ink Terracotta Tile, Basic Grey Obscure, Basic Grey Recess, Papertrey Ink Stamper's Select White

Inks: Memento Tuxedo Black

Copics: B24, B41, B45, B95, R14, YR24, W3

Other: Nestabilities Standard Circle Large, Large Classic Inverted Scalloped Circles, Standard Circle Small, Cuttlebug Distressed Stripes & Spots and Dots embossing folders, Sizzix Mini Bird Crazy & Things Framelit dies, Paper piercer Sponge mat, Silver eyelets, Crop-O-Dile, Googly eyes, Stamp-a-ma-jig, Foam tape

Card Style: Gatefold

Tuesday, June 05, 2018

Blingy Monochromatic Birthday

I loved making that monochromatic card so much that I made another one! This time I also added red bling. I gave this one to my daughter who happens to be the mother of my granddaughter (the recipient of the other monochromatic card). So we're keeping it in the family. :)


I stamped several of the retired SU! Doodle This stamps on white cardstock using my favorite go-to black ink, Memento Tuxedo Black. It doesn't smear when used with Copics. I colored it using warm grays and then ran it through the Cuttlebug with the Script embossing folder. 

And then there's the bling! Blingety-bling-bling, I went nuts, didn't I? I just had to put something on all of that monochromishness, so I raided my gem collection to see if I could bring it up a notch. At first, I just did the clear gems. But it just needed something more. So I threw some red gems in and added some red organdy ribbon, and that seemed like just enough.


I used a piece of white cardstock only on half of the inside, and did a cut-out, popped-out piece on the other half since the ribbon would kind of be in the way. I think it works pretty well. I stamped and colored the inside image the same as on the outside and blinged it up, too. The inside saying is from Fiskar's Make a Wish Quotes.

I liked how these clear gems kind of went "outside the box" and spilled into the black base. I dunno, I'm weird.


So there you go! I have one more card to show you and then I need to get busy on my Father's Day cards and I need to make a baby quilt for my 5th grandbaby, due next month!

Thanks for looking and have a great day!

Stamps: SU! Doodle This, SU! Elegant Greetings, Fiskars Make a Wish Quotes

CS: Black, Papertrey Ink Stamper's Select White

Ink: Memento Tuxedo Black

Copics: W1, W3, W5, W7

Other: Nestabilities Standard Circle Large, Classic Scalloped Circle Small, Cuttlebug Script & D'Vine Swirls embossing folders, Red organdy ribbon, Clear and red gems, Foam tape, Paper piercer, Piercing mat

Sunday, June 03, 2018

To Someone Special

This card was made for my granddaughter who recently had a birthday. I love this image. It's another Pure Innocence digital stamp. It's so sweet, and it's so much fun to color. I seem to be drawn to them lately.

For this one, I went monochrome.....just because. I actually found it quite satisfying to limit myself on colors. I had done a card that way in the past


I loved playing with my old Stampin' Up! Botanicals set on the gray designer paper and inside the card. I hadn't pulled it out in a long time. It's a classic that will never age. The images look so beautiful stamped.

On the inside, I went simple. Just a piece of the Basic Grey Granola paper with some paper piercing around the edges. The bee is also from Botanicals. The "Happy Birthday" image is from SU Birthday Greetings. It fits in so well with the Botanicals set, don't you think?


I took this pic so you could see the shine on the wings. Maybe I should've added glitter, too? I dunno.


And I gave her some princessy slippers by adding a gem to each. 


Well, thanks for looking! Take care!

Stamps: Pure Innocence PI049, SU Botanicals, SU Birthday Greetings

CS: Black, Papertrey Ink Stamper's Select White, Basic Grey Granola designer papers

Inks: Copic W1, W3, W5, W7; Memento Tuxedo Black

Other: Nestabilities Curved Rectangles, SU corner punch, SU 1/2" circle punch, clear gems, Inkssentials Glossy Accents (on wings), paper piercer, foam tape

Saturday, June 02, 2018

Congratulations, Grad! Impossible Card

I ran across a tutorial for making an "Impossible Card" on Splitcoaststampers and went to YouTube to see what it actually does that makes it have that name. It's called "impossible" because it uses an optical illusion to make it look like the base of the card can't possibly be from one piece of cardstock even though it is. And it's very easy to make! Here is a very helpful YouTube tutorial which includes doing them in multiple sizes.


I made this card in a hurry, although it took hours to create. I had to take quick pics at the end before getting it into the envelope. Please overlook the flaws. 

I decided on a purple base for a graduation color. The recipient is homeschooled and I'm not sure if she wore a cap and gown or what color they were, so I prayed and took my chances. To make it more girly and cheerful, I chose some orange and lime green papers to go with the purple. I thought they kept the purple from getting too heavy. You can't see it in the pics, but the green and orange papers are glittered! They came that way. They're very pretty and a heavy weight. DCWV makes wonderful papers! 

For the little mouse graduate, I popped his gown, cap and diploma out after coloring him with Copics. I used the W5 marker along the edges of the cut-out pieces to darken the white part that showed. A little oopsie in the pic below: I wasn't as careful to tuck that foam tape in on his cap, so it shows from the back. It's not as noticeable in person, but of course, the camera picks up everything!


Had I been thinking, I'd have made him a "she" with long eyelashes. But I was so rushed. Oh, well.

I'm not terribly happy with where the word "GRAD" was placed, but once again, I was rushed. I would've loved to have the letters dance along the contour of the mouse. But I was afraid I'd ruin the piece the mouse was on. So I played it safe and stamped the letters in a row.

The "Congratulations" piece is used to stabilize the card base and to add more interest.

I have other cards to show you, but I haven't given them to their recipients yet. I will be giving them out tomorrow, so there will be several new posts coming soon.

Take care and have a nice weekend!

Stamps: Stampabilities House Mouse "The Graduate", Stampabilities "Congratulations! 04", Purple Onion Designs "Girls Are Weird" small alphas

CS: Papertrey Ink Royal Velvet, Papertrey Ink Stamper's Select White, DCWV The Citrus Matstack designer papers, Basic Grey Wisteria

Inks: Mementos Tuxedo Black

Copics: V06, B24, E11, E13, E15, R02, W3, W5, E31, E33

Other: Nestabilities Stars Five, Long Classic Rectangles Large, Paper piercer, piercing mat, Foam tape, Scor-Pal, Bone folder

Friday, May 18, 2018

You Are a Rock Star

I made this card for one of my daughters who just turned 22. She gave me the Tim Holtz stamp set Mini Bird Crazy and Other Things for my birthday and I wanted to use it for her card. I bought the matching dies and used them to create the hat and balloon accents. I love this set! It's quirky and fun, just like her. 

I went very old school with this one. Lots of stamping, and no dry embossing. It was fun to stamp so much again. A truly "stamped" card.


Stamps: Purple Onion Designs "Girls Are Weird" large alphas, "Girls Are Weird" small alphas, Tim Holtz Mini Bird Crazy and Other Things, SU Leafy Glade, SU Canvas, SU Filigree

CS: Black, Olive Green, Yellow, White

Inks: Copics, Mementos Tuxedo Black, VersaMark

Other: Star Nestabilities, Standard Circle Large Nestabilities, Tim Holtz Mini Bird Crazy and Other Things dies, circle punch, paper piercer, clear gems, googly eyes, Inkssentials Glossy Accents (for balloon and hat shine, foam tape

Sunday, March 08, 2015

I actually have stamped in the last year!

I'm sorry I've not posted on here in awhile. I've had a very busy year with a lot of changes and upheaval. Right now my stamping stuff is in boxes because our son and his new wife are living in my stamping room while they save up for a house. We offered to give them a good start on their new life together, and I'm happy to put my crafting aside for their happiness.

For now that means no stamping for me. Too much to haul out. That's okay. I'm keeping busy.

But back in September, before all of my stuff went into storage, I was able to make a card for my hubby's birthday. I took pics, but that was about it. So I am finally getting around to posting it. You'll have to forgive me, but I've forgotten a lot of the things I used to make this. I'll list what I can.


The stamps are from Penny Black Critter Party and Stampin' Up! All Year Cheer I. The trees and fence are dies from Taylored Expressions. I popped them out with mounting foam.


I also popped the butterflies out with tiny pieces of mounting foam. Very tricky! I colored with Copics. And I am not the best at making perfect round circles of punched holes, as you can see.


The inside has another die cut from another Taylored Expressions die. My husband gifted me a bunch of them 2 Christmases ago, and I'm ashamed to say that I only just started using them before making this card. They're lovely!

I believe the designer papers are all Basic Grey.

Thanks for looking! I hope to be stamping again by the end of this year. Take care and see you then!

Tuesday, October 22, 2013

Best Wishes, Eagle Scout!

Not my Eagle Scout, but another boy in my son's troop who helped him on his Eagle Project 2&1/2 years ago, and has now become an Eagle himself. I wanted to create a card that said "Boy Scouts" with what I already had. Thankfully, I had a nice eagle image from my Our Daily Bread Designs' set, In God We Trust.


I did a decent amount of heat embossing on the card. The sentiment is HE'd on a thick piece of vellum (close-up below), the eagle is HE'd (including the marks on his brown body - seen below - which I added by hand using a stick and dipping it in Brilliance Graphite Black ink and then covering it in clear EP).

I did some paper piercing around the star.


And I folded the sentiment to where it's arched on the front and flat on the back. Then I trimmed the edge with scissors and held it together with a brad.


I used Forest Branches to emboss the side panels. I stamped the background scene from SU Yukon on the top of one panel.

Scouts are always doing things involving ropes and such, so I thought I'd carry that theme with the leather strips and the jumbo eyelets. Made me think of tents for some reason. The old kind, I guess. All the cardstock was done with direct to paper with its coordinating ink to give the feel of leather or khaki canvas.

I hope you like my scouting card! I enjoyed doing a masculine card for a change!

Stamps: Our Daily Bread Designs In God We Trust, SU Sincere Salutations, SU Yukon

CS: SU True Thyme, SU Chocolate Chip, White, Black, vellum

Inks: SU True Thyme, SU Chocolate Chip, Brilliance Graphite Black, Vintage Photo and Antique Linen Distress Inks, various Copic markers

Other: Cuttlebug Forest Branches embossing folder, Nestabilities Large Pinking Circle and Star dies, jumbo eyelets, khaki brad, leather strips, red grosgrain ribbon, paper piercing tool, sponge dauber, ticket corner punch, clear EP

Friday, October 18, 2013

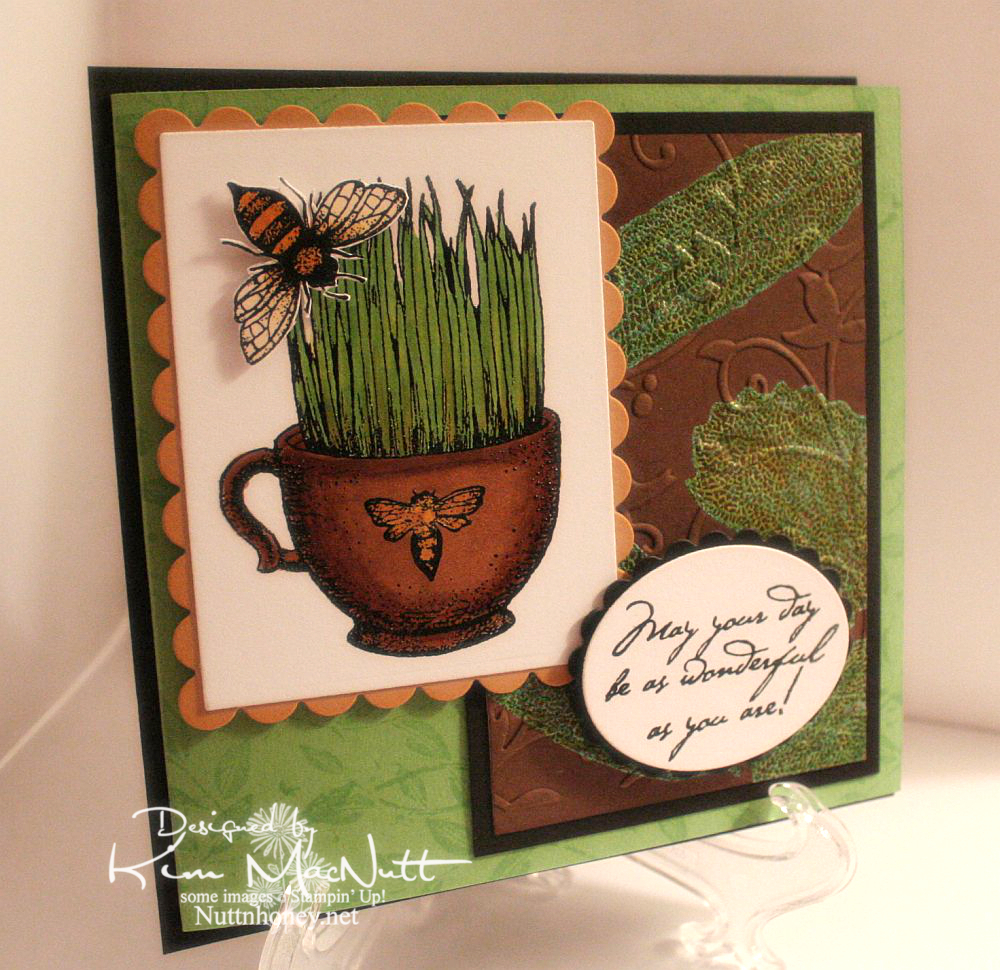
May Your Day Be As Wonderful As You Are!

This is the most stamping and playing with ink I've done in a long time! I heat-embossed so much on this card, y'all! I am loving all this playtime! This card is for my mother's birthday.

For the brown background piece I first did direct to paper with the Antique Linen Distress Ink pad. Then I stamped the leaves from SU Autumn in VersaMark ink and heat embossed with SU Vintage Verdigris EP. Then I went over it with DI Vintage Photo and lastly with SU Basic Brown. So now it just looks brown. But that's how I got there! lol Then I rubbed a light green Copic marker over the leaves and wiped them off. I'm not sure, but I think embossing powder might react with Copics and soften. Just be careful if you try this.


I hope you can see that I heat-embossed the grass image and the bee. It made for some enjoyable coloring with Copics afterwards. The bee is popped up with foam tape.


On the inside I wanted to create a sort of dancing bee scenario. I stamped them all in Brilliance Graphite Black and heat-embossed them with clear EP. Then, once cooled, I ran the edges through the Cuttlebug using the D'Vine Swirls embossing folder. To hide the folder edge and keep with the black lines image, I used some grosgrain ribbon. I rolled both inside and outside edges of the Green Galore CS with the Leaf Prints wheel and VersaMark ink. Busy, busy, buzzy!


The white paper collapsed a bit from the Cuttlebug embossing. A thin extra layer in the sandwich probably would've fixed that. Ah, well.


I hope you liked my imperfect, but happily-created card, and thanks for looking!

Stamps: The Angel Company (TAC) - not sure of stamp set names, but the image is from one and the saying is from another; SU Autumn, SU Leaf Prints wheel, SU Birthday Greetings

CS: Black, SU Green Galore, SU More Mustard, White

Inks: VersaMark, Copic Markers, Brilliance Graphite Black (for heat embossing), Tim Holtz Distress Ink Vintage Photo and Antique Linen, SU Basic Brown

Other: Cuttlebug Birds and Swirls and D'Vine Swirls embossing folders, Nestabilities oval, rectangle, and scalloped dies; Clear heat embossing powder, SU Vintage Verdigris embossing powder, foam tape