Showing posts with label great finds. Show all posts

Tuesday, January 23, 2018

I Made a Stamp Positioner for Less Than $12

When I got back into stamping, I saw that several stamp positioners had come out on the market while I was away, and that the most popular one was $60! I'm sorry, but that product is way over-priced! So I looked around on YouTube to see if anyone had found a way to make one and found numerous videos with lots of ideas. Ha! Apparently, others also thought it was too expensive!

The one I liked the most because of its simplicity was this one:


I set out to buy the parts she mentioned as inexpensively as possible.


I found a clear jewel dvd case on eBay for $1.75 plus $3.49 shipping. He charges a little more now, but still pretty cheap for a single case.

I took out the middle section (the part that the dvd sits on) very carefully. I also trimmed the latch so it wouldn't catch. It was easy to do.

I bought a large single sheet of fun foam (probably about 12" x 18") at Michael's for $.99 (lots of colors to choose from - I went with lime green) and cut two pieces to sandwich together. I glued them together and placed them in the case.

I also bought a Little B Perfect Positioner and cut it to fit the inside of the box. I did not put it on the paper the way the YouTuber did. I just stuck it right onto the fun foam. For added strength I coated the back of the Little B with Tack It Over & Over which is a repositionable glue. I don't know if that's necessary. That was just my choice. The top surface is just sticky enough to hold paper in place, so you don't need to get a magnetic sheet and magnets like some positioners have.

I've used it tons of times already and it works great!


Not bad for $12. My thanks to the person who created this. You saved me nearly $50!

Tuesday, November 20, 2012

Magnetic wall of dies!

Oh, my goodness! I ran across an amazing display of dies on Pinterest and had to share. A WALL of dies! Isn't this a great idea? I'm assuming she used magnetic paint which, from what I've read, has to be stirred vigorously from the bottom before you paint so the metal bits get distributed evenly, since they naturally sink.

What a collection!


Friday, June 01, 2012

Dry Embossing with Die Cuts

Well now, isn't this an ingenious idea? Watch the video to see what I mean. I can see doing this with any image that can be cut out easily enough. Thanks to Hero Arts for this great idea!

Wednesday, March 09, 2011

How I spent some of my birthday money

I love organizational tools. Enough, in fact, to spend precious birthday money on them.

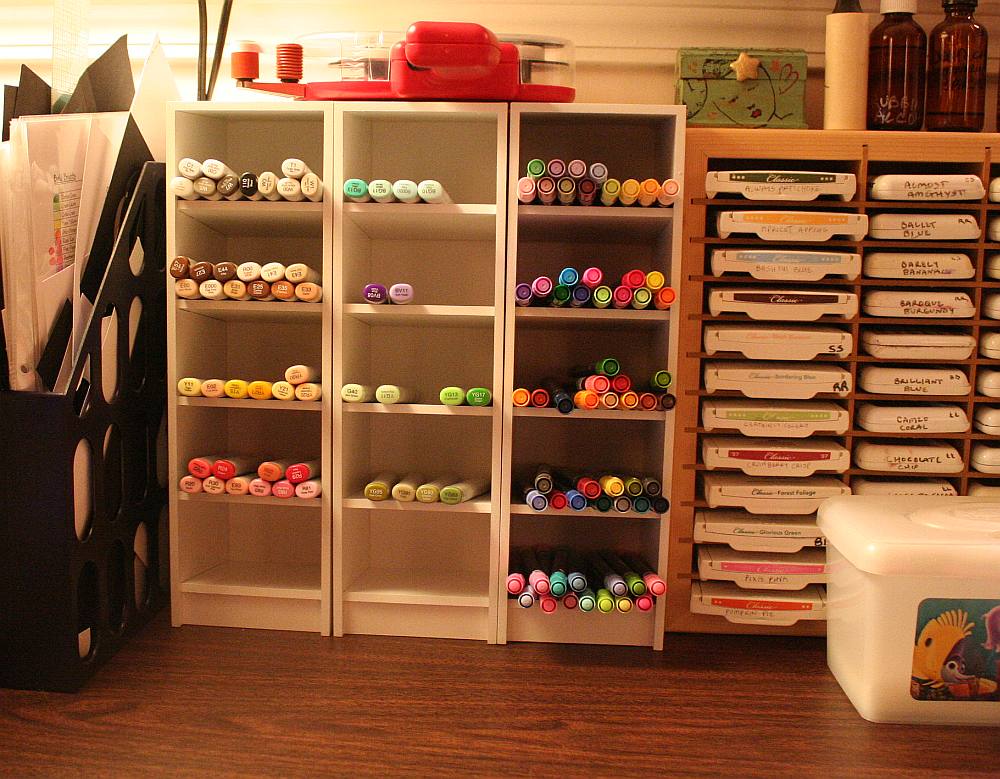
I had been drooling over the Color Cubbies that I've seen around the stamping blogosphere and knew that someday I would have some of my own.

At first I was only going to buy 2 as I don't have a very big Copic collection yet and I thought I could use them for my SU and CTMH markers, as well. But the shipping was pretty high on 2. So I put one more in the cart just to see if it would change by much. Well, 3 was barely more in shipping than 2! So I figured I'd just bite the bullet and get 3 now even though it meant I'd have less to spend on other things.

I LOVE them!


They're really well made and packaged. Good and sturdy. And I don't think they're too expensive. It is so easy to see all of my markers at a glance now, and it's so easy to remove and replace them.

Now I just need to decide which Copics to buy so I can start filling 'em up!

Saturday, February 26, 2011

Inexpensive way to make alcohol ink applicator pads

If you use alcohol inks and an applicator with removable felt pads, here's a tip I ran across that keeps the cost down on those pads.

Sunday, December 05, 2010

Free Christmas printables

Hello, my stamping friends! Hope all is well with you! I ran across something I thought you'd like. How about some free Christmas printables??

Go get 'em!

Sunday, October 24, 2010

Free digiscrapping kit from Shabby Princess

Forgive me for being neglectful of this blog, but life is too full right now for me to even be thinking about stamping. It's way down on my list of things to do. But I was cleaning out my inbox and discovered this little tidbit that I thought was worth sharing.

Check out The PLENTIFUL Collection over at Shabby Princess. It's FREE! How nice of them!

Thursday, July 22, 2010

Color inspiration

If you want some help finding yummy color combos, look at this blog. I could just EAT it, yum!

Daisy Pink Cupcake

Friday, July 16, 2010

Got shiny hair?

Donna made this fabulous card using this excellent video created by Lysa as a tutorial for making shiny black hair. Thanks for sharing this video with us, Donna! I'm definitely going to give it a try!

Monday, March 29, 2010

Embossing a digital image

I tell ya, the skilz out there in the stamping world amaze me. Someone on Paper Craft Planet pointed us to a tutorial on how to emboss a digital image. Holy cow! What will they think of next?

Tuesday, March 16, 2010

Oh my ears and whiskers!

Maybe I should change the name of this blog to Printing and Coloring Between the Dishes and the Laundry, because I'm not doing much stamping lately!


Oh, this card gave me fits! I had to redo the rabbit scene because I overdid the color layering on the first one and also made the mistake of correcting an area with a black Micron pen after it was colored. It pretty much ruined the scene because the correction stood out like a sore thumb.

The second time I colored it I used only a minimum of colors. I'm getting better at choosing colors beforehand rather than just grabbing what catches my eye and ending up using 30 Copics for one little scene! I don't want to discourage anyone from trying to repeat what I did, if they want to try.

Everyone is having fun with the Alice in Wonderland theme lately since the new Tim Burton movie came out (anyone see it? I want to, but haven't yet). Thanks to the heads up from LeAnne at Wee Inklings, I have been enjoying The Graphics Fairy blog and all the free clip art she's been sharing. Some of it is in black and white and can be colored.

She posted this rabbit image which is a book illustration created by Sir John Tenniel for Lewis Carroll's book Alice's Adventures in Wonderland. After a little googling I found an even better, cleaner copy plus a whole bunch more here.

I did what Donna does to make her die cut cards stand up. I cut 2 pieces of black card stock and scored the second one around 1/2" from the top, folded it and glued it to the first one so it would hinge. That way I can use the whole die cut image rather than chopping a bit of it off (and wasting card stock trying to get it just right).

The designer paper is from the Basic Grey Archaic collection, one of my favorites. I used the Argyle embossing folder on it.

For the white piece I printed the (first?) line the rabbit said in the book and trimmed the bottom using the Fiskars Diamond border punch. Then I bowed the piece out a bit and sewed it to the card, sort of like a faux pocket.

When coloring the rabbit scene I went simple on the background and went more dimensional on the rabbit. I wanted him to be white, but he needed to stand out a bit. So I used the warm grays for his fur. I also used the warm grays to add shadows.


The bow was done with my homemade Bow Easy. I did a double bow and spread the loops out. They don't like staying that way, though.

So, this is a totally unstamped card. Thanks for looking! Have a lovely evening!

Image and saying printed from computer. Image found here. Inspiration from The Graphics Fairy.

Copics: W00, W1, W3, W5, BG11, YG93, E35, R29, YR23

CS: Black, Basic Grey Archaic, SU More Mustard, PTI Stamper's Select White

Other: Cuttlebug Argyle embossing folder, Nestabilities Curved Rectangles, Classic Ovals Large, Classic Oval Scallops Large, Fiskars Diamond border punch, sewing machine, black organdy ribbon, red gems, 3D Dots, SU Summer Sun marker, Micron black pen for adding grass


Tuesday, March 09, 2010

Nestie Storage

I recently saw someone using a cd case for her Nesties storage and I thought, "Wow! what a great idea!" So I looked around the house for a case we weren't really using much and found a nice one that can hold all of my Nesties, and then some! This one has 94 pockets! If I filled it up (highly unlikely) it would be too bulky. It's a bit bulky as it is now that I've put all my dies in it, but not too bulky to zip up.


Here's what it looks like inside. I made labels for each set so I could easily name them in my card recipes.


For longer dies I used the lower pockets. I can still keep things in the upper pockets. They'll just be slightly obscured.


Eventually, I might get some sheets of magnetic paper for them to cling to inside the pockets, because there is a lot of sliding around going on and I don't want to lose any dies. Not a perfect solution, but a convenient and compact way to store them.

I save all the packaging the dies came in for future resale. It's always nicer if you can buy something in its original packaging, don't you agree?

Have a lovely day!

Thursday, February 18, 2010

Sketch books from Taylored Expressions and Mojo Monday

I found out the other day that you can get all of the 2009 sketches for Mojo Monday right here (pdf). Just print out and put in clear page protectors. You can save room by putting them back to back. Or if you're really savvy, print them on both sides of the paper. I ain't there yet.

And today I discovered that you can get all the Taylored Expressions sketches all in one place right here (pdf).

Does it get any better? Thanks to Taylor and Julee for making this so easy for us!

Sunday, January 17, 2010

ATG Adhesive allergies

Anyone have any allergy issues with the Scotch ATG Gold adhesive? It's bothering me a bit. And the smell is annoying. Very strong. My lips feel a little tingly like when I blow up too many balloons. My head feels a tad fuzzy, as well. I've never had an adhesive do this to me.

I made a card with it today and had to move it away from me because the smell of the adhesive was so strong on the card (will post the card soon). Dern! I hope I can resolve this issue.

Any feedback would be appreciated.

Thursday, January 14, 2010

On the ATG 714, its refills and the place I bought it from


I can highly recommend framingsupplies.com to anyone who wants to buy the ATG 714! They got my order to me super fast and it was very well packaged. In fact, it was thoroughly encased in a pillow of bubble wrap! It was a sight to behold! Nothing could harm my stuff! Ha!

As you can see from the pic it will be much more economical to refill the ATG 714 than it was to fill the Mono Adhesive applicator. Mono usually goes for between $2 and $4, usually closer to $4, for 13 yds.. The ATG Gold adhesive I bought is around $3.50 per roll for nearly 3 times the amount of adhesive (36 yds.).

Yes, I think my ATG will pay for itself in no time!

I have played with it a bit on scraps and am, so far, impressed with the adhesive. I will try to get in some creative time soon and will let you know what I think of it. Only time will tell on how strong the adhesive proves to be, but it seems to be accepted in the stamping community that the adhesive is very good. So I'm hopeful.

Tuesday, January 12, 2010

Removing hindrances to happy stamping

Three things have hindered me lately from wanting to stamp: my messy stamping room, my frustration over the adhesives issue, and not being happy with the white card stock I've been using. The second and third things are basic stamping issues that all stampers face at one point or another.

White card stock is probably the most used of all card stocks. And if it won't stay glued down then how can we enjoy creating paper art? I don't want my hard work to fall apart after a month. And, as we all know, quality is vital to the card stock we use. We all probably have some old, cheap cs we bought as new stampers, thinking it didn't really matter at the time. But once we saw how much better the nicer cs performed we put the cheap stuff aside (or gave it to our kids to play with!).

So solving these 2 issues makes the paper art experience far more enjoyable.

As to adhesives, I am hoping I have now solved this problem. I have heard nothing but praise for the 3M ATG 714 adhesive gun (used originally by custom framers), but the price! Yikes! But I've been schlepping along for so long with my not-so-great glues and adhesives and just had had enough.

Despite the initial big investment, I think the ATG 714 will pay for itself in cost savings on refills and much less frustration during the creative process. So soon I will be joining the ranks of ATG 714 users! I ordered it and some refills here. It seems to be the best deal, so far. And I've read that their customer service is very good. So, that's done!

And I used to buy large quantities of white card stock from Marco Paper (Beckett Expression Radiance) because it was as nice as SU's Whisper White and was cheaper; and I could avoid shipping charges by picking up my order at the local stamping convention they participate in once a year in our area. But I had heard so many rave reviews about Papertrey Inks' Stamper's Select White card stock; and it's half the price of the Beckett! (My apologies. It's actually the same price - $0.15 per sheet, not counting shipping costs - as the Beckett, but only if you buy the 250 sheet ream, and shipping is likely going to be high. It's $0.215 per sheet for the Beckett if you buy the 50 pack.) Plus, PTI has free shipping on orders $55 or more. So I took the plunge and ordered some. I also ordered some of their 5.5"x5.5" envies and some of their Perfect Match card stock collection. I am very hopeful about these products.

I think the solving of both the adhesive and white card stock issues will make me want to stamp more. I realize now that these two issues were greatly hindering me from enjoying the card making process. Now, to clean up my stamping room!

I'm not into feng shui, but I do think that if there's something in the way that I keep tripping over rather than dealing with, it will have its effect. I just moved two of them out of my way!

Let's hope for good!

Friday, July 03, 2009

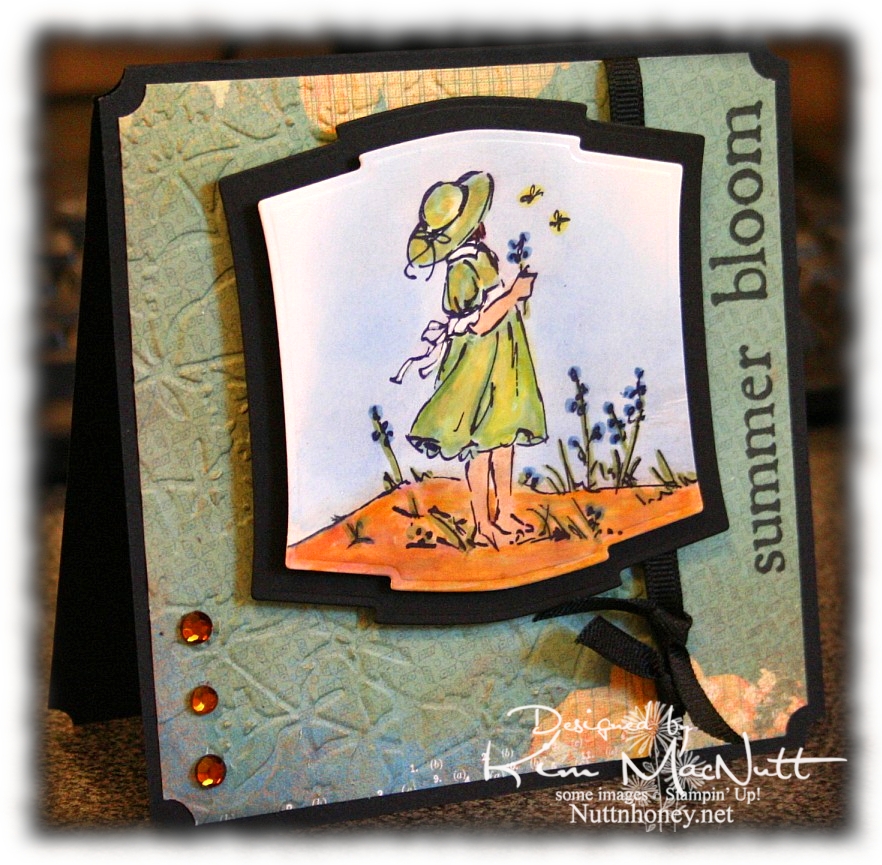
Summer Bloom


Happy Friday! I'm in the middle of painting a bathroom closet, but wanted to post a card while I'm resting. My sweet hubby is off work today and he's building some new shelves for me. When we had this house built over 14 years ago, we chose the ventilated shelving. You know, the wire kind? Well, it's good for some storage situations, but it's the pits for things like bottles and such. The shampoos and conditioners I have stored in there never want to stay totally upright, and if one falls over, the whole bunch fall over like Dominos. And things fall through the grates. I've lived with this annoyance long enough and it's time for real wood shelves! I can't wait! Next will be my pantry. Same issues! I want good old-fashioned wood shelving like my grandmothers had!

So in between applying coats of paint, I've been sneaking in some creative time. There hasn't been a lot of that this week, but I did manage to make one other card I will set up to post soon. (Yes, Doris, I knew about the pre-posting option on Blogger and have been taking full advantage of it! Praise God for such blessings, yes?) I still have lots of chores to do today, unfortunately. But tomorrow looks pretty free (for now). We'll be having company over.

Anywho, when I want to relax in a creative way, I watercolor. So this card and the next one are the results of that.

I used one of the papers from the Recess pad for this card, in fact. I also found out that Archiver's carries THE best black ink removing cleaner I have ever tried (and I've tried just about everything, including Simple Green):


It's the only cleaner I've tried that completely removes Stampin' Up's Basic Black ink from my stamps; it's the hardest ink I've ever tried to remove. Normally, I have to buy it online, so I was very happy to see it in the store! It's $5.99 for 2 oz., but there were no 8 oz. refills on their shelves just yet (I might just have to beg for them to carry it!).

NIFTY TIP ALERT! I found that if I spray a little quarter size amount of the Ultra Clean stamp cleaner on a rag and rub the stamp with it I use a lot less of the cleaner up. Since it's a bit pricey, I also only use it for black or very dark inks because the other cleaners all work fine with all other colors. It's just the black that is so stubborn. I've not tried it on StazOn Jet Black ink, so I can't report on that one, but I'm extremely happy with the results on every other black ink I've tried it on!

End of commercial! Now, back to the card.

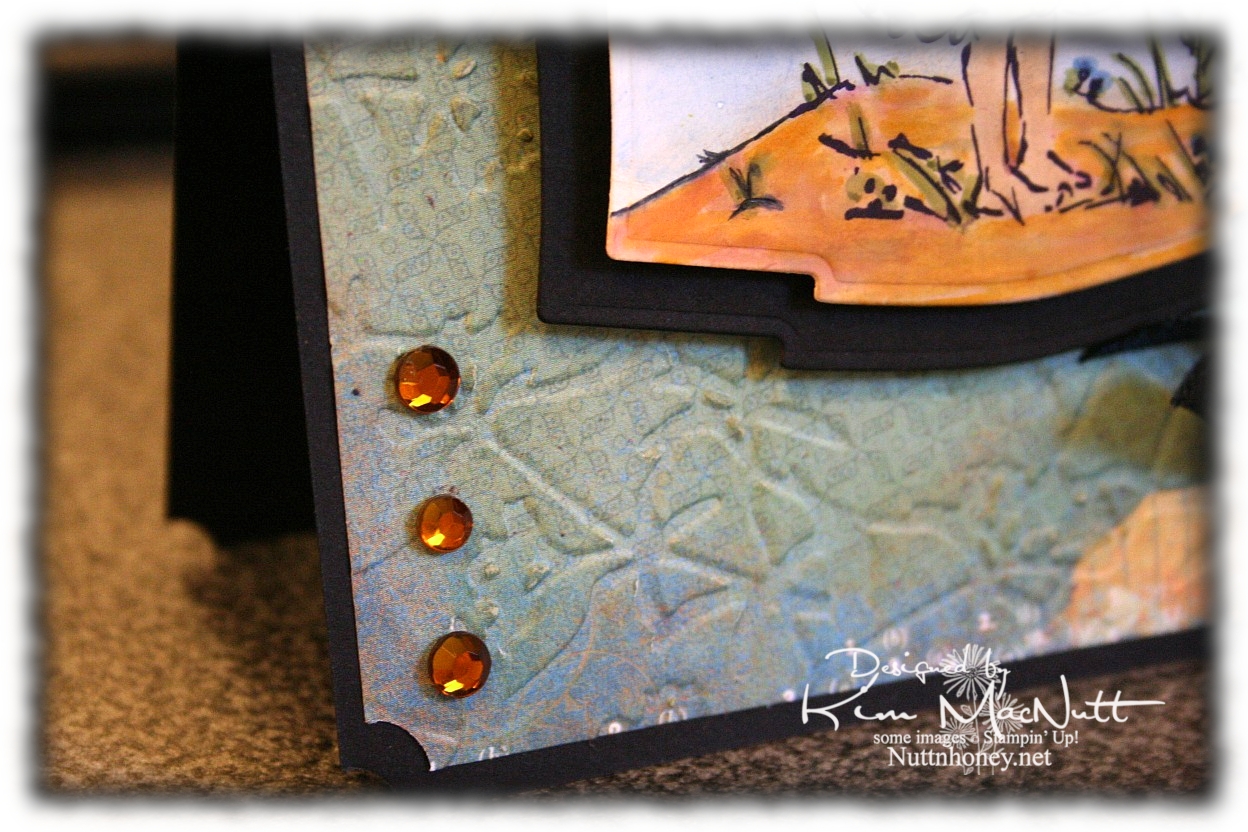
Here's a close-up of the paper. Cool patterns so small, you almost don't see them (click to enlarge).


I'm running out of free time so I had better get to the recipe! Have a lovely day and a great Independence Day, for all my American readers! We Americans need to grow in appreciation for our freedoms before they are lost! We are so blessed and we need to work hard to protect those precious freedoms we so often take for granted! We need to care about what our politicians are doing. It affects us whether we like it or not. We are endowed by our Creator with certain unalienable rights! And we must remember that our Creator is the One Who has given us these freedoms! Pray for our nation!

Blessings!

Recipe

Stamps: Stampin' Up! Summer By the Sea, Purple Onion Design "4 Seasons"

CS: Black, Basic Grey Recess "Academy", glossy white

Inks: SU Basic Black, Versafine Onyx Black, Bashful Blue, Creamy Caramel

Markers: Sage Shadow, Brocade Blue, Old Olive, More Mustard, Summer Sun, Basic Black (to extend line on the ground on the left)

Other: Cuttlebug Floral Screen embossing folder, Nestabilities Labels Two dies, ticket corner punch, amber gems, black grosgrain ribbon, Sticky Doos, 3D Dots, Inkssentials opaque white gel pen (for white dress accents), sponge daubers (used for applying ink to sky and sand)

Saturday, May 30, 2009

Clear stamp cleaner

Good afternoon!

I wanted to share with you a product I found at Archiver's the other day. I just had to try it because my regular stamp cleaners were turning my clear stamps yellow!

It's by Ranger Ink and it's called Inkssentials Clear Stamp Cleaner, made especially for clear stamps (acrylic and photopolymer). I've used it to clean off Versafine Onyx Black ink, Stampin' Up! Basic Black and Memento Tuxedo Black with great results. The hardest to remove was the Stampin' Up! black. It's always been one of the hardest to remove from any stamp, but if I clean it right after stamping, this new cleaner takes 90% or more of the ink off my clear stamps. It removes 100% of the other two inks.

The price for a 2 oz. bottle was $3.99. Not bad!

So, if you also are looking for a good clear stamp cleaner, I recommend this one. It does the job without yellowing! Yay!

End of commercial. lol

Friday, May 01, 2009

ODBD May Release Day!! Blessed is the nation...


Today is the day if you've been wanting to purchase some great patriotic stamps with a Christian bent for your 4th of July cards! Our Daily Bread Designs has some nice new sets!

Not only is ODBD releasing new stamps, but there's also a sketch challenge for May! Yes, ODBD is having a sketch challenge! If you choose to play, please watch the ODBD blog for details. The info you need will be posted on Saturday, May 2nd.

This card is my first for the sketch challenge. I'm using one of the sentiments from the In God We Trust May release.

Unlike most patriotic cards, this one has very muted reds, whites and blues. I actually did not intend that. It just happened. I actually started with very vibrant versions of those colors. And I just wasn't happy with anything I was doing. So I dug into some new designer papers Kelley is now carrying in her store. and found some great choices. Who says you must use only bright colors on a patriotic card?

The ones I used are not specifically patriotic, but still work. They're from Memory Box. The biggest and smallest pieces are from the same paper taken from the Poppyfinch collection. The bigger one was just sponged a lot with ink and looks more muted. The reddish piece is from the Rhubarb Tart collection. The oval piece is from the Basic Grey Granola collection. Kelley doesn't carry that one, but she does carry several Basic Grey papers and is expecting more in!

I used the Cuttlebug Tiny Bubbles embossing folder on the biggest piece and then sponged Tim Holtz's Vintage Photo and Black Soot Distressed Inks very lightly over the raised part. Then I sponged some SU Bashful Blue ink over that. I just recently bought some Tsukineko Sponge Daubers after avoiding them for years because of the cost. I LOVE them! They are so much nicer to use than the big pieces of cut-up sponges I've been using all these years! I should've given in sooner!

I sponged a bit of the brown and black inks around the reddish piece (although, it's not terribly visible) and then used SU's spiral punch on one side.

The smallest piece and the piece with the Scripture have paper piercing done with the Ornare Decorative Corners piercing template.

I did the scrolled corners using my Cuttlebug and a Sizzix Sizzlit die from the Architectural Accents set. Boy was it hard getting the pressure right to cut them out! Too much and it feels like you're gonna break the die. Too little and you can't punch it out completely. Oye!

The cross is a sticker from EK Success Jolee's Boutique. I found it at Target. I sponged it with the brown, black and blue inks and added 2 small pearls to the one in the center which came with the sticker. Kelley doesn't sell this particular cross, but she has some similar ones in her store.

Well, thanks for looking and I hope you play in the sketch challenge! At SCS please put in the keywords: ODBDSC03 and ODBD.

Stamp: In God We Trust by Our Daily Bread Designs

CS: Black, Memory Box Rhubarb Tart and Poppyfinch, Basic Grey Granola

Inks: Versafine Onyx Black, Tim Holtz Distressed Inks Vintage Photo and Black Soot, SU Bashful Blue

Other: Cuttlebug Tiny Bubbles embossing folder, Nestabilities Classic Oval Large and Small, Ornare Decorative Corners piercing template, Sizzix Sizzlits Architectural Accents, Pearls, EK Success Jolee's Boutique cross sticker, SU spiral punch, 3D-Dots, Tsukineko sponge daubers

Wednesday, April 01, 2009

Release Day! Our Daily Bread Designs April sets - I Corinthians Love


Today is release day for Our Daily Bread Designs' April sets!! Check out the ODBD website for details on how to order.

Here's a card using Our Daily Bread Design's I Corinthians stamp. This single stamp is compatible with the Love One Another and the Love sets. They're all so nice! So many possibilities! Then there's the Children of God set. They've got you covered from courtship to marriage to babies to anniversaries! And all using the precious Word of God!

Do you ever run out of something at the worst possible time? I think we all do. So we learn to adjust, yes? I ran out of red cardstock before making this card and I SO wanted to use red! So I started digging into my older cardstock folders where I hadn't dug in a loooong time - those ones with the odd pieces of cardstock I bought before I got into buying whole packs of each color. And I found some nice, heavy cardstock with red on one side and black on the other. See, Doris? Black is never far away from me! lol

The red wasn't as bright as I needed it to be so I did direct-to-paper with an orange ink that helped brighten it up without making it look orange, believe it or not. Worked a treat!

The designer paper I used is from the K&Company Hannah 6 x 6 pad. I sewed a black edge around it and then cuttlebugged it with the Script embossing folder which is more visible in the picture above. The flowers were punched out of Basic Grey's Blitzen collection. I don't know if they still offer that collection. It complements the Hannah paper nicely, with some blues and reds in it to add visual interest.


I did a little paper piercing around the flowers on the 3/4" black circles I punched out, which is also more visible in the top picture. I added the gems to bring out the red in the ribbon and cardstock. I used 3D-Dots under them to pop them out. I LOVE 3D-Dots, I tell ya! I think they're the nicest dots I've ever used. They come in 1/16" and 1/8". I use the 1/16" strips (more economical than dots) and it's just the perfect thickness, IMO. You can really build up a card's 3D effect using a thinner dimensional.

For the main stamp I used Brilliance Graphite Black ink. It's a much better black, IMO, than (SU) Basic Black, but it must be heat-set if you want to color an image stamped with it. SU's black has a bluer tint to it while Graphite Black has more of a brown tint; a truer black, it is. The downside is that it's messy to work with because it's a pigment ink, albeit, a quick-drying one.

I finished things off with some red polka dot ribbon. That ribbon just zings, doesn't it?

Stamp: Our Daily Bread Designs I Corinthians

CS: Black/red duo, K&Company Hannah 6 x 6 pad, Basic Grey Blitzen Collection, white

Inks: Brilliance Graphite Black, Pumpkin Pie (for direct-to-paper on black cs)

Other: Cuttlebug Script embossing folder, flower punch, 3/4" circle punch, red gems, piercing tool, sponge mat, sewing machine, 3D-Dots strips, red polka dot ribbon, corner punch