Showing posts with label SU Simply Circles. Show all posts

Tuesday, August 18, 2009

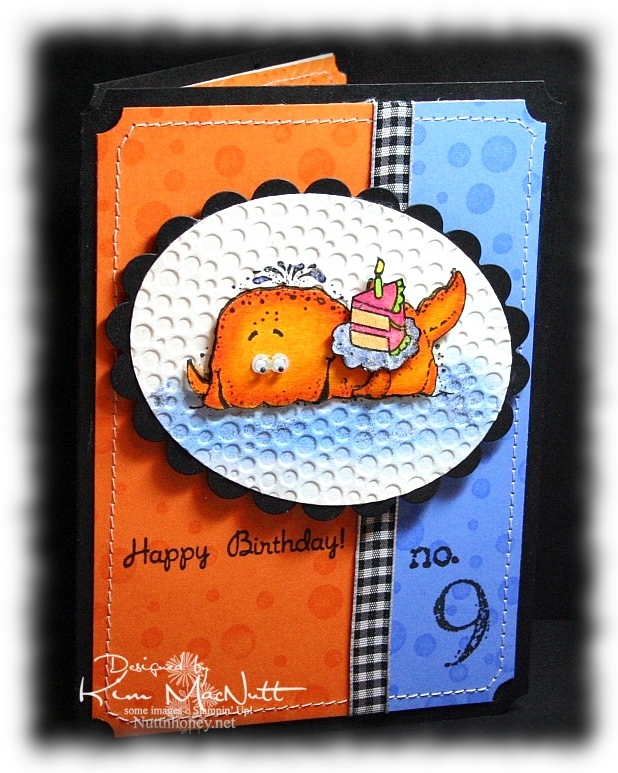
Whale Birthday


Wow, has it really been 17 days since I last posted here?? Well, my mojo just wasn't moving much in those 17 days and the only thing that got me stamping was my littlest's upcoming birthday. I just haven't been in a creative mood lately. I've not even been crocheting much which is odd for me because I love it. I think this whole national health care situation has been weighing so heavily on my mind that it's been hard to relax and do anything fun. Plus, it's so hot and huuuuumid. And the garden has been keeping me busy with the little energy I have in this heat. I canned tomatoes and homemade pizza sauce yesterday. It about did me in! I wish the garden didn't flourish in the hottest part of the year!

So anyway, I made this card for my littlest who just LOOOOOVES fish of any and every kind. When she checks out books at the library, they are almost all about fish and the sea. I knew that I would use either SU Fishy Friends or SU Silly Sealife on her card. I went with Silly Sealife's whale. He's always fun to color.

And for once, I actually stamped the background rather than use a designer paper. I used to use VersaMark ink on pretty much every card I ever made until I fell in love with designer paper.


For the whale, I used Canson watercolor paper and stamped the whale with my favorite black ink: Versafine Onyx Black. Then I colored with SU markers and a few CTMH markers. I started with a darker color (Pumpkin Pie) on the edges. Then I used Summer Sun to blend toward the center. Then I recolored the edges and the inside to strengthen the colors. No water brush. I just used the markers to blend. Works perfectly on watercolor paper!

I used a Post-It note to block the whale while I sponge-daubed Bashful Blue and Ballet Blue inks on the "sea". Then I rubbed a glue stick over parts of the sea and sprinkled blue glitter here and there. I colored the water spouting out of his head with a Bashful Blue marker and glued a bit of blue glitter there, too. "Glued a bit of blue glitter". Say that 5 times fast! lol


The cake is from the Taylored Expressions set "Sweet Celebration". I also used the cake on the inside (see above). I blocked the cupcake part of the image so I could just get the cake inside.

The dimensions of this card are approx. 4.5" x 6". It was made to fit an invitation envelope measuring 4.75" x 6.5". I bought some at WalMart just to have a different size to create with.


Can you guess where our littlest wants to go on her birthday? The Georgia Aquarium, of course! We'll probably go by The Varsity for lunch beforehand. Can't wait!

TFL and have a blessed week! I hope my mojo returns soon! This place has been too quiet!

Recipe

Stamps: Stampin' Up! Silly Sealife, SU Collage Alphabet Numbers, SU Simply Circles, Taylored Expressions Sweet Celebration

CS: Black, Pumpkin Pie, Ballet Blue, Canson watercolor paper, white (inside)

Inks: VersaMark, Versafine Onyx Black, Bashful Blue, Ballet Blue

Markers: Pumpkin Pie, Summer Sun, Bashful Blue, Apricot Appeal, Yoyo Yellow, CTMH Bubblegum, CTMH Citrus Leaf

Other: Cuttlebug Tiny Bubbles embossing folder, Nestabilities Classic Oval Scallops Large, Classic Oval Large, Stamp-a-ma-jig, googly eyes, blue glitter, Frosted Lace Stickles, sewing machine, black gingham ribbon, 3D-Dots, ticket corner punch, sponge dauber

Monday, April 02, 2007

Circle of frogs card


Recipe:

Stamps: Simply Circles, Unfrogettable, Riveting

Paper: Black, Pink Passion, White

Ink: Basic Black, VersaMark

Accessories: Prismacolor pencils, Gamsol, blending sticks, Stamp-a-ma-jig, Basic Black marker, Inkworx air art gun, Pinking scissors, Dimensionals, mini Pop Dots, black gingham ribbon, ½” circle punch, 1&1/4” circle punch, circle cutter

Techniques: Prismacolor & Gamsol

I’ve seen circular card themes and always wanted to try it myself. So I decided to use one of the Riveting circle images as my jumping off point. The sitting frog from Unforgettable seemed like a good choice for going around the circle.

(On a side note, normally, the sitting frog has a heart image hovering over its head. I divided the frog stamp up so I wouldn’t have to block the heart image. I attached the heart to the side of the stamp. It will be far more useful to me without the heart. That’s right, folks, my frog has no heart! ;D )

This card measures 5&3/4” width and height. If you want it to fit in a smaller envelope, adjust the size of the background accordingly.

If you look closely at my froggy circle, you’ll see I made some boo-boos. But as much work as it was to get the stamping and coloring done, I’ll live with a few imperfections! I’m working on not trying to be so **** about that sort of thing. ;)

I began by stamping the Riveting circle stamp in Basic Black ink on a big piece of white cardstock. Then, using the Stamp-a-ma-jig, I positioned a frog below and directly above the circle. Then amazingly, I was easily able to position 2 frogs on either side pretty much the same distance apart.

Once I got the frogs stamped I went to work picking colors. At that point I hadn’t decided anything yet, just winged it. I knew I wanted some standard colors, but I chose the more secondary versions of red, yellow, blue and green, and threw in purple and orange for good measure. I used the Prismacolor/Gamsol technique and then added dimension by shading each frog with a color not far from its color on the color wheel. In other words, I shaded the pink frog with a rosy red. I shaded the green frog with an aqua blue. I shaded the blue frog with purple and the purple frog with a dark blue. The yellow frog was shaded with orange.

The frustrating thing with Prismacolors is I can’t erase them if they go outside the lines. I’m not aware if there’s a PC eraser. Anyone know?

After coloring the frogs, I used a circle cutter and cut them out leaving a bit of white space around the edges. Then I mounted it on black and cut the circle size I wanted and then edged it with pinking scissors just for fun. I decided that the background would be pink and chose Pink Passion cs as the closest match. On the Pink Passion cs, I used a couple of the circle stamps from Simply Circles and stamped them in VersaMark ink, and used the Inkworx air art gun and the Basic Black marker for the splotches. Then I mounted the circle feature onto the Pink Passion using Dimensionals and then mounted that on the black. I added a black gingham ribbon as an accent.

To add a little more pizzazz to the overall look, I again stamped the Riveting circle on a scrap of white cardstock and punched out the center with a ½” circle punch. Then I punched the outside of the circle with a 1&1/4” circle punch. I colored in the lines with a black Prisma pencil and adhered it to the center of the circle with mini Pop Dots. Then I stamped the Riveting stamp yet again on Pink Passion cs and punched out the middle and adhered it with mono to the center of the Riveting image below the raised version. That kept the continuity of the Pink Passion background going.

Hope that made sense.

Prismacolor herbs card


Recipe:

Stamps: Sweet Herbs, Simply Circles

Paper: Black, Pumpkin Pie, White

Ink: Basic Black

Accessories: Prismacolor pencils, Gamsol, Blending sticks, Cuttlebug “Tiny Bubbles” embossing folder, orange/yellow gingham ribbon, Dimensionals, Diamond Glaze, Basic Black marker, ruler

Techniques: Prismacolor & Gamsol, Cuttlebug

I made this card while watching My Fair Lady, so I’ll probably always associate the two. :) I keep thinking of the part where Eliza Doolittle is at the horse races and is “how do you do”ing everyone and is speaking cockney with perfect poise. lol What an actress!

I’ve had the retired Sweet Herbs set for many years and had never made a serious attempt to use the set until I got in this Prismacolor/Gamsol groove I’ve been in lately.The main stamp of potted herbs seems perfect for coloring. I can still hear Rex Harrison singing even as I type. Is he a hoot or what!

Okay, on to the card. I stamped the image with Basic Black ink on white cardstock. Then I colored the image with Prismacolor pencils and Gamsol. The pots and the plants were pretty straightforward to color. No pink pots for me, just yet. ;) The little plant stakes were my choice, and I chose a sunny yellow to offset the reds and greens. I really ought to do my kitchen in these colors. I go to them so often in so much of what I do. They’re just so relaxing.

Close-up:


I used a ruler to mark a horizon and drew the thin black line with the Basic Black marker to ground the image. Then I colored the “table/counter” with Prismacolors in the yellow range to mirror the plant stakes color.

I stamped the “Hello” stamp from Simply Circles onto Pumpkin Pie cs. As I’ve usually been doing ever since I got my Cuttlebug, *grin* I cuttlebugged the Pumpkin Pie cs using the Tiny Bubbles embossing folder. I mounted that to black cs and added some orange/yellow gingham ribbon. Then I mounted the herb image on black and adhered it to the Pumpkin Pie cs with Dimensionals dabbed with a bit of Diamond Glaze (Crystal Effects) to make a firm bond.

Tuesday, March 13, 2007

Turtle watercolored card


Recipe:

Stamps: Simply Circles, Silly Sealife, Paint Prints, For the Love of Chocolate, Magenta mesh stamp

Paper: Always Artichoke, Black, Basic Grey "Blitzen Collection" designer papers, Glossy white

Ink: VersaMark, Basic Black, Baroque Burgundy, More Mustard; Markers: Always Artichoke, Baroque Burgundy, Old Olive, Apricot Appeal

Accessories: Cuttlebug Tiny Bubbles embossing folder, large circle punch, small (1&1/4") circle punch, small oval punch, 1/16" hole punch, Dimensionals, sponges, antique copper mini-brads

Techniques: watercoloring, sponging

Well, I'm a bit "early" this time! lol It's ONLY Tuesday. I am really happy with this card. Don't you just love it when your work gives you such pleasure?

Here is this week's Sunday challenge.

I did a little thinking outside the box on this one. Amy had the image feature as a square-ish rectangle and I decided to do a circle. I had been wanting to play with that Silly Sealife turtle for quite some time, so this was my chance to make him shine. Of course, I watercolored him! ;) I'm going crazy for watercoloring! Just love it!

My bigger sentiment didn't quite reach the vertical element to the left as Amy's does, but otherwise, it stuck pretty close to the plan.

To create this card I cut Always Artichoke cs so that it opened from the bottom. I stamped the big and small circles from the Simply Circles set around the edges in VersaMark ink. Then I sponged Basic Black over that to give it a softer look.

I then cut a piece of Basic Grey designer paper from the Blitzen collection and ran it through the Cuttlebug using the Tiny Bubbles embossing folder. I made sure the printed side of the paper would receive the concaved (inward) imprint rather than convex (outward). Then I mounted it on black cs.

I cut the other elements going across and down and matted them with black cs. The one to the left I stamped in Basic Black using a Magenta mesh stamp. Then I sponged it in Basic Black ink. I then used a 1/16" hole punch and made holes for the brads. I then affixed the brads to the piece and mounted it using Dimensionals.

For the turtle element, I stamped on glossy white cs twice. I punched out one of the turtles with a 1&1/4" circle punch. Then I watercolored the other one using Baroque Burgundy, Always Artichoke, Old Olive, and Apricot Appeal markers, cut him out carefully, and mounted him directly over the other turtle with Dimensionals and trimmed off the part outside the circle. I had to cut a tiny piece of a Dimensional to hold up his widdle head. :)

Next, I mounted the turtle(s) on the black circle and cut a 1&1/4" circle out of another piece of black cs. Then I positioned the bigger circle punch over the smaller punched hole right where I wanted it (hold the punch upside down so you can see where you're cutting) and punched that out. Then I mounted it to match with the bottom black circle and made sure the smaller hole was lined up with the white circle/turtle image (hope that wasn't too confusing).

I stamped the "delight" image from the Paint Prints set in Basic Black on glossy white and sponged it with Baroque Burgundy, More Mustard, and Basic Black. I masked a stamp from the For the Love of Chocolate set for the words "in life" and stamped it on Always Artichoke. I punched it out using the smaller oval punch and sponged it with Basic Black. Adhered all that on and was finished!

Lots of work, but worth the effort, I think.

Wednesday, February 21, 2007

Whale sketch challenge card


Recipe:

Stamps: Silly Sealife, Simply Circles, Riveting, Curvy Verses

Paper: Black, More Mustard, Tag from Basic Grey Blitzen Collection, white glossy

Ink: Basic Black dye ink, Versamark, More Mustard, Really Rust, Bordering Blue

Accessories: Black gingham ribbon, Dimensionals, 1/8" hole punch, Waterbrush, Stamp-a-ma-jig, post-it notes for blocking on word stamp, Inkworx art gun, black marker, 1&1/4" circle punch

Techniques: watercoloring

Here's my contribution to the SC112 challenge. I can't tell you how many times I goofed up that whale and word phrase part. Ugh! I spent waaaay too long on this card, but I'm happy with it, finally.

Tuesday, February 20, 2007

Froggy fun thank you card


Recipe:

Stamps: Unfrogettable, Print Pattern, Simply Circles, Riveting

Paper: Black, Bashful Blue, Apricot Appeal, white glossy, white

Ink: Basic Black dye, Bliss Blue, Summer Sun, Only Orange, Versamark

Accessories: Sponges, crayon, 1&1/4" circle punch, Dimensionals, Black grosgrain ribbon

Techniques: crayon resist

I did the crayon resist technique on the frogs. It's one of my favorite techniques. I used Bliss Blue because I don't have Bashful Blue ink yet. I mixed Summer Sun and Only Orange to get the Apricot Appeal-ish look because, well, I don't have it either. Worked okay, though.