Showing posts with label Non-SU. Show all posts

Sunday, March 08, 2015

I actually have stamped in the last year!

I'm sorry I've not posted on here in awhile. I've had a very busy year with a lot of changes and upheaval. Right now my stamping stuff is in boxes because our son and his new wife are living in my stamping room while they save up for a house. We offered to give them a good start on their new life together, and I'm happy to put my crafting aside for their happiness.

For now that means no stamping for me. Too much to haul out. That's okay. I'm keeping busy.

But back in September, before all of my stuff went into storage, I was able to make a card for my hubby's birthday. I took pics, but that was about it. So I am finally getting around to posting it. You'll have to forgive me, but I've forgotten a lot of the things I used to make this. I'll list what I can.


The stamps are from Penny Black Critter Party and Stampin' Up! All Year Cheer I. The trees and fence are dies from Taylored Expressions. I popped them out with mounting foam.


I also popped the butterflies out with tiny pieces of mounting foam. Very tricky! I colored with Copics. And I am not the best at making perfect round circles of punched holes, as you can see.


The inside has another die cut from another Taylored Expressions die. My husband gifted me a bunch of them 2 Christmases ago, and I'm ashamed to say that I only just started using them before making this card. They're lovely!

I believe the designer papers are all Basic Grey.

Thanks for looking! I hope to be stamping again by the end of this year. Take care and see you then!

Friday, December 31, 2010

Coffee lady


Oh joy! I stamped! The desire to stamp has been coming back to me and I put together a card the other day in honor of me being sick and reading Julia Child's My Life in France book. Ha! A good book to read while sick, IMHO.

This card is nothing special, but I think it's okay for someone who hasn't stamped in a ridiculously long time and is also under the weather. The coffee lady looks how I feel these days. I've had a lingering cold for weeks now and I have near me my trusty cup of PG Tips tea to console me.

I hope you enjoy my coffee (or tea) lady, and have a Happy New Year!

Tuesday, July 13, 2010

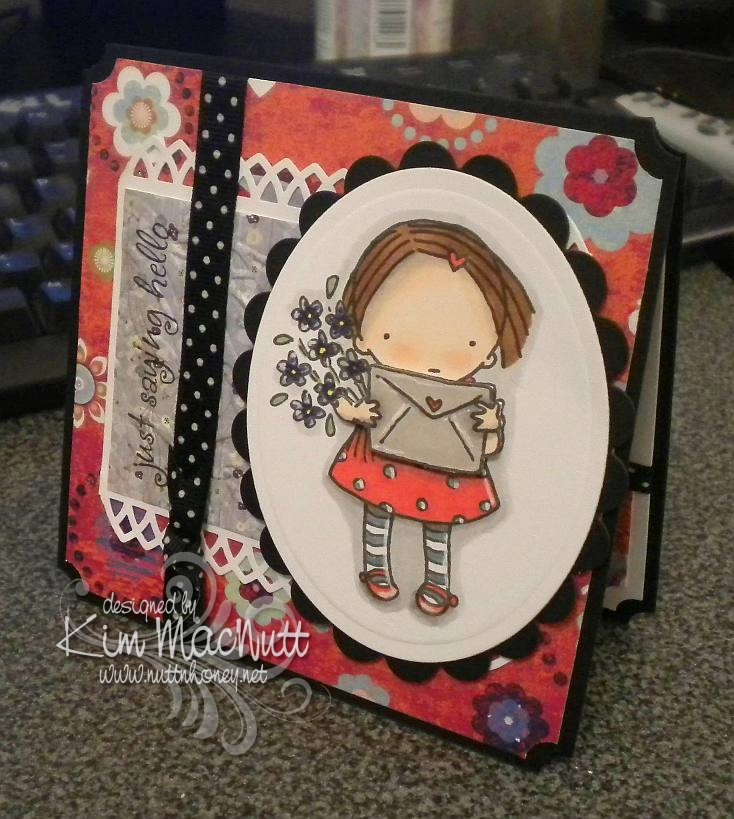
Just saying hello


Yay! I actually created a card! I've put my stamping on the sidelines for awhile now. Real life has pushed it way down the list, but I just had to do some creating or I'd burst!

I actually made this card on Sunday, but my camera has a problem and needs fixing, so I had to borrow my daughter's camera. Unfortunately, it's not as crisp and clear as mine is in low light, which is all I had to work with. So forgive the not-so-great photo.

Nothing much new here. I picked the same old standbys: ticket corner punch, cuttlebugging some of the designer paper, favorite polka dot ribbon (which, of course, comes in tiny, expensive little spools!), digital image as center point.

As always, I had fun coloring the sweet little girl from the Pure Innocence collection. And she was what prompted me to choose the papers I did.

I used my new Martha Stewart Arch Lattice border punch and trimmed the ends to create a pointed edge.

The envelope and arms are popped out with foam tape. I wanted to show that better, but the camera wouldn't cooperate with me.

I highlighted here and there with an opaque white gel pen. I love how much that trick adds to the look.

I hope you enjoy this meager offering of mine. Have a lovely week!

Recipe

Stamps: Digital stamp Pure Innocence 004, saying from Hero Arts CL305 set Sending Happy Thoughts

CS: Black, Pocket Full of Posies by DCWV designer paper, Basic Grey Wisteria designer paper, white

Ink: Versafine Onyx Black, computer ink

Copics: Y15, R24, YG63, E25, E35, E00, E93, BV08, BV11, T1, E41, W1, W3, W5

SU Markers: Bordering Blue, Brocade Blue

Other: Cuttlebug Floral Screen embossing folder, Spellbinders Nestabilities Classic Oval Large, Classic Oval Scallop Large, ticket corner punch, Martha Stewart Arch Lattice border punch, Inkssentials opaque white gel pen, black polka dot ribbon, foam tape

Wednesday, April 28, 2010

Dream


Hello! We are getting such beautiful weather lately! Sunny and cool and windy! Doesn't feel like NE Georgia in April a-tall! Is it unusually cool where you are?

This card was inspired by the artwork of Alina at simcards. She does these adorable circle flower thingies which inspired my distressed circle "flower" and she does an awesome job coloring her images and adding touches of white here and there. She also recently used the spiral punch, so that inspired me to pull mine out and use it.

The placement of the clear gems was inspired by sweet Donna at 3 Umbrellas. She does such whimsical things with gems and pearls!

I used the Forest Branches embossing folder on the main image. I'm iffy about that one, but I think it kinda works. Think "wind".

I used Stampin' Pastels (chalks) to color the sky and around the girl. So much softer and easier to apply than markers.

Well, I just realized that I can't give you my Copics color list because I put them away and didn't take note of which ones I had used! Oops! Sorry about that!

The main image was one of those I mentioned having colored a few days back. I hope to get another card made with another one I am happy with. I had a couple of duds that will likely end up in the trash, though!

Hope you have a lovely week! Thanks for coming by! Happy coloring!

Stamps: Pure Innocence 006 digi by Heather Ellis, word stamp from CTMH Geometric Thoughts

CS: PTI white, black, Basic Grey Recess (retired), Basic Grey Obscure (retired), and Basic Grey Lemonade 6X6' pads

Ink: Computer and Memento Tuxedo Black, various Copics

Other: Cuttlebug Forest Branches and Stylized Flowers embossing folders, spiral punch, Nestabilities Classic Oval Large, Classic Oval Scallops Large, paper piercing tool, circle punches, small and large oval punches, gems, Stampin' Pastels, kneaded eraser, 3D-Dots, black gingham ribbon, thin black grosgrain ribbon

Wednesday, March 31, 2010

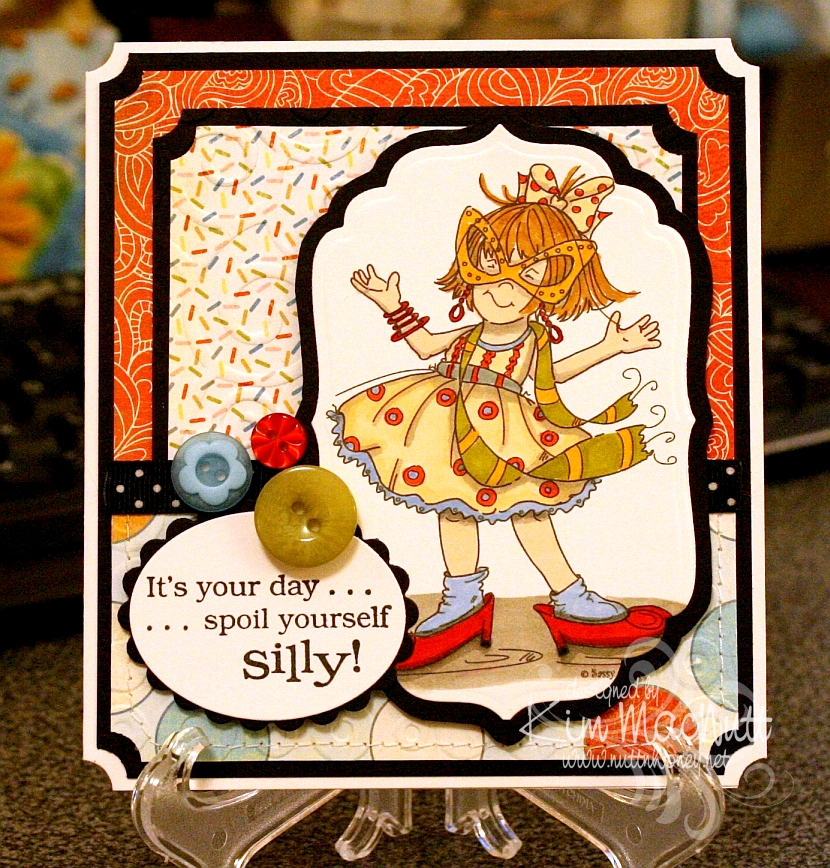
Spoil yourself silly!

I am so excited about the great illustrators I keep running across who are marketing digital stamps of their artwork to card makers. I ran across another one on Paper Craft Planet and wandered about on her site ooohing and ahhing over her wonderful images. She's Cheryl Alger of Sassy Cheryl's.


Her style reminds me of the Ramona/Henry/Ribsy books. Her drawings have such wonderful movement. I especially like her quirky/gangly children. She really captures childhood, I think.

This image was a freebie for joining her PCP group. What fun it was to color! I bought a couple more of her images and will hopefully be playing with them soon.

Goodness, I need to slow down! This is getting to be an obsession!

Stamps: All the Frills digi by Sassy Cheryl's, word saying from Penny Black Bubbly set

CS: PTI white, black, Basic Grey Cupcake collection

Inks: printer, Versafine Onyx Black

Copics: W3, W5, E000, R00, E41, YR20YR23, E35, E57, YG95, R24, R29

Other marker: SU Bashful Blue

Other: Cuttlebug D'Vine Swirls, Spots and Dots, Nestabilities Classic Oval Small, Classic Oval Scallops Small, Labels 4, ticket corner punch, black polka dot ribbon, SU Playground buttons, sewing machine, foam mounting tape, 3D-Dots

Sunday, March 28, 2010

You're so...Sweet


Isn't this a fun cupcake? It was a digi freebie from Christy Croll of Tiddly Inks if you join her Paper Craft Planet group. Tiddly Inks is another one of those stamp companies with the cutest images ever. She has many in rubber, if you prefer, over at Stamping Bella. Oh my goodness, how I wish she would put some of her rubber stamps in digi format!! IMO, her cutest ones are in rubber.

I went a bit wild with my sewing machine, lol I thought I'd just avoid every attempt to line the stitching up and watched where the needle took me. It took me all over the place.

Thanks for stopping by and have a blessed Sunday evening!

Stamps: Tiddly Inks Spring Cupcake digi, Inkadinkado Birthday Cupcake saying

CS: SU Real Red, PTI white, SU Tempting Turquoise, SU More Mustard, black

Inks: printer, Versafine Onyx Black

Copics: W3, W5, BG11, BG13, YR23

Other: Nestabilities Blossom dies, Standard Circles Small die, SU Scallop Trim Border punch, corner rounder punch, sewing machine, foam mounting tape, red polka dot ribbon, black gingham ribbon, red gems

Monday, March 22, 2010

You're on my mind


It's been hard for me to feel creative lately with the weight of this horrid health care reform bill pressing on my mind. But yesterday I got some organizing done in my stamping area and that helped. So after I organized, I colored.

I hope you're not tired of the Pure Innocence images. I just love them. They're so simple, so pleasing to the eye, so carefree, so fun to color.

I went simple on the colors and used the warm gray Copics to add shadows. Some of the coloring was done with Copics, some with SU markers. My Copic collection needs some blues and purples!

Here are the Copics I used:


I used the white gel pen to put a shine on the girl's shoes. I also added glitter to the dress, heart barrette, and the butterfly.

The red piece of card stock was cut in the center with one of the Nestabilities large pinking circle dies. Then I "stitched" around the edge with a white gel pen. I used foam mounting tape to adhere it to the black cs. It's slightly raised and the circle with the scene on it is adhered to the black below it, creating a window effect.

I decided to be a bit out of the box and set the scene catty-corner. I don't know, I just liked it!

I distressed the edges of the black and red cs with a scissors blade. On the purple cs, I drew a freeform wavy line along the edge with a light pencil and then paper pierced it. I erased the line with a kneaded eraser.

The sentiment is from the Upsy Daisy Stampin' Up! set I just got in the mail today. Will hopefully be playing with that set soon!

Thanks for looking! Making this card cheered me up a bit. I hope it cheers you up, too.

Stamps: SU Upsy Daisy, Pure Innocence 023 digital stamp by Heather Ellis

CS: Lovely Lilac, black, Real Red, PTI Stamper's Select White

Ink: Versafine Onyx Black

Copic markers: W3, W5, 110, R00, R29, R30, B0000, YG13, YG63, Y21, YR23, E35

SU markers: Lovely Lilac, Almost Amethyst

Other: Nestabilities Large Pinking Circles and Standard Circles Small dies, paper piercing tool, sponge mat, Inkssentials opaque white gel pen, black polka dot ribbon, thin black satin ribbon, white button (Basic Grey), foam mounting tape, Crystal Snow fine white glitter, glue pen


Tuesday, March 16, 2010

Oh my ears and whiskers!

Maybe I should change the name of this blog to Printing and Coloring Between the Dishes and the Laundry, because I'm not doing much stamping lately!


Oh, this card gave me fits! I had to redo the rabbit scene because I overdid the color layering on the first one and also made the mistake of correcting an area with a black Micron pen after it was colored. It pretty much ruined the scene because the correction stood out like a sore thumb.

The second time I colored it I used only a minimum of colors. I'm getting better at choosing colors beforehand rather than just grabbing what catches my eye and ending up using 30 Copics for one little scene! I don't want to discourage anyone from trying to repeat what I did, if they want to try.

Everyone is having fun with the Alice in Wonderland theme lately since the new Tim Burton movie came out (anyone see it? I want to, but haven't yet). Thanks to the heads up from LeAnne at Wee Inklings, I have been enjoying The Graphics Fairy blog and all the free clip art she's been sharing. Some of it is in black and white and can be colored.

She posted this rabbit image which is a book illustration created by Sir John Tenniel for Lewis Carroll's book Alice's Adventures in Wonderland. After a little googling I found an even better, cleaner copy plus a whole bunch more here.

I did what Donna does to make her die cut cards stand up. I cut 2 pieces of black card stock and scored the second one around 1/2" from the top, folded it and glued it to the first one so it would hinge. That way I can use the whole die cut image rather than chopping a bit of it off (and wasting card stock trying to get it just right).

The designer paper is from the Basic Grey Archaic collection, one of my favorites. I used the Argyle embossing folder on it.

For the white piece I printed the (first?) line the rabbit said in the book and trimmed the bottom using the Fiskars Diamond border punch. Then I bowed the piece out a bit and sewed it to the card, sort of like a faux pocket.

When coloring the rabbit scene I went simple on the background and went more dimensional on the rabbit. I wanted him to be white, but he needed to stand out a bit. So I used the warm grays for his fur. I also used the warm grays to add shadows.


The bow was done with my homemade Bow Easy. I did a double bow and spread the loops out. They don't like staying that way, though.

So, this is a totally unstamped card. Thanks for looking! Have a lovely evening!

Image and saying printed from computer. Image found here. Inspiration from The Graphics Fairy.

Copics: W00, W1, W3, W5, BG11, YG93, E35, R29, YR23

CS: Black, Basic Grey Archaic, SU More Mustard, PTI Stamper's Select White

Other: Cuttlebug Argyle embossing folder, Nestabilities Curved Rectangles, Classic Ovals Large, Classic Oval Scallops Large, Fiskars Diamond border punch, sewing machine, black organdy ribbon, red gems, 3D Dots, SU Summer Sun marker, Micron black pen for adding grass


Sunday, March 07, 2010

You Make Me Smile


ETA: Jamie Lane asked me to enter this post in the technique week challenge over at Frosted Designs. Do you have a favorite technique that you could enter? My current fave is "watercoloring" with Copics. Go enter for a chance to win some free digis! Thanks for the encouragement, Jamie!

Just like I'm crazy about our new Basset, Ally, I'm crazy about digital stamps. Maybe it's because they arrive so quickly after paying for them (usually, within hours) or maybe it's because I can color them, and I LOVE to color.

I'm just nuts about this fairy. I found her on Etsy and just had to have her. She's such a sweet thing. She was created by Claire Keay of Jellypark. I love her illustrations and plan to buy more. She's an awesome watercolorist, too.

You can see that the fairy's wings and flower wreath have glitter on them. I also glittered the flowers and the butterfly. I used Crystal Snow fine white glitter, my favorite all-around go-to glitter.

I glued tiny clear gems to some of the flowers for extra sparkle and dimension.


I'm working on doing shadows and such with my Warm/Cool Gray Copics. I'd love to get more of them so I can vary the intensity; mainly, I need more in the cool range. Those grays are so versatile! They really are a necessity, imo. I grab them all the time.

I wanted this scene to have a watercolor quality about it. I still have lots to learn, but it sure is fun trying!

I took a page from Amy Sheffer's book and distressed the edges of my dp (Basic Grey Stella Ruby) to jazz it up a bit. Then I sewed it with a straight stitch and went back over it with a freehand stitch. That was great fun!

Thanks for coming by for a look! Hope you enjoy! Check out Claire's other wonderful illustrations here.

Stamps: Sitting Fairy by Claire Keay of Jellypark, sentiment by Jody Poesy (no longer selling stamps), SU Canvas

CS: SU Old Olive, black, Basic Grey Stella Ruby Collection, PTI Stamper's Select White

Inks: Versafine Onyx Black, printer

Copics: W1, W3, W7, C1, T1, 0 (colorless), E000, E02, E25, E27, E33, E35, E41, E43, E44, E57, E93, BG10, BG11, BG13, Y21, YR23, R02, R20, R22, R24, R30, R81, YG11, YG13, YG17, YG91, YG93, YG95

Other: Pumpkin Pie SU marker, Nestabilities Labels 2, Stamp-a-ma-jig, tiny clear gems, Diamond Glaze (to glue gems down), black zigzag ribbon, Crystal Snow fine white glitter, glue pen, scissors for distressing edges, sewing machine, 3D-Dots


Friday, February 26, 2010

Spring!


I am desperate for spring! Are you? I'm tired of being cold all the time and having pruney, dry skin and the bleak grayness everywhere I look and the low light. I yearn for green grass and flowers, fresh air and sunshine! Since I can't have any of it yet, I picked one of the Pure Innocence digis that says "spring" to me. It also says "carefree" and "sunshine" and "warmth".

Oh, how I love my new Copics! I want to color all the livelong day. I have been so distracted trying to do my usual stuff: laundrylaundrylaundry, dishes that never end and homeschooling. I just want to PLAY! And sometimes I do play when I should be doing other things. Oh, spring, please get here soon so I can have a big dollop of you and start feeling like myself again! I'm tired of hibernating!

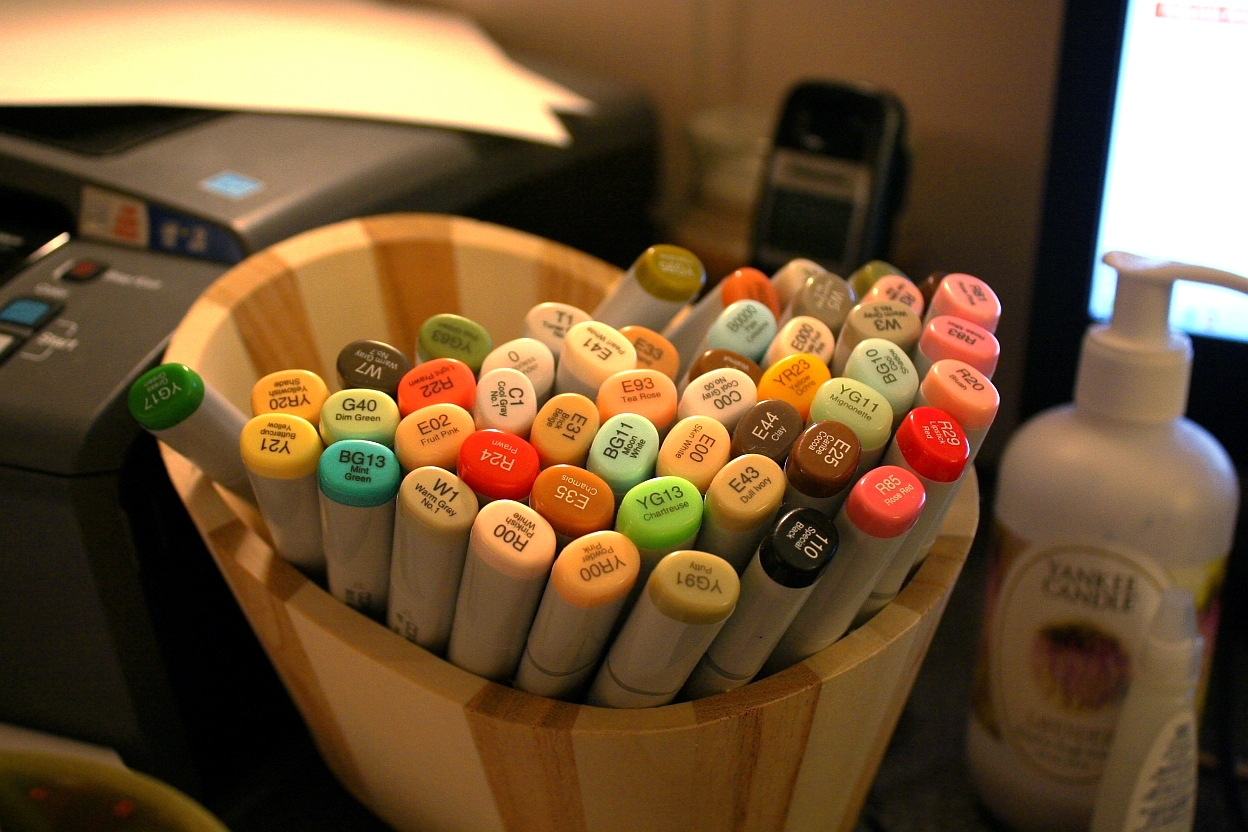
I think I almost used every one of my Copics on this card scene, seriously. So I am posting a pic of all of my markers. Hee! Actually, I just like looking at them. They're so pretty. *sigh* Like a bouquet of flowers.


I used my new homemade Bow Easy to do the bow. It worked great! To make it look like I tied the bow onto the ribbon that went around the card, I tied a knot in the ribbon, positioned it in place, and then glued the bow to the knot. It looks like I tied the bow right to the ribbon, or like it's all one piece.


I really wanted a fresh feel to the card. White and the pale blue from the sky were my inspiration.

I am in love with the Pure Innocence digi line! (Site is currently down for maintenance) They are just soooo precious! To this sweet little girl I added freckles and the word, "Spring" from Hero Arts CL305 and bumped up the grass scribbles a bit for added depth. Otherwise, everything else is the digi image.

Thanks for looking! I hope to be doing more coloring soon, so keep an eye out!

Recipe

Stamps: Pure Innocence 007 by Digi Stamp Characters, Spring by Hero Arts Sending Happy Thoughts (CL305)

CS: Papertrey Ink Stamper's Select White

Inks: Versafine Onyx Black, printer

Other: Cuttlebug D'Vine Swirls embossing folder, Nestabilities Curved Rectangles, paper piercing tool, sponge mat, Prima daisy, Basic Grey button, 3D-Dots, Diamond Glaze (to hold down flower, button and bow), white organdy ribbon
, Micron pen for freckles and scribbles

Saturday, January 30, 2010

Sweet Friend Birthday


Please forgive the crooked word sayings! Don't you just hate it when everything is just so on a card and then you ruin it by goofing up some last minute addition? I wasn't about to start over! I guess I'm getting over my perfectionism. That's a good thing!

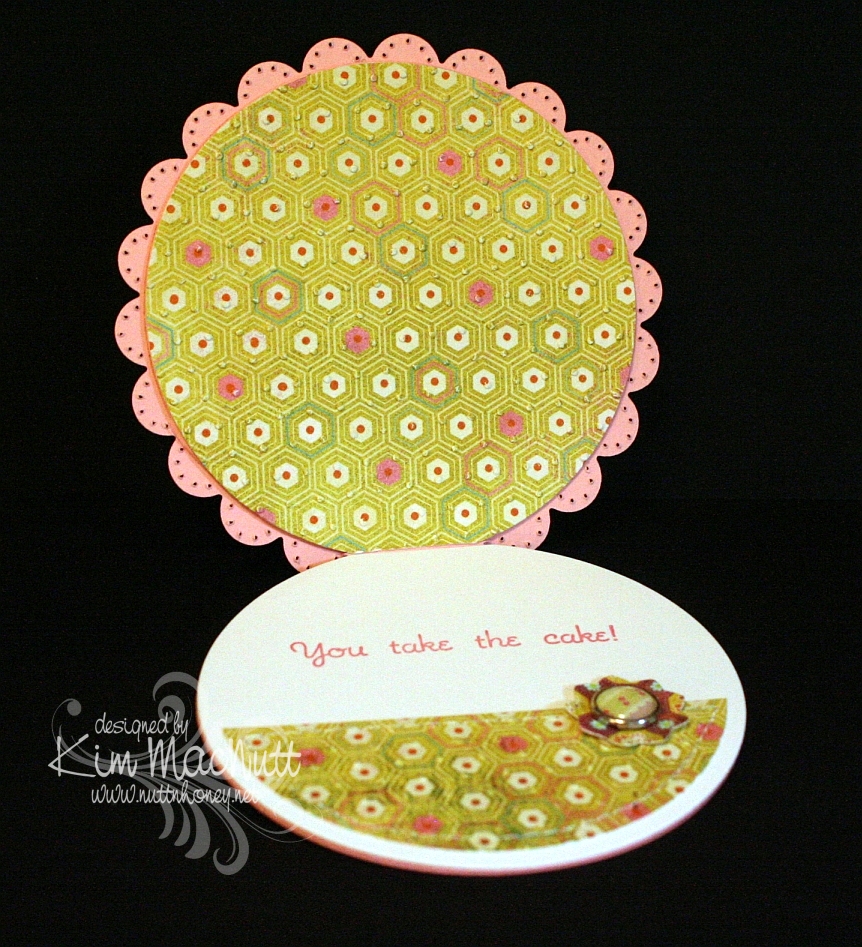
This card design is the sketch challenge for this week's Mojo Monday (Week 123). We had the choice of either doing it round or square. I took the round challenge since I don't do round cards and thought it was about time I did. I even did up the inside!

Mine was a tad different from the MM sketch. I turned the bottom left embellishment into a full-fledged flower with stem and leaves, by accident, actually. After I laid the flower on the line of grosgrain ribbon I was inspired to turn the ribbon into a flower stem and I added leaves to further the theme.

All the designer paper is from the Basic Grey Lemonade collection.


Did you notice anything unusual about this card? There is something missing that usually isn't. Can you guess?


Have you guessed yet? I'll give you a hint. It starts with "b".

Thanks for looking! I'm pretty tired right now or I'd go into more detail. It's one of those icky days for me that we ladies have. Blah.

If you have any questions about how I made this card, feel free to ask.

Have a lovely weekend!

Recipe

Stamps: Sweet Celebration by Taylored Expressions

CS: SU Pretty in Pink, Papertrey Ink Stamper's Select White, Basic Grey Lemonade Collection designer papers

Inks: SU Rose Romance, CTMH Kiwi

Other: Nestabilities Standard Circle Large and Small, Classic Scalloped Circle Large and Small, Flower Creations 3; Martha Stewart Embossed Zigzag border punch, small oval punch, Cuttlebug Swiss Dots embossing folder, paper piercing tool, sponge mat, sewing machine, Basic Grey Lemonade buttons, pink grosgrain ribbon, Basic Grey Lemonade brads, Sticky Doos foam square

Tuesday, January 26, 2010

I Think You're Amazing!


I played with my very first digistamp today! I've heard about digital stamps and wondered if I'd enjoy working with them. And I did! Not technically stamping, per se, but no one would know by looking at it. So is this cheating to use a non-stamp as an image that looks stamped on a card? Can you tell I'm from the olden days? I need to get with it, don't I. I would've loved to have lived in Cranford before the railway came, if that's any indication.

There's someone to blame for this adventure I had, but she doesn't know it. Donna at 3 Umbrellas, you are to blame for getting me started, you enabler, you! ;) You had to link to that incredibly adorable site, Pink Petticoat, and then you had to make me go all over their website to try to find the image you used on your card, which I never found, but I saw all sorts of other cuteness. All that looking brought me eventually to their blog where I found some freebies (blog's left sidebar) and just had to download them. And then I had to print out the too-cute-for-words little birdie to play with. And I had to learn this adorable, easy and FUN technique to use on it. And here we are. What a great little adventure! Expect me to be dragging out my chalks, glue pen and Crystal Snow glitter a lot in the future! What an easy way to color images in a soft way! I love it! Sometimes markers are too much - too dark, too intense, too heavy. Chalks fill the bill if you want a softer look. I use tiny 1/4" pompoms and an alligator clip to apply them, but I need something smaller for the tinier parts of an image (like the flowers and small hearts on this one). What do y'all use? I was thinking make-up applicators might work.

Not only did Donna enable me to try a digistamp, but she also inspired the design of this card. She has such a clean, simple style and I am in awe of how she does it. I tried really hard to not pile stuff on my card. It was hard for me, I'll admit. I'm a layer girl. But I kept it simple and clean as far as I was able. I just kept making myself "think like Donna". ;) Did I succeed? I love her style, not to mention, her sweet personality.

For the digi, I used the Papertrey Ink Stamper's Select White card stock in my printer on the "best" print setting. No problems. Set your printer to "card stock" (if yours has that setting) for the type of paper so it prints best.

Coloring was so easy with the chalks. I had it done in no time. Then I used the Sakura Quickie Glue Pen where I wanted glitter and lightly dusted everything with the Crystal Snow.

Before I cuttlebugged the yellow cs, I stamped it in VersaMark ink with the retired SU Canvas background stamp. I LOVE that stamp for adding a textured look.

Hope you enjoy this card. Thanks for coming by! And thanks, Donna, for being such an inspiration to me!

Recipe

Stamp: Pink Petticoat Little Birdie digi, SU Canvas

CS: SU So Saffron, Papertrey Ink Stamper's Select White

Ink: VersaMark, printer

Other: Cuttlebug Swiss Dots embossing folder, Nestabilities Labels Four die, chalks, 1/4" pompoms and alligator clip for applying chalks, Sakura Quickie Glue pen, Crystal Snow glitter, pale blue organdy ribbon, light blue gingham ribbon, pearl gems, 3D-Dots

Sunday, January 24, 2010

Cuppie Birthday!


Hello! Yes, more stamping! I'm on a roll, I think! 

This sketch design is the same Mojo Monday sketch as the last card I made (from Week #122). It's a good, simple sketch. I find I prefer the simpler sketches, as they give you more freedom to play. 

The colors I chose were from this week's color throwdown (#76) at The Color Throwdown blog, except that I don't have Melon Mambo. So I used Positively Pink. I think we all need a little Spring, yes? 

I hadn't played with my birthday cuppies in awhile and needed a birthday card. So out they came. I thought the colors worked well with these bright, cheerful stamps, don't you? 

Speaking of cheerful, there's nothing like a dog to cheer you up on a miserably gray and dreary day. We are loving our sweet Basset girl! We left her alone for the first time today so we could go to church. She woofed at us in her crate as we were leaving, voicing her concern that maybe we had unintentionally forgotten her. I was a little worried. But she was just as we had left her when we got back, and oh, the happiness at seeing us! Dogs are the best, aren't they? 

One thing you might notice on this card is that I didn't use any designer paper. Lately, it seems I reach for the dp first thing and I was getting kind of tired of the routine. So I determined that I was only going to use card stock this time. I have to admit that I enjoyed staying away from the dp for a change. It used to be the norm before all this dp hit the market. Remember how we used to stamp a lot more on our cards? The dp revolution changed that. I kind of miss the old way sometimes. Do you? Or maybe you still rely heavily on cs. Of course, I still had to busy it up, didn't I? ;) 

I used the retired (still shaking my head over that one) SU Canvas background stamp on the Positively Pink and Old Olive cs's and then cuttlebugged the PP cs with the D'Vine Swirls embossing folder to add even more interest. 

You probably can't see it very well on the So Saffron cs, but before cuttlebugging it I stamped the pile of cuppies from the Sweet Celebration set by Taylored Expressions upside down and right-side up in VersaMark ink. Well, I think the rest is pretty self-explanatory and I must get ready for school tomorrow. I have some prep work to do for the kids' schedules (we homeschool) and it is late! 

Have a lovely Monday and thanks for coming by for a peek! 

Stamps: Sweet Celebration by Taylored Expressions, SU Canvas 

CS: Papertrey Ink True Black, SU Positively Pink, SU Old Olive, SU So Saffron, PTI White 

Inks: Versafine Onyx Black, VersaMark 

SU Markers: Creamy Caramel, Pumpkin Pie, Apricot Appeal, Bordering Blue 

CTMH Markers: Pink Carnation, Topiary 

Other: Cuttlebug D'Vine Swirls and Spots and Dots embossing folders, Nestabilities Classic Oval Scallops Large, Classic Oval Large, ticket corner punch, black gingham ribbon, yellow gems, Black Micron archival pen (for stripes on candles), 3D-Dots, Stamp-a-ma-jig, paper piercing tool, sponge mat

Friday, January 22, 2010

Ginger Rogers


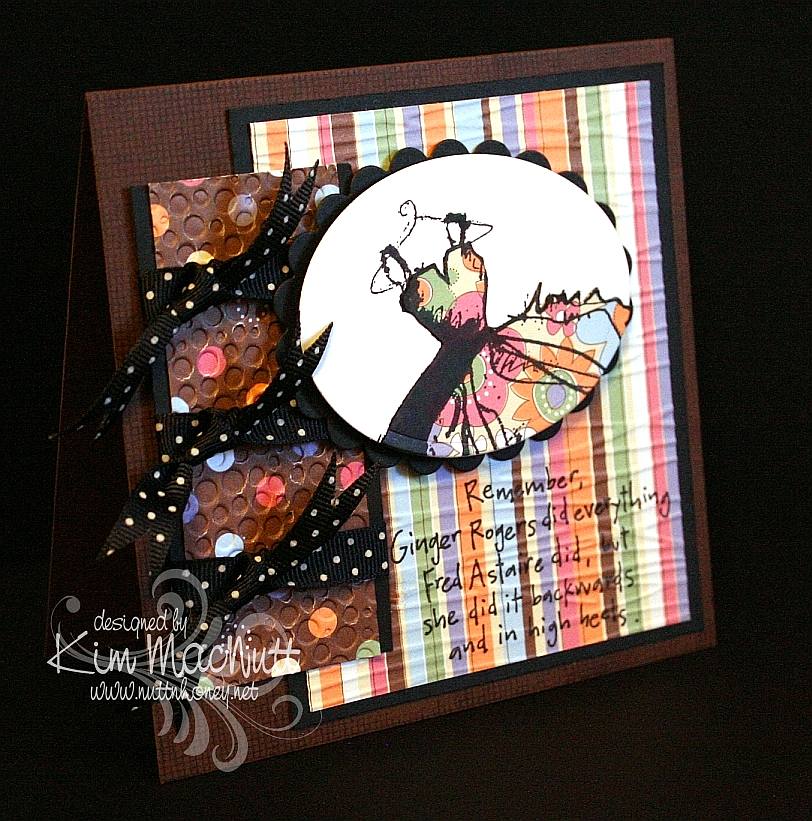
I found some time to stamp yesterday! Since I'm slow in making a card it's quite a feat to get a big enough chunk of time to complete one, so I was a happy girl. I used this week's Mojo Monday (122) sketch and played yet again with my Dawn Houser stamp. Well, stamps, actually, because the saying stamp is hers, also. This time I only used part of the dress image. 

I stamped it on white cs and on dp. Then I cut the dp image out except for the hanger and glued it down over the white image. The rest is pretty self-explanatory. Two things I'll mention are that I stamped the saying before cuttlebugging it, and I used an extra piece of cs under the Forest Branches-embossed section when I cuttlebugged it, but not under the Tiny Bubbles-embossed section. Can you see the difference? It really does help to add the cs. 

Btw, I am busier than usual now because we have added a new member to our family. Thanks to The Pioneer Woman, I fell in love with her Basset, Charlie, and wanted one of our own; and now we have one! We adopted her this week from a Basset rescue. Her name is Ally and she's a dream. My hubby says it's like having a big dog in a little dog's body. He's right! She's the most laid-back, easy-going dog ever! And you can't outlove her. She'll take it all. :) I might need to look around for some Basset stamps now! 

Thanks for coming by! Have a lovely weekend! 

Stamps: My Mother's Dress and 8357-N , both by Dawn Houser, SU Canvas 

CS: Papertrey Ink Dark Chocolate, PTI True Black, Making Memories Cheeky Collection designer paper, PTI Stamper's Select White 

Inks: Versafine Onyx Black, VersaMark (on Dark Chocolate cs) 

Other: Cuttlebug Forest Branches and Tiny Bubbles embossing folders, Nestabilities Classic Oval Scallops Large, Classic Oval Large, black polka dot ribbon, 3D-Dots, Stamp-a-ma-jig 

Card's outer measurements are 5"x5"

Monday, January 18, 2010

The Lord is my Light


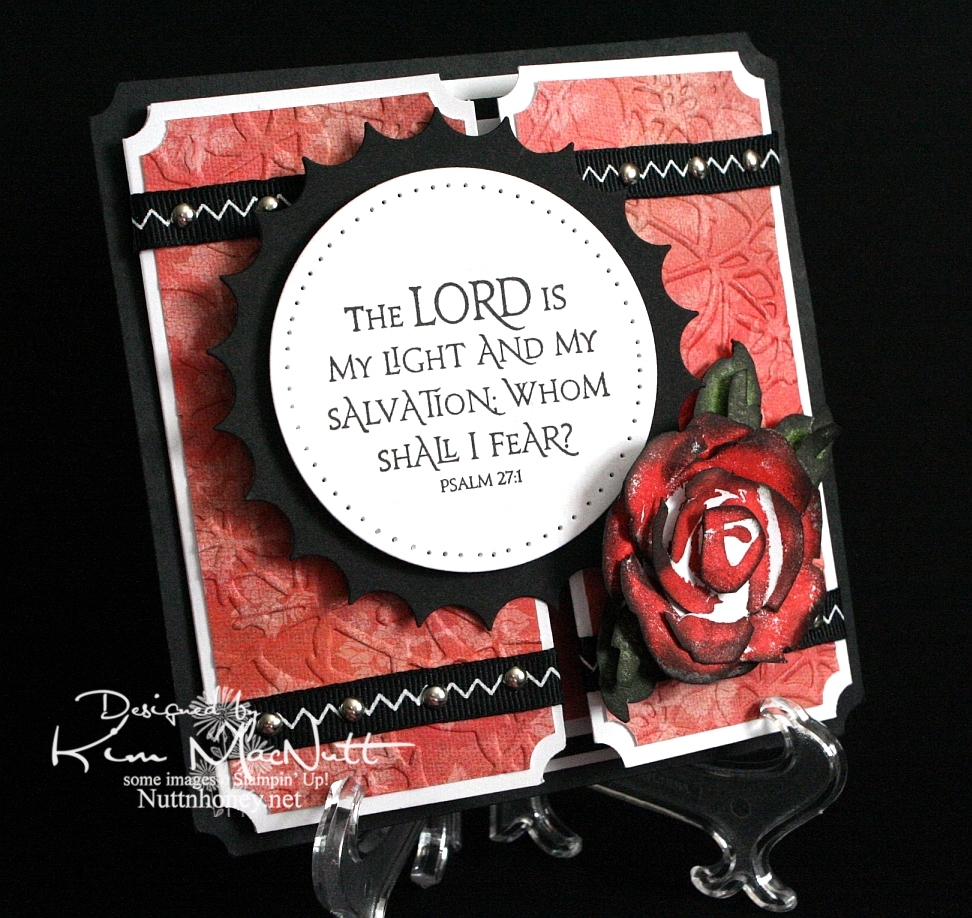
Another rose. Once I start making them it's hard to stop, I love them so. This was my first card using the new PaperTrey Ink Stamper's Select white cs and the ATG 714 adhesive. The fumes were really bothering me at first, but the smell seems to have dissipated a bit. Maybe I should get the regular adhesive (924) instead?

About the PaperTrey Ink card stock, it's niiiiice. Good and stiff and crisp. Very substantial. Took ink very well. I definitely will enjoy using it. The black cs on this card is the True Black from their sampler pack. Very nice. More toward the reddish black than the blue-ish. Closer to SU's.

I tried doing something to keep the designer paper from cracking when I ran it through the Cuttlebug. I added another piece of card stock behind it in the embossing folder. It mostly worked. The imprint isn't as strong, but almost no cracks appeared. It's a trade-off, I guess.

I was a tad sloppy on the ribbon and mini-brad embellishments, mainly because the ribbon pinches when I punch a hole in it. And I didn't even try to line the brads up perfectly. It has a bit more charm that way, right? I like it anyway.

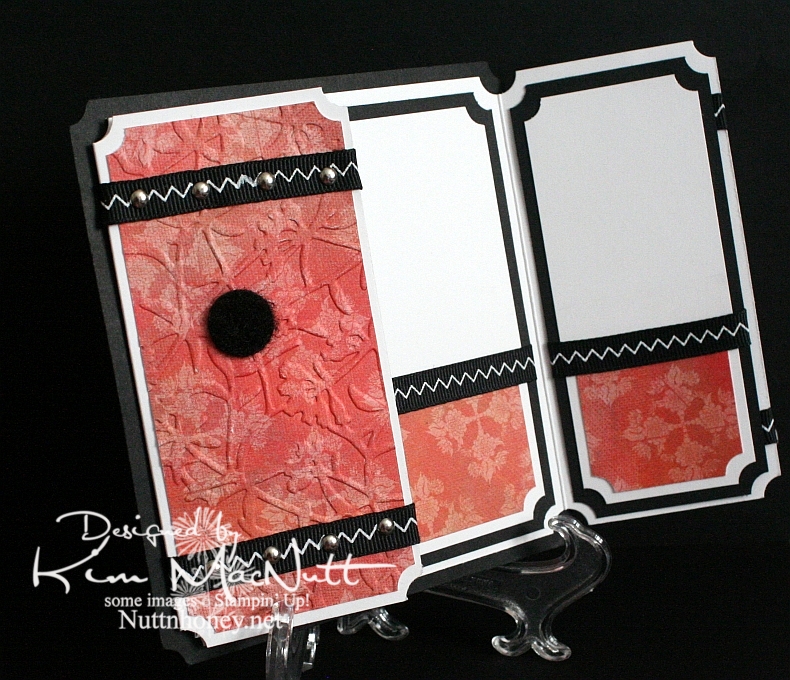
I left the inside blank so I can use it for a generic note of encouragement. I would've cuttlebugged the dp inside, but forgot until after I had glued everything down. This ATG adhesive is good and strong! Really love it despite the fumes.

As you can see, I used a black Velcro dot to help keep the card closed.

Can't think of anything else to add. TFL, and have a lovely day! Pray for Haiti!


Recipe

Stamps: SU Roses in Winter, Our Daily Bread Designs Light of the World

CS: Papertrey Ink True Black, PPI SS White, Memory Box Rhubarb Tart designer paper

Inks: Versafine Onyx Black, SU Ruby Red, SU Old Olive, SU Always Artichoke, Antique Linen Distress Ink

Other: Nestabilities Large Classic Inverted Scalloped Circle, Standard Circle Large, Cuttlebug Floral Screen embossing folder, paper piercing tool, sponge mat, silver mini-brads, black zigzag ribbon, ticket corner punch, Sticky Doos, 3D-Dots, 1/16" hole punch, black Velcro dot

Friday, January 15, 2010

Joyful Consolation


I know we're probably all thinking about and praying for Haiti right now. How could we not when the people there are suffering so much? I know I'm thinking about them nearly every minute of the day.

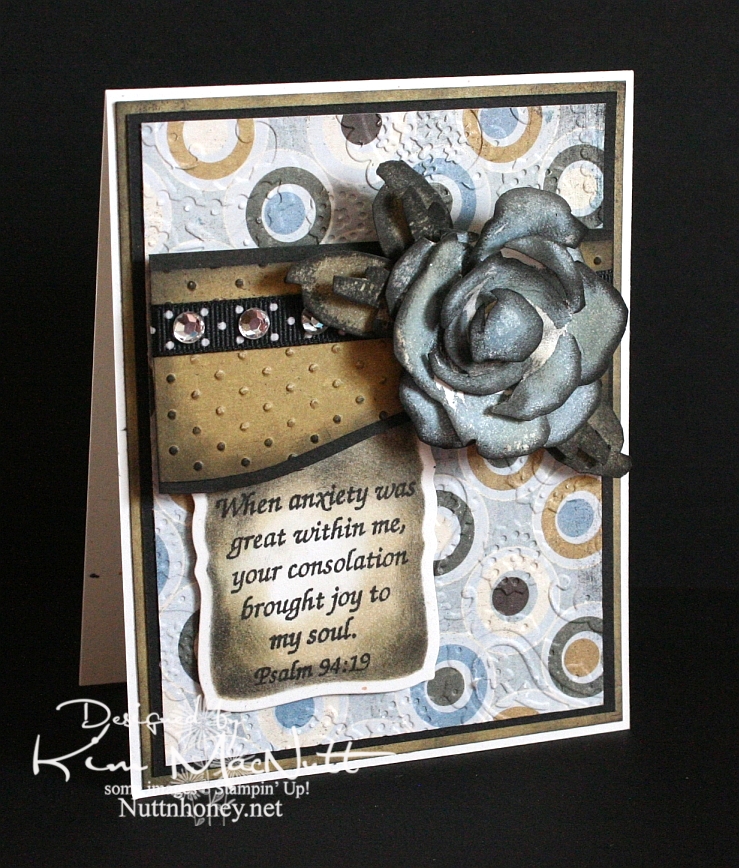
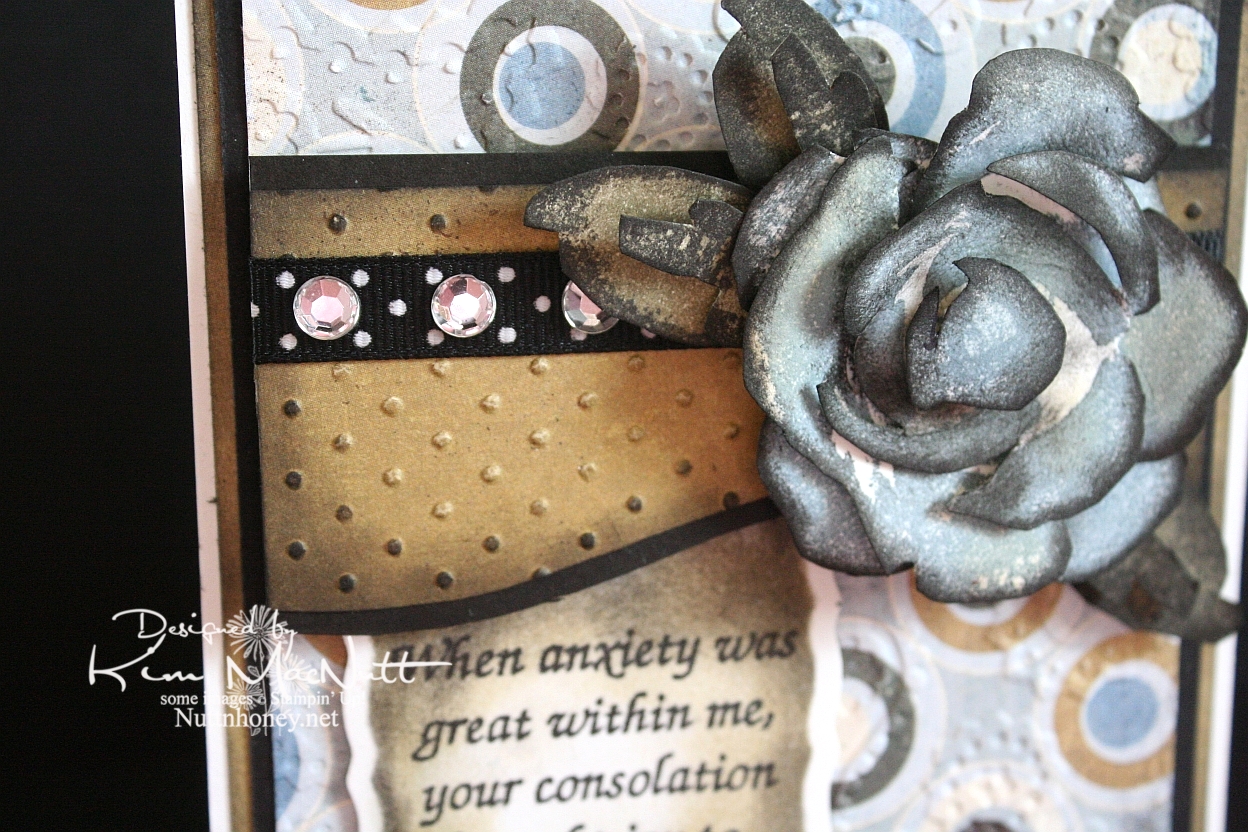
When I was stamping last night I wanted to use a Scripture stamp and this one from Psalm 94 really stuck out at me. The anxiety in Haiti is great, but those who know Christ there can feel His consolation even in the midst of disaster. He is still with them. He knows suffering.

We were reading in Romans 8 the other night and these words could not have been more timely in helping us understand such a tragedy as this big earthquake:

22 We know that the whole creation has been groaning as in the pains of childbirth right up to the present time. 23 Not only so, but we ourselves, who have the first fruits of the Spirit, groan inwardly as we wait eagerly for our adoption as sons, the redemption of our bodies. 24 For in this hope we were saved. But hope that is seen is no hope at all. Who hopes for what he already has? 25 But if we hope for what we do not yet have, we wait for it patiently.

26 In the same way, the Spirit helps us in our weakness. We do not know what we ought to pray for, but the Spirit himself intercedes for us with groans that words cannot express. 27 And he who searches our hearts knows the mind of the Spirit, because the Spirit intercedes for the saints in accordance with God's will.

The earth groans, waiting for its redemption from the curse God placed on it when Man first sinned. And we who are on this earth suffer along with it. I don't know if Haiti is cursed like Pat Robertson said, but I do know that the Bible says we are all under the curse of sin until we are redeemed from it. And Christ is the Redeemer to deliver us from it. His death on the cross was done to redeem us. The Bible says, "God made him who had no sin to be sin for us, so that in him we might become the righteousness of God." (2 Corinthians 5:21).

He became sin for us. Wow. And we become the righteousness of God through Him. Double Wow.

But even after our redemption from sin we must live in this sin-filled world and live with the consequences that go with it. Suffering comes in many forms, and tragedies like this one are some of the worst. But I believe that God allows this suffering so we will learn to care for one another. Because, really, if everything always went our way and life was super easy, what kind of people would we be? It takes suffering to bring us out of ourselves. Look at how the world is responding to Haiti's misery. It's beautiful to see people all over the world dropping everything to help.

Okay, end of sermon. :)

I got to play with my ATG 714 last night and I love it! The first time I loaded the adhesive in was a bit tricky, but I know that will get easier each time. It's a bit harder to use and get used to, at first, but it definitely sticks well. I'm sure it will get easier the more I use it. Of course, I need to give my card time before I'll really know how well the adhesive holds. I'll report back later. So far, so good, though! It's so nice to make a card and not have messy glue everywhere. To use, you hold the trigger down and roll across your paper. I found that it was easier to keep holding the trigger down and not lifting the applicator up when turning corners on the paper. If I lifted it and then turned, some of the adhesive snapped back. I hope that makes sense.

BTW, I got the PaperTrey Ink order in today and will try to play with the white cs soon. I'll let you know what I think later.

It's been awhile since I did a Roses in Winter 3D rose, and I needed something for this week's Mojo Monday card (Week 121) that would make an impact where the circle would be. The wide, blank area on the left was perfect for a word stamp, so I selected a Scripture, as I mentioned above. I thought the rose would be a nice accent to the Scripture, so I made my dp choices and proceeded to pick the rose color. I went with SU Bordering Blue as it was the closest blue I had to the colors in the dp. I stamped in the blue and then sponged a little Antique Linen Distress Ink over it in places. Then I used a sponge dauber to sponge the edges with black ink. The leaves were done with SU True Thyme (retired) and black to keep the muted theme going. I also sponged True Thyme around the edges of the Scripture piece.

After running the dp section under the rose through the Cuttlebug with the Swiss Dots embossing folder, I sponged the Antique Linen ink over it to cover the white cracks in the embossed part. Then I sponged black lightly around the edges. I added the black polka dot ribbon and clear gems to jazz it up a bit. I also sponged black lightly around the plain dp behind the circled piece to keep the look uniform.


I used the Perfectly Paisley embossing folder on the circle dp. Also used lots of dimensional stickies to pop the rose, the piece behind it and the Scripture section.

Hope you have a blessed day and please keep Haiti in your prayers, as I'm sure you already do.

Recipe

Stamps: Stampin' Up! Roses in Winter, Scripture stamp from Impressions of Faith

CS: White Confetti, Basic Grey Granola collection, black

Inks: Versafine Onyx Black, SU Bordering Blue, Antique Linen Distress Ink, SU True Thyme

Other: Cuttlebug Perfectly Paisley and Swiss Dots embossing folders, Nestabilities Curved Rectangles die, black polka dot ribbon, sponge daubers, 3D-Dots, Sticky Doos, clear gems

Monday, January 11, 2010

Merci Beaucoup!


Hello! Well, I've been scarce around here, haven't I? I just haven't felt like stamping lately...until yesterday. I actually had the urge! How about that!

Before I get started, I'd like to ask you stampers what your favorite adhesive is. I have been really unhappy with my adhesives lately. They either don't stick for long (Tombow Mono Adhesive and Scrapbook Adhesives E-Z Runner) or stick fine, but are a mess to use (Tombow Mono Multi and Tombow Mono Glue Stick). Is there the "perfect" adhesive that permanently sticks without being messy? What's the latest popular adhesive out there? I sure would appreciate your help!

Okay, back to the card...

I needed a thank-you card for a friend so that motivated me to get stamping. But if you saw my stamping room aka The Dumping Ground For All Things Without Places To Go, you'd understand why I'm not very motivated these days. I can't even get to most of my stamps right now. I had to raid my single stamp drawers just to make a card. And do you think I'm even slightly motivated to plow into the piles?

Still, I was very happy with my stamp choices. I love Dawn Houser's My Mother's Dress stamp. It is gorgeous all by itself and can be for just about any type of feminine card you need, except maybe a sympathy card, although I wouldn't be surprised if someone pulled even that off.

One thing I enjoy doing with that stamp is stamping it on designer paper and cutting it out. Had I thought of it in time I could've cuttlebugged it, as well, for even more drama.

Nifty tip alert: For a stamp with large areas of solid rubber to ink, lay the stamp rubber side up on the table and ink it over and over so you can see just how much ink is getting on the solid areas. I didn't do that on this imprint, but I did it with others I was experimenting with and may use them in future projects. It really helps to see the ink being applied rather than taking a chance on the ink not being heavy enough in the right areas to look good once it's on the paper. I did repair this image by using my black Copic marker. Worked very well with the Versafine Onyx Black ink.
I used the pinking nesty to give the card some zing. I also added pizazz with the blue designer paper for the saying and the clear gems. I saw other stampers sponging color on their white nestied cutouts and did that here, as well. Adds a fake "layer", which I love! I just put the circle back in the nesty template and held it firmly and carefully while adding color with a sponge dauber. I worked my way from the edges toward the center.

For the holes I used a circular plastic canvas frame for a template. So much easier than trying to eyeball it. Not perfect, but as close as I have been able to get. Anyone find a better tool for the job?


For the dress waist I punched a 1/16" hole in the ribbon and then in the dress - separately. Then I put the brad through the ribbon and then through the dress and secured it in the back. I glued the ribbon ends behind.

I kept the continuity inside the card by using the blue dp, holes and brads from the outside. I used the sewing machine without thread to do the holes.


It felt good to stamp again, but I am reminded each time just how time-consuming this hobby is, at least for me. I'm not a quick card maker! I really have to carve out a good chunk of time to get a card made.

Have a lovely week, and thanks for taking the time to look!

Stamps: Dawn Houser "My Mother's Dress", Merci Beaucoup by Rubber Stamps of America

CS: Black, Basic Grey Archaic and Granola collections (outside), Basic Grey Sugared collection (inside) (not sure what the blue dp is from), white

Inks: Versafine Onyx Black, Copic black marker for touching up dress, Distress Ink Antique Linen

Other: Cuttlebug Script embossing folder, Nestabilities Large Pinking Circles, Standard Circle Small, black polka dot ribbon, black grosgrain ribbon, antique brass mini-brads, clear gems, 3D-Dots, paper piercing tool, sponge mat, plastic canvas circle for hole template, 1/16" hole punch, sewing machine for holes inside card, sponge dauber for circle sponging

Thursday, July 30, 2009

Thinking of Coffee and You!


Hello again! Hope your week is going shwell! I am keeping busy with blackberries and veggies in my garden. It's a small garden, but it still has me hopping!

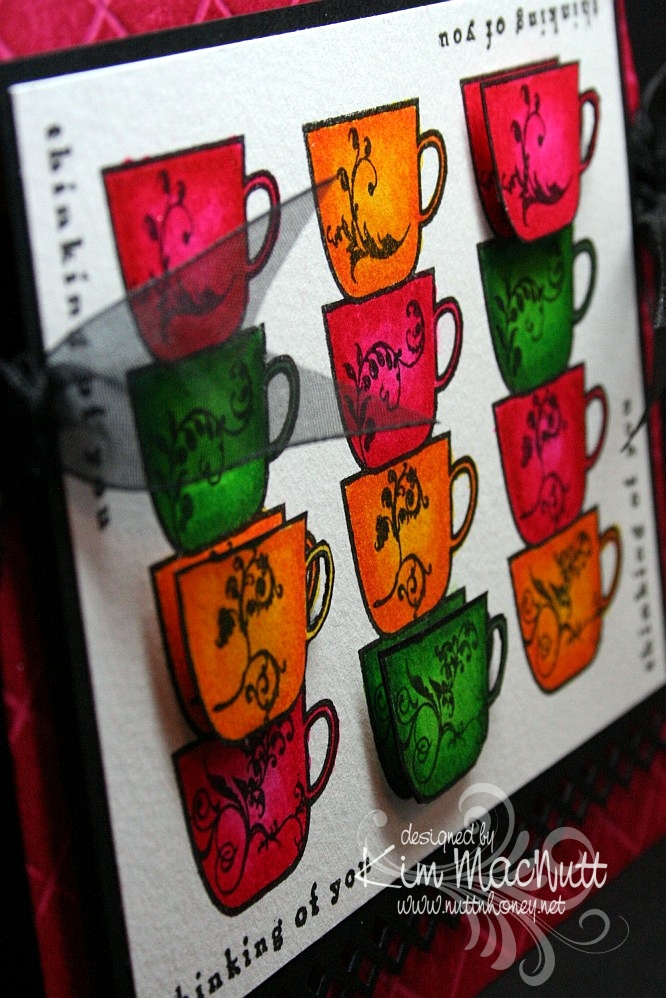
This is the second card I made last week. Once again, I was just playing with some coloring and ended up with this. I was inspired by Betty Wright's card here. Her's is far superior to mine! I loved the way she lined the cups up, so I did that on mine. Maybe next time I'll do what she did and use designer paper on the cups. It's fabulous, isn't it? Mine was just a simple coloring job. I used 2 marker colors on each cup. The darker was for the edges, and the lighter was for the centers.

I used the Stamp-a-ma-jig for lining up the saying on all 4 sides. I used the Scor-Pal on the Rose Red base and then DTP'd the base with Rose Red ink. I think the rest is pretty self-explanatory.

Oh, and I stamped extra cups so I could do a bit of dimension on the card.


We're supposed to get rain a lot this week. We need it! If you're getting too much, please send some our way, ok? ;)

Have a blessed week's end!

Recipe

Stamps: Flourishes Coffee with You, Savvy Stamps "Thinking of You"

CS: Rose Red, black, white

Inks: Versafine Onyx Black, Rose Red

Markers: Real Red, Pixie Pink, Pumpkin Pie, Summer Sun, Garden Green, Green Galore

Other: Scor-Pal, Fiskars Diamond border punch, Stamp-a-ma-jig, 3D-Dots, black organdy ribbon

Monday, July 27, 2009

Howdy Octopus!

Well, hey there! Did you wonder why it got so quiet here all of a sudden? Well, I have been busybusybusy! Blackberries are coming in like crazy and I've been picking and picking! I tried my hand at yogurt making the other day and put up some pickles from the garden today. The daily stuff doesn't go away just because I have other things to do, so I am swamped with work. But I love it! Homemaking is such a satisfying occupation for me. I'm so thankful I can put so much of my energy into serving my family. I love being busy around the house. I am leaving the computer off a lot now, so I am much more productive with my time. It makes me happy to have a contented hubby and kids.


This past week I actually got some stamping done! I have 2 cards to share. One in this post and one in a future post, as yet uncreated.

Usually my creative muse will start with stamping an image and coloring it. That's what happened this week. The Silly Sealife set was calling to me and I just had to stamp that adorable octopus! I love coloring that cute little thing! It's so satisfying.

I pulled out some watercolor paper and my markers and went to town. My inspiration for this card was the lower blue paper which is from the Basic Grey Obscure pad (actually, both are). That pad has some really cool papers! The blue paper reminded me of the sea. And it went perfectly with the D'Vine Swirls embossing folder and the octopus, don't you think? I used the inverted scallop circle die to add some extra pizazz. I have still not mastered getting brads right with my Crop-a-Dile yet. t's a gamble every time! So one is right and one is wrong. Can you tell which is which?

TFL! Have a lovely week! Summer's almost over, can you believe it?

Recipe

Stamps: Stampin' Up! Silly Sealife, Wordsworth Howdy SO35-G

CS: White, black, Basic Grey Obscure 6 x 6 pad, Canson watercolor paper

Inks: Versafine Onyx Black

Markers: Bordering Blue, Taken with Teal, Tempting Turquoise, Really Rust

Other: Cuttlebug D'Vine Swirls and Spots and Dots, Spellbinders Nestabilities Large ClassicInverted Scalloped Circles and Standard Circle Large, jumbo brads, natural hemp cord, ticket corner punch, Crop-a-Dile, water brush, piercing tool, sponge mat

Saturday, July 11, 2009

Hello Friend


Not much stamping this week. We had some home repairs done and my time wasn't so free. But I did whip this card up yesterday after the work was completed. The doggy stamp was calling to me. ;)

I haven't done much background stamping lately so I thought I'd use one for this card. I thought this old SU Chicken Wire stamp was just the right touch.

There is laundry waiting for me and a kitchen to clean up. And I think I need to shoo some kids off the Wii, so I better run.

I'm really enjoying all this offline time! It gives me time to ponder and pray. But I do miss being able to blog hop more.

Hope your day is a lovely one!

Recipe

Stamps: Penny Black Critter Party, Stampin' Up! Chicken Wire (retired), saying from a TAC set I have forgotten the name of.

CS: White, Bordering Blue, Memory Box Rhubarb Tart, black

Ink: Versafine Onyx Black

Markers: Creamy Caramel, So Saffron, Barely Banana, Summer Sun, Bordering Blue, Old Olive, C1 Cool Gray Copic

Other: Nestabilities Blossom and Standard Circle Small dies, Prima Daisy Dreams daisy, Sticky Doos, spiral punch, Stamp-a-ma-jig, black gingham ribbon, Diamond Glaze (for dog's nose), yellow Stickles