Showing posts with label double-inking. Show all posts

Tuesday, October 27, 2009

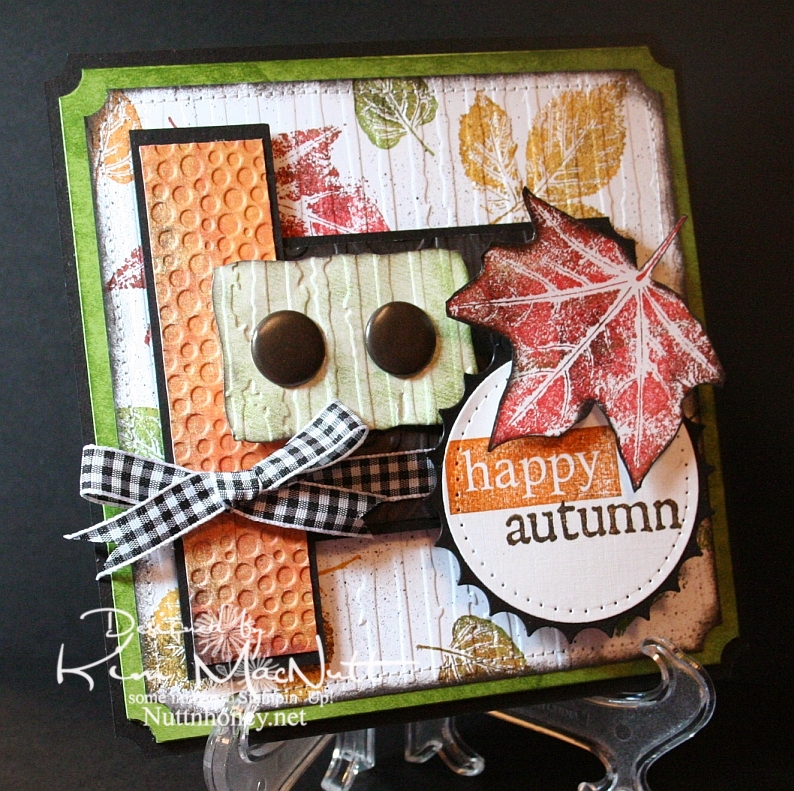
Happy Autumn!


This card was made using this week's Mojo Monday sketch.

I couldn't let autumn go by without pulling out my favorite autumn stamp set. It wouldn't be right. SU Lovely Leaves is a classic and I was surprised and disappointed when Stampin' Up! retired it. Maybe they weren't aware of its versatility.

Real fall leaves don't have just one color in them. They're a symphony of colors. So when I use my Lovely Leaves set I generally stamp them in a main color (largely from the Earth Elements color group) and then sponge other colors, including black for a little character, right on the stamp. Then I huff warm air on them and stamp. It produces a lovely effect.

That's what I did on the white background of this card. Then I finished it off using a Basic Black marker in an Inkworx Air Art gun to get a splattered effect. Once that was done I ran it through the Cuttlebug with the Distressed Stripes embossing folder and then clipped the corners with the ticket corner punch and then sponged black ink around the edges using a sponge dauber. Then I sewed around the edges. I really did a number on that poor old white piece of cardstock, didn't I?

It's not easily visible, but I used the D'Vine Swirls embossing folder on that dark piece of paper in the center. The dark paper has the pattern of tree bark on it from the Basic Grey Granola collection. I sponged it with black ink after running it through the Cuttlebug. A lot of work for something you can barely see! lol

For the words, I stamped the "happy" stamp from SU So Very in Pumpkin Pie ink and then lightly sponged it with black ink to burnish its appearance. I stamped the "autumn" stamp from the Purple Onion Designs' 4 Seasons set in Pumpkin Pie and then stamped it in black ink very lightly. Unfortunately, you can't see the cool, subtle effect that it produced in this pic.

I pressed the Old Olive cardstock behind the white piece onto the SU Just Jeans background stamp which was inked up with Old Olive ink. It gave a nice patterned but not too distinct appearance. I did the same on the greenish piece under the jumbo brads before running it through the Cuttlebug.

I always enjoy making cards with Lovely Leaves. It's one of my favorite sets.

Thanks for coming by for a look! Have a blessed day!

Recipe

Stamps: SU Lovely Leaves, SU So Very, SU Just Jeans, Purple Onion Designs "4 Seasons"

CS: Black, Old Olive, white, Basic Grey Archaic, Basic Grey Granola

Inks: Ruby Red, Old Olive, More Mustard, Pumpkin Pie, Versafine Onyx Black

Other: Nestabilities Standard Circle Large, Large Classic Inverted Scalloped Circles, Curved Rectangles, ticket corner punch, Cuttlebug Distressed Stripes, Tiny Bubbles and D'Vine Swirls embossing folders; sewing machine, paper piercing tool, sponge mat, sponges, sponge dauber, jumbo brads, 3D-Dots, Sticky Doos, Basic Black marker, Inkworx air art gun, Black gingham ribbon

Sunday, September 27, 2009

Sing and Make Music in Your Heart to the Lord!


Well, I got some fun stamping in yesterday since it rained the whole day and I felt a need to create. This card started out with lots more green in it and little black, but transformed over time to this heavily blue and black creation. With as much ribbon that I have, you'd think I'd use more variety. What can I say? I just can't get enough of the black and white stuff!

The inspiration came from Angella's card with her button flowers. I loved the tied ribbon in the button holes idea. Despite having a rainbow of buttons, what did I pick? Black! I'm hopeless!


Anywho...I wanted to play with my new Shapeabilities/Poseabilities Flower Creations 3 set. So that was where I started. I figured I could use a button for the center and add the ribbon. It's really tricky getting ribbon through a button hole, but I just used a small embroidery needle with a large eye and folded the ribbon in half lengthwise on the end to fish it through the eye. The needle with the ribbon took a bit of pulling to get through, but it did make it through. If you have one of those rubber grabbing pads you use for opening jars, I think it would work well in helping to grab and pull the needle.

For the holes around the oval, I used the same oval nestie die, placed the cut paper oval back into the die, front facing down and then turned it to face up and held it down on my sponge mat while I punched the holes. The inner edge of the die worked well as a template. For the flower, I just did it freehand, punching in the corners and ends first, then in the centers of the rows and then filling in evenly the rest of the spaces. Does that make sense?


For the blue bird on the oval I stamped in SU Bashful Blue ink and then in CTMH Crystal Blue ink to get the color as close as possible to the blue in the Basic Grey paper. I sponged the edges of the oval with CTMH Blush ink.

You'll notice I used Cuttlebug folders on this card. I used Script and Perfectly Paisley.

Although it's barely noticeable, I will point out that I stamped SU Canvas on the SU Soft Sky cs in VersaMark ink.

This card fits in an envelope like the ones in this post. The size of the envelope is 4.75"X6.5".

This was a fun and enjoyable card to make. I hope you enjoyed looking at it! Have a blessed Sunday!

Recipe

Stamp: Our Daily Bread Designs Sing to the Lord, SU Canvas

CS: Black, SU Soft Sky, Basic Grey Lemonade 6X6" pad, white

Inks: SU Bashful Blue, CTMH Crystal Blue, CTMH Blush, Versafine Onyx Black, VersaMark

Other: Cuttlebug Script and Perfectly Paisley embossing folders, Spellbinders Nestabilities Classic Oval Small, Classic Oval Scallop Small, Poseabilities (Shapeabilities) Flower Creations 3, paper piercing tool, sponge mat, black button, black gingham ribbon, 3D-Dots, sponge dauber

Wednesday, March 18, 2009

You're the Cat's


I am all finished with my shoulder therapy sessions (3 months' worth!) and wanted to thank the therapist and the receptionist for making my therapy experience such a positive one. Challenging, yes, but positive. May I say that if you have the kind of surgery that requires physical therapy and "homework" that you DO IT? I am so glad I obeyed my therapist's and doctor's orders. I am now pain-free where once was agonizing pain (I had a torn rotator cuff). Had I not done the therapy I would have a frozen shoulder now and the surgery would have been a waste. I love my therapist and doctor!

Anywho, one of the ways I wanted to show my appreciation was by making them cards. Susan, the receptionist, always had a smile and a kind word for me. She joked around with hubs and me nearly every time we went. Her laid-back manner really helped me overcome the fear I had of what therapy was going to be like. Such a sweetie.

Cindy was my therapist, and she was always challenging me. At times early on, I was not happy about this. But I listened to her and she listened to me. She allowed me to have a say when I was uncomfortable or feeling pushed too hard. I very much appreciate all she did for me. She checked up on me about my "homework", making sure I was doing what she had told me to do, and she corrected me when I was doing movements wrong so I wouldn't hurt myself. She's a treasure and worth her weight in gold.

So, this first card is for Cindy, my therapist. You can't spend months with a person and not get to know them at least a little. I found out she loves cats. So it felt right to use the Stampin' Up! Cool Cat set (retired) to make her card.

I started with the designer paper I love so much by Basic Grey. I don't go ga-ga for every paper they create, but some send me to the moon! One of those is Archaic. I love every single paper in that pad!

At first I wasn't going to cuttlebug anything on this card (I know, hard to fathom). But even with the fabulous Archaic papers and the added stitching it still wasn't quite right. It was too *blah*. So I used the D'Vine Swirls embossing folder on the top and the Distressed Stripes folder on the bottom. I ran into a slight dilemma using the Distressed Stripes the way I did. I wanted the stripes to be vertical, but my card was wider than the folder. Because I put the folder over most of the lower piece to emboss, by the time I went to do the rest it wouldn't fit in the Cuttlebug machine! And there was no way I could get it to fit. So I set the Cuttlebug plates on the floor and acted like *I* was the Cuttlebug machine and stepped with all of my weight on it. It helped. Not quite the deep impression I wanted, but good enough. Thinking about it now, I bet if I had gotten the paper slightly damp I maybe could've gotten a deeper impression. Oh well, too late. The area that was less "impressive" has the 2 flowers over it. I don't think anyone will notice.

Btw, I stamped the saying before doing the cuttlebugging, but you probably already knew that, huh? You can't stamp on the cuttlebugged part. It won't come out right a-tall. Remember that. You must think ahead like I don't always do. :-P

For the kitty I stamped it first in Pumpkin Pie ink, then very lightly in Chocolate Chip, and then rolled the edges a bit in Basic Black, huffed warm air on it and stamped on the white cs. It gave the kitty a Siamese look, don't you think? I love it because it's splotchy look goes along with the theme of the Basic Grey papers. I spritzed some Copic Special Black ink over the kitty scene using my Inkworx gun to add some interest.

Did you know that you can use Copics in your Inkworx Air Art gun? Just take out the tube inside the cylinder that the screw fits into. That enlarges the holding capacity. Lay the flat side of the marker down and tighten the screw. Voila! Return the tube (after taking out the screw first and then returning it) for regular markers.

I added tiny aqua and amber gems to the collar area to give the kitty a jeweled collar and used a punched-out flower with an aqua gem on the tail. I punched the flower out of the matching paper from the bottom of the card.


I did double stitching around the kitty scene using Bashful Blue cs and black, of course.

The ribbon situation was another area I had some trouble with. At first I was only going to use one ribbon to visually divide the papers. But I felt the upper part of the card still needed something. So I carried the ribbon idea up a little higher and added the black gingham for a little "wow"ness.

The inside was pretty self-explanatory. I used the "plain" Basic Grey papers from Archaic and carried the theme from the outside to the inside. I stitched around the small piece of dp. The inside sentiment is from Stampin' Up! Cheery Chat (retired).


Well, thanks for looking! I will get to the other card soon. Running out of time. May not get it posted tonight.

Stamps: SU Cool Cat, SU Cheery Chat

CS: Black, Basic Grey "Archaic" 6" x 6" pad, Bashful Blue, White

Inks: Pumpkin Pie, Chocolate Chip, Basic Black

Other: Cuttlebug D'Vine Swirls and Distressed Stripes embossing folders, Sewing machine, Flower punch, Amber and aqua gems, Stamp-a-ma-jig, 3D-Dots, Black grosgrain ribbon, Black gingham ribbon, Copic Special Black marker, Inkworx air art gun

Saturday, September 13, 2008

Autumn Thank You


More Fall for ya! I love bringing out the Lovely Leaves set at this time of year. (I'm a little anxious for Fall to get here. Summer has worn out its welcome with all these hurricanes, don't you think?) This card represents the colors I think of when I think of Autumn.

I began with a black base. I put Ruby Red cs on top of that. But first I stamped it in Really Rust using the SU Canvas background stamp. Then I ran it twice (due to size) through the Cuttlebug using the Script folder. Then I sponged over it with Ruby Red ink to pop it out.


For the main piece with the leaves I started with white cs. I stamped the maple leaf in Old Olive, then lightly in Really Rust. Then I sponged Basic Black on parts of the leaf. I huffed on the stamp and stamped on the white cs. I stamped the red leaf in Ruby Red first, then Really Rust. I sponged the leaf with Basic Black here and there and huffed and stamped it on the white cs also. The little leaf was stamped in Old Olive. Another small leaf (hard to see) was stamped in Really Rust.

Then I used Basic Black ink and stamped the outline stamps from Lovely Leaves randomly around the scene. I ran the piece through the Cuttlebug using the Tiny Bubbles embossing folder and then sponged More Mustard and a tiny bit of Ruby Red over the white parts, but tried to avoid the leaves.

I used the corner punch and mounted the white piece to black. I punched 1/16" holes in the corners and added silver mini brads. I added the ribbon and the sentiment piece (details below) and mounted the whole thing on the Ruby Red using Dimensionals. I used Dimensionals to pop the sentiment up as well.

For the sentiment piece I stamped the Canvas stamp in Creamy Caramel on Old Olive cs and then stamped the sentiment from Savvy Stamps in Basic Black over it. Then I punched it out with the small oval punch, holding it upside down to see precisely where I needed to punch it. I then punched a bigger oval in black. I adhered them together with Dimensionals and stuck the sentiment piece on the ribbon with more Dimensionals.


I put that whole piece on the Ruby Red with Dimensionals and used a white gel pen to add dots around several of the black edges a la Faith.

For the inside of the card I took 2 pieces of Ruby Red and sponged them with Ruby Red ink. Then I used the corner punch and took off the corners. Then I used the white gel pen around the edges. I also stamped the outline stamps from Lovely Leaves in 2 corners using Basic Black ink.


Phew! That was a job to explain! I hope you enjoy this card. Thanks for looking!

Stamps: SU Canvas, SU Lovely Leaves, sentiment by Savvy Stamps

CS: Black, Ruby Red, White, Old Olive

Inks: Ruby Red, Basic Black, Old Olive, More Mustard, Really Rust, Creamy Caramel

Other: Cuttlebug Script and Tiny Bubbles embossing folders, Corner punch, 1/16" hole punch, Sponges, White gel pen, Dimensionals, Lg. oval punch, Sm. oval punch, Black zigzag ribbon, Silver mini brads

Sunday, May 25, 2008

Fairy dream card using CTMH Toadstools set

I love the Toadstools set by CTMH, but I rarely use it. Today I decided to play with it and some, you guessed it, designer paper.


First I ran the designer paper through the Cuttlebug using the "Stylized Flowers" embossing folder. Then I sponged it with some dark brown ink to pop it out.

I punched out a black oval and punched 3-1/16" holes in it for the mini-brads. I also punched out 3 squares (1/4") and punched holes in those, too. I assembled the whole lot and adhered it with Dimensionals.


For the word stamp, toadstools and fairy I stamped in a golden brown ink and then marked up the stamps with a black marker. Then I huffed warm air onto them and stamped. That gave a nice multi-colored effect. I used Mini Pop Dots to pop out the fairy. I made an extra pair of wings so the fairy would look more dimensional. I sponged black and moss green inks over the toadstools and fairy. I used Dimensionals to pop out the Dream/fairy scene.

Recipe:

Stamps: CTMH Toadstools, "Dream" stamp by TAC
CS: Dark brown, Basic Grey designer paper, Black, White
Inks: Black, Dark brown, Mossy green, Vintage Photo (golden brown) distress ink
Other: Cuttlebug "Stylized Flowers" embossing folder, oval punch, 1/4"square punch, 1/16" punch, antique copper mini-brads, plaid ribbon, Black marker, sponges, Dimensionals, Mini Pop Dots

Tuesday, April 08, 2008

I stamped today! Fresh Fruits set

It's been a long time.


This is a simple design to start back with. I had to use a flash to get the colors right. I oomphed it up a bit by using the Cuttlebug and the Mesh embossing folder on the pumpkin cardstock. To bring out the relief image of the embossing, I sponged some pumpkin ink over it. Of course, I used black as an accent color, as anyone who knows my card-making style would expect. ;)

To make the pineapple bottom, I used 2 colors of ink: mustard and ruby red - both together created a pumpkin-y color. I stamped first in the mustard, and then in the red, and then on the white cardstock. For the top I used mustard and olive green, stamping in the mustard first, then the olive. Then I rubbed a black marker around the edges of the stamps and stamped over the inked images. I use a Stamp-a-Ma-Jig to position the second images properly. I huffed on the stamps before stamping every time, btw.

Here's a close-up of the pineapple so you can see how nice the inks mesh together and how cool it looks to outline the images:


I really like how the image turned out! I'll be doing this again.

Recipe:

Stamps: SU Fresh Fruits, Amazing to Zany
CS: Black, Pumpkin, White
Inks: More Mustard, Ruby Red, Old Olive, Basic Black, Pumpkin Pie
Other: Basic Black marker, Cuttlebug, "Mesh" embossing folder, zigzag ribbon, oval punch, Stamp-a-Ma-Jig, silver mini-brad, Dimensionals