Showing posts with label SU Riveting. Show all posts

Sunday, June 21, 2009

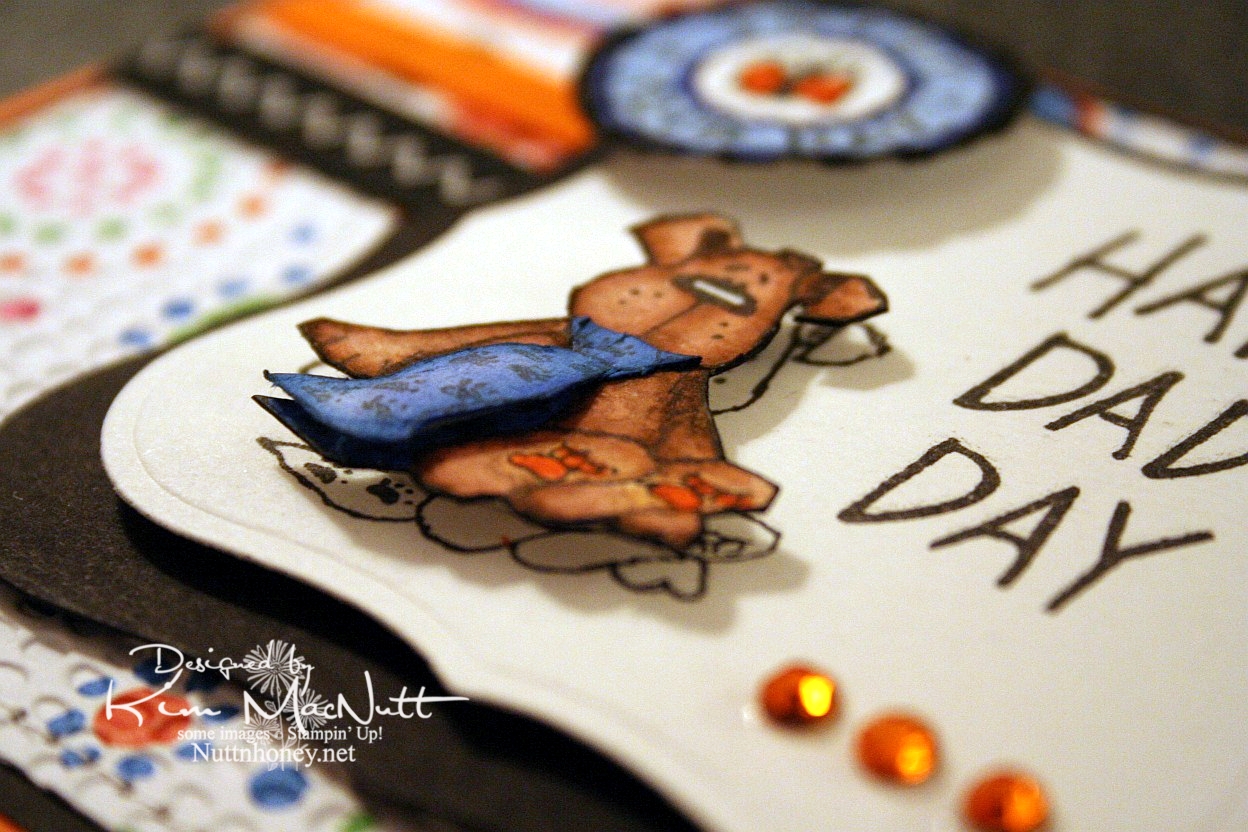
Happy Dad's Day!


Happy Sunday! And Happy Father's Day to all the dads out there (not sure I have any dad readers, but if I do, that's fer you!).

I gave this card to my hubs this morning. He already has his present. He's a tech geek and wanted one of these for Father's Day. It was quite the hit at scout camp (which is why he got it early - he had to share his joy with the other geeky scout dads, of course).

So, all he got from me today was a card and eating out at one of our favorite hole-in-the-wall Chinese restaurants.

This doggy from the Penny Black "Bubbly" set was, I thought, a great Father's Day image, what with the tie and all. I stamped him 3 times: once on the main piece, and twice on scraps, all watercolor paper. Then I cut out the dog and then just the tie to give it extra dimension. I glued the top of the tie down at the neck and used a bit of a dimensional piece to make it stick out at the bottom like a real tie would. I stamped the SU Riveting circle and then punched it out and ran it through the Cuttlebug. Then I put it on with a 3D-Dot.


For the inside I took a Hero Arts stamp from "Happy Dad's Day" (CL335) and blocked the word "Dad" and the exclamation point and re-inserted the exclamation point at the end of "I Love You". That was a bit tricky as the exclamation point kind of gets in the way and it took 2 Post-It notes to get it out of the way.


Well, I've got 2 more cards to get ready to post for you this week. I plan to continue spending lots of time offline as I find it so relaxing, and my kids like it that I'm so available to them! My house stays cleaner, too! Go figure! ;)

Have a wonderful day and week! Be blessed and get in some stamping!

Recipe

Stamps: Penny Black "Bubbly", Stampin' Up! Riveting, Hero Arts "Happy Dad's Day" (CL335) (inside)

CS: Only Orange, black, American Crafts "Celebration" dp, Canson watercolor paper

Inks: Versafine Onyx Black

Markers: Only Orange, Creamy Caramel, Close to Cocoa, Brocade Blue, Bashful Blue, Ballet Blue, Basic Black

Other: Cuttlebug Mesh and Tiny Bubbles embossing folders, Nestabilities Labels One, 1" circle punch, gems, black zigzag ribbon, orange grosgrain ribbon, 3D-Dots, sewing machine, Post-It notes

Thursday, July 31, 2008

Mojo Monday Week #48 With Love


Oye vey! I didn't know if I would EVER finish this card. Some cards come together effortlessly. Then there are those cards that fight you all the way. This be one of them. But I was determined to not let it get the better of me.

I made this card for a dear friend who had a harrowing experience getting a very unpleasant and invasive medical test done. Bless her! I thought she'd be cheered up by this card. It's ironic that I suffered so much making her a card. Life is strange.

I had Julee's current Mojo Monday design already in my head and I think it went so well with showing off the papers I chose, don't you? Here's the design I used:


I fell in love with these papers at Michael's yesterday and knew I had to make something with them. The floral one is an Anna Griffin paper (AG024) and the red one is called "Starburst Translucent" by The Paper Company. They went so well together that I just knew I'd love whatever I did with them.

The red paper is made of weird stuff. My mono adhesive wouldn't stick to it! I had to use mono multi (a liquid glue) to get it to stick. It's kind of wallpaper-ish, slick and smooth. Beautiful, but boy, is it persnickety!

As you can see, I made a scalloped border!!!!!! Yes, and it about drove me crazy, I must say. First I tried doing it with the slit punch. Not good. You have too many little things that can go wrong with that method. So I then tried making one by using the edge of one of my rectangular Nesties. So-so. It wasn't quite wide enough for the piece I needed and the look was o-kay.

So third try was the charm. I used the 1/2" circle punch and made 8 circles of Vanilla cs. Of course, wanting them to adhere to that pesky red paper, I had to use the mono multi messy glue. That was a bit of a pain. But I finally got the circles lined up and attached. I had to trim off a bit on the ends to make them line up with the red paper as you can see. This method, while still quite a headache, was the easiest of the 3 I tried. All I can say is that the scallop punch is going to be worth every penny! EVERY penny!

After not using any Cuttlebug embossing folders on that last card, I made up for it on this card. hee hee! Yes, 3 Cuttlebug folders this time! :D I used "Script " on the floral paper, "Tiny Bubbles" on the red, and "Swiss Dots" on the Mellow Moss circle. I LOVE texture!

I also love ribbon! I used a lot of different kinds, didn't I? This is the kind of look I love: solids, dots and checks. Can it get any better? I want my house to look like this card! lol

And then I went and put a checked red pattern on the main piece of Mellow Moss cs with the SU Canvas stamp using Ruby Red ink. More whimsy, more "texture"!

Lessee, I think the rest is self-explanatory. If not, please ask questions. I'm so tired after making this card that I am probably staring right at something I should explain. Please help me if I forgot something important.

Oh, the moss, black and red circles were made using Nesties. The vanilla circle was cut out using a 1&1/4" circle punch. The heart was punched out with the 1/2" circle punch and the heart has Diamond Glaze on it to pop it out. I used Real Red ink for the heart and colored it with the marker to make it look more "out there" Then I put on the Diamond Glaze.I sponged the edges of the vanilla circles with Basic Black ink to give them some definition.

See, I knew I'd forget something! Dimensionals pop out several of the circles and were also added to the floral/black piece to pop it out from the Mellow Moss.

Phew! I think I got it all. Maybe? Too tired to care.

Thanks for looking! zzzzzzzzzzz

Stamps: SU Canvas, SU Riveting

CS: Mellow Moss, Black, Anna Griffin floral (AG 024), "Starburst Translucent" by The Paper Company, Vanilla

Inks: Ruby Red, Basic Black, Real Red

Other: Cuttlebug embossing folders: "Script", "Tiny Bubbles", and "Swiss Dots"; Nestabilities regular circles and scalloped circle, Dimensionals, 1/2" circle punch, 1&1/4" circle punch, Sponge, Diamond Glaze, Real Red marker, Moss grosgrain ribbon, Black plaid ribbon, Red plaid ribbon, Black polka dot ribbon

Monday, April 02, 2007

Circle of frogs card


Recipe:

Stamps: Simply Circles, Unfrogettable, Riveting

Paper: Black, Pink Passion, White

Ink: Basic Black, VersaMark

Accessories: Prismacolor pencils, Gamsol, blending sticks, Stamp-a-ma-jig, Basic Black marker, Inkworx air art gun, Pinking scissors, Dimensionals, mini Pop Dots, black gingham ribbon, ½” circle punch, 1&1/4” circle punch, circle cutter

Techniques: Prismacolor & Gamsol

I’ve seen circular card themes and always wanted to try it myself. So I decided to use one of the Riveting circle images as my jumping off point. The sitting frog from Unforgettable seemed like a good choice for going around the circle.

(On a side note, normally, the sitting frog has a heart image hovering over its head. I divided the frog stamp up so I wouldn’t have to block the heart image. I attached the heart to the side of the stamp. It will be far more useful to me without the heart. That’s right, folks, my frog has no heart! ;D )

This card measures 5&3/4” width and height. If you want it to fit in a smaller envelope, adjust the size of the background accordingly.

If you look closely at my froggy circle, you’ll see I made some boo-boos. But as much work as it was to get the stamping and coloring done, I’ll live with a few imperfections! I’m working on not trying to be so **** about that sort of thing. ;)

I began by stamping the Riveting circle stamp in Basic Black ink on a big piece of white cardstock. Then, using the Stamp-a-ma-jig, I positioned a frog below and directly above the circle. Then amazingly, I was easily able to position 2 frogs on either side pretty much the same distance apart.

Once I got the frogs stamped I went to work picking colors. At that point I hadn’t decided anything yet, just winged it. I knew I wanted some standard colors, but I chose the more secondary versions of red, yellow, blue and green, and threw in purple and orange for good measure. I used the Prismacolor/Gamsol technique and then added dimension by shading each frog with a color not far from its color on the color wheel. In other words, I shaded the pink frog with a rosy red. I shaded the green frog with an aqua blue. I shaded the blue frog with purple and the purple frog with a dark blue. The yellow frog was shaded with orange.

The frustrating thing with Prismacolors is I can’t erase them if they go outside the lines. I’m not aware if there’s a PC eraser. Anyone know?

After coloring the frogs, I used a circle cutter and cut them out leaving a bit of white space around the edges. Then I mounted it on black and cut the circle size I wanted and then edged it with pinking scissors just for fun. I decided that the background would be pink and chose Pink Passion cs as the closest match. On the Pink Passion cs, I used a couple of the circle stamps from Simply Circles and stamped them in VersaMark ink, and used the Inkworx air art gun and the Basic Black marker for the splotches. Then I mounted the circle feature onto the Pink Passion using Dimensionals and then mounted that on the black. I added a black gingham ribbon as an accent.

To add a little more pizzazz to the overall look, I again stamped the Riveting circle on a scrap of white cardstock and punched out the center with a ½” circle punch. Then I punched the outside of the circle with a 1&1/4” circle punch. I colored in the lines with a black Prisma pencil and adhered it to the center of the circle with mini Pop Dots. Then I stamped the Riveting stamp yet again on Pink Passion cs and punched out the middle and adhered it with mono to the center of the Riveting image below the raised version. That kept the continuity of the Pink Passion background going.

Hope that made sense.

Hoppy Birthday froggy card


Recipe:

Stamps: Unfrogettable, Shapes & Shadows, Hot to Dot wheel, Riveting, Print Pattern

Paper: Black, Sage Shadow, Glossy white, Pretty in Pink

Ink: VersaMark, Basic Black, Sage Shadow, Pretty in Pink, Apricot Appeal

Accessories: Crayon, sponges, Dimensionals, “stamp” deco scissors, zigzag ribbon, mini Pop Dots, circle punch (1&3/4”?)

Techniques: crayon resist

I did the main feature using one of my favorite techniques: crayon resist. I stamped the Unfrogettable critters in Basic Black on Glossy white cs. For added interest, I stamped the twinkle image from Shapes & Shadows. Then I ran a crayon around the edges of the critters and then sponged Sage Shadow, Pretty in Pink, and Apricot Appeal over them. Then I rubbed the crayon off with a rag and mounted the piece to black cs.

I rolled the Hot to Dot wheel twice over the Sage Shadow cs and mounted that to the black. I added the ribbon to the crayon resist feature and mounted that onto the Sage Shadow using Dimensionals.

Then I stamped the “Hoppy Birthday” stamp on Pretty in Pink cs which was already stamped with Print Pattern (a scrap from my collection) and punched it out with a big circle punch. I adhered that to a scrap of black cs and then cut it out using some “stamp” deco scissors. I adhered that to the crayon resist piece with Dimensionals.

I stamped the Riveting image on both Sage Shadow and Pretty in Pink in Basic Black ink. I punched out the middle on both, and then punched the outside of the Sage piece. I mounted the sage piece with mini Pop Dots onto the crayon resist piece. Then I mono-ed the pink center circle piece underneath and in the center of the sage piece.

Wednesday, February 21, 2007

Whale sketch challenge card


Recipe:

Stamps: Silly Sealife, Simply Circles, Riveting, Curvy Verses

Paper: Black, More Mustard, Tag from Basic Grey Blitzen Collection, white glossy

Ink: Basic Black dye ink, Versamark, More Mustard, Really Rust, Bordering Blue

Accessories: Black gingham ribbon, Dimensionals, 1/8" hole punch, Waterbrush, Stamp-a-ma-jig, post-it notes for blocking on word stamp, Inkworx art gun, black marker, 1&1/4" circle punch

Techniques: watercoloring

Here's my contribution to the SC112 challenge. I can't tell you how many times I goofed up that whale and word phrase part. Ugh! I spent waaaay too long on this card, but I'm happy with it, finally.

Tuesday, February 20, 2007

Froggy fun thank you card


Recipe:

Stamps: Unfrogettable, Print Pattern, Simply Circles, Riveting

Paper: Black, Bashful Blue, Apricot Appeal, white glossy, white

Ink: Basic Black dye, Bliss Blue, Summer Sun, Only Orange, Versamark

Accessories: Sponges, crayon, 1&1/4" circle punch, Dimensionals, Black grosgrain ribbon

Techniques: crayon resist

I did the crayon resist technique on the frogs. It's one of my favorite techniques. I used Bliss Blue because I don't have Bashful Blue ink yet. I mixed Summer Sun and Only Orange to get the Apricot Appeal-ish look because, well, I don't have it either. Worked okay, though.