Showing posts with label SU Silly Sealife. Show all posts

Tuesday, May 25, 2021

Silly Whale Birthday

Hello! Another sea-themed card. This time I'm using my old Stampin' Up! Silly Sealife set. The card sketch I'm using is Mojo Monday 560


I chose two papers from the Basic Grey Archaic collection because they are "wavy" like the sea. And one of them has a "bubbly" look that made me think of being under water. The one behind the sentiment wasn't "wavy" or "bubbly", but I liked how it went with the other two. 

I thought the Stampin' Up! Cheery Chat birthday greeting would go very well with the whole look on the front, and I used the matching birthday saying inside. I love the whimsy of the font.

I used the Nestabilities Labels Three die to frame the sentiment, but I'm not sure it was the best choice. Maybe a tad too wide for the look? I dunno.

And, of course, I gave in to using my Tiny Bubbles embossing folder because this card has a water theme...and...bubbles.


My happy little whale is spouting glittery water. 


It's probably hard to see, but I used the D'Vine Swirls embossing folder to create "waves" on the lower bubbly-looking paper. 

And here's the inside. Aren't those sea creatures adorable? This is such a versatile stamp set, I tell ya!


Close-up of the inside.


So, yet another sea card. I think that's my last one for awhile though. Hope you're having a good week! Take care and thanks for coming by!

Stamps: SU Silly Sealife, SU Cheery Chat

CS: Black, Ivory, SU Chocolate Chip, Basic Grey Archaic designer paper

Inks: Memento Tuxedo Black, Versafine Onyx Black

Copic Markers for whale: B0000, B00, B21, BG11, E11, E13, E15

Other: Cuttlebug Tiny Bubbles and D'Vine Swirls embossing folders, Nestabilities Standard Circle Large and Labels Three dies, hole punching tool, foam tape, large brown eyelets, Frosted Lace Stickles glitter gel

Monday, July 19, 2010

Lovely Friend


Hey all! No shiny black hair here yet, but a lovely octopus!

I started out by picking the paper and the octopus from SU Silly Sealife just seemed to fit well with it. It was all an excuse to color really! I looked through my digis and nothing spoke to me. So I went through my rubber stamps and settled on the octopus. You notice I made him a her? It just seemed right since I was making the card fairly feminine. Although, I imagine octopuses aren't very lovely in and of themselves, but God created them so unique that they have a beauty all their own. So there. ;)

Hope you have a lovely Monday, my stamping friends! I have mountains of laundry and dishes waiting for me!

Recipe

Stamps: Stampin' Up! Silly Sealife, Stampin' Up! Amazing to Zany

CS: CTMH Autumn Terracotta, black, Basic Grey Archaic designer paper, white

Inks: Memento Tuxedo Black, Versafine Onyx Black

Copic markers: E57, R02, W3, W5, YG63, YG91, YG93, YG95

Other: Nestabilities Standard Circle Large & Small, Large Classic Inverted Scalloped Circle, paper-piercing tool, sponge mat, large & small oval punches, pearl gems, cream satin ribbon, black gingham ribbon, sewing machine, foam tape, Inkssentials opaque white gel pen, homemade Bow Easy

Tuesday, August 18, 2009

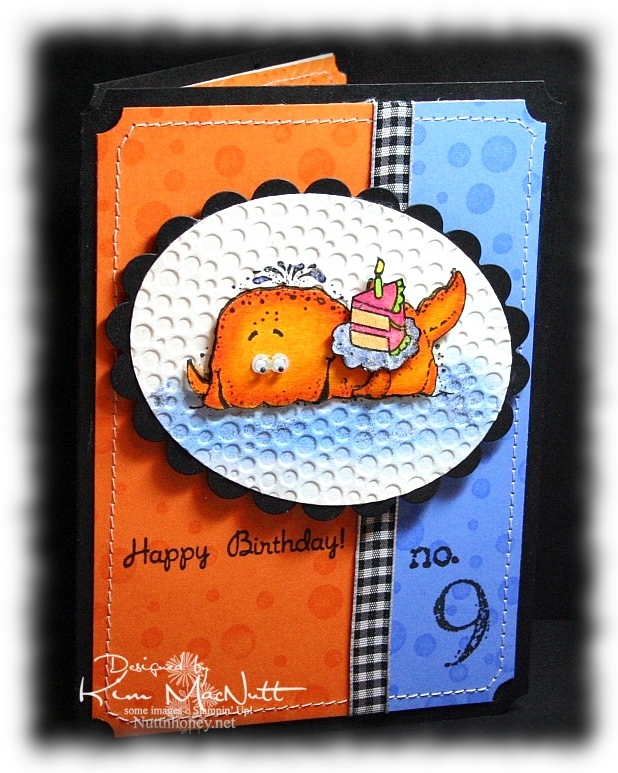
Whale Birthday


Wow, has it really been 17 days since I last posted here?? Well, my mojo just wasn't moving much in those 17 days and the only thing that got me stamping was my littlest's upcoming birthday. I just haven't been in a creative mood lately. I've not even been crocheting much which is odd for me because I love it. I think this whole national health care situation has been weighing so heavily on my mind that it's been hard to relax and do anything fun. Plus, it's so hot and huuuuumid. And the garden has been keeping me busy with the little energy I have in this heat. I canned tomatoes and homemade pizza sauce yesterday. It about did me in! I wish the garden didn't flourish in the hottest part of the year!

So anyway, I made this card for my littlest who just LOOOOOVES fish of any and every kind. When she checks out books at the library, they are almost all about fish and the sea. I knew that I would use either SU Fishy Friends or SU Silly Sealife on her card. I went with Silly Sealife's whale. He's always fun to color.

And for once, I actually stamped the background rather than use a designer paper. I used to use VersaMark ink on pretty much every card I ever made until I fell in love with designer paper.


For the whale, I used Canson watercolor paper and stamped the whale with my favorite black ink: Versafine Onyx Black. Then I colored with SU markers and a few CTMH markers. I started with a darker color (Pumpkin Pie) on the edges. Then I used Summer Sun to blend toward the center. Then I recolored the edges and the inside to strengthen the colors. No water brush. I just used the markers to blend. Works perfectly on watercolor paper!

I used a Post-It note to block the whale while I sponge-daubed Bashful Blue and Ballet Blue inks on the "sea". Then I rubbed a glue stick over parts of the sea and sprinkled blue glitter here and there. I colored the water spouting out of his head with a Bashful Blue marker and glued a bit of blue glitter there, too. "Glued a bit of blue glitter". Say that 5 times fast! lol


The cake is from the Taylored Expressions set "Sweet Celebration". I also used the cake on the inside (see above). I blocked the cupcake part of the image so I could just get the cake inside.

The dimensions of this card are approx. 4.5" x 6". It was made to fit an invitation envelope measuring 4.75" x 6.5". I bought some at WalMart just to have a different size to create with.


Can you guess where our littlest wants to go on her birthday? The Georgia Aquarium, of course! We'll probably go by The Varsity for lunch beforehand. Can't wait!

TFL and have a blessed week! I hope my mojo returns soon! This place has been too quiet!

Recipe

Stamps: Stampin' Up! Silly Sealife, SU Collage Alphabet Numbers, SU Simply Circles, Taylored Expressions Sweet Celebration

CS: Black, Pumpkin Pie, Ballet Blue, Canson watercolor paper, white (inside)

Inks: VersaMark, Versafine Onyx Black, Bashful Blue, Ballet Blue

Markers: Pumpkin Pie, Summer Sun, Bashful Blue, Apricot Appeal, Yoyo Yellow, CTMH Bubblegum, CTMH Citrus Leaf

Other: Cuttlebug Tiny Bubbles embossing folder, Nestabilities Classic Oval Scallops Large, Classic Oval Large, Stamp-a-ma-jig, googly eyes, blue glitter, Frosted Lace Stickles, sewing machine, black gingham ribbon, 3D-Dots, ticket corner punch, sponge dauber

Monday, July 27, 2009

Howdy Octopus!

Well, hey there! Did you wonder why it got so quiet here all of a sudden? Well, I have been busybusybusy! Blackberries are coming in like crazy and I've been picking and picking! I tried my hand at yogurt making the other day and put up some pickles from the garden today. The daily stuff doesn't go away just because I have other things to do, so I am swamped with work. But I love it! Homemaking is such a satisfying occupation for me. I'm so thankful I can put so much of my energy into serving my family. I love being busy around the house. I am leaving the computer off a lot now, so I am much more productive with my time. It makes me happy to have a contented hubby and kids.


This past week I actually got some stamping done! I have 2 cards to share. One in this post and one in a future post, as yet uncreated.

Usually my creative muse will start with stamping an image and coloring it. That's what happened this week. The Silly Sealife set was calling to me and I just had to stamp that adorable octopus! I love coloring that cute little thing! It's so satisfying.

I pulled out some watercolor paper and my markers and went to town. My inspiration for this card was the lower blue paper which is from the Basic Grey Obscure pad (actually, both are). That pad has some really cool papers! The blue paper reminded me of the sea. And it went perfectly with the D'Vine Swirls embossing folder and the octopus, don't you think? I used the inverted scallop circle die to add some extra pizazz. I have still not mastered getting brads right with my Crop-a-Dile yet. t's a gamble every time! So one is right and one is wrong. Can you tell which is which?

TFL! Have a lovely week! Summer's almost over, can you believe it?

Recipe

Stamps: Stampin' Up! Silly Sealife, Wordsworth Howdy SO35-G

CS: White, black, Basic Grey Obscure 6 x 6 pad, Canson watercolor paper

Inks: Versafine Onyx Black

Markers: Bordering Blue, Taken with Teal, Tempting Turquoise, Really Rust

Other: Cuttlebug D'Vine Swirls and Spots and Dots, Spellbinders Nestabilities Large ClassicInverted Scalloped Circles and Standard Circle Large, jumbo brads, natural hemp cord, ticket corner punch, Crop-a-Dile, water brush, piercing tool, sponge mat

Tuesday, June 02, 2009

I've been published! Woot!


I had sent this card in to a magazine almost 2 years ago! It was one of those deals where if you send a SASE with your card you would get your card back if they decided not to use it. I never got it back. I was just wondering the other day about this very card! Isn't that weird? And now it's published! How cool is that? The magazine just came to my house today!

This is the third time I've been published. I'm just so stoked! I need to submit more cards. I'm always so overly critical of myself and usually chicken out. But I should make myself do it! You should, too!

Stamping magazines have been changing hands and names so much lately that I'm not even sure who it was I actually submitted this to. But I'm very thankful they saw fit to use it!


If you get the August issue of Crafts 'n Things you'll find my card in the Reader Gallery on page 96.


I want to give a shout out to my stamping friends Connie Babbert and Sue Erickson who also got their cards published on this same page! Congrats, ladies!!

Have a wonderful day today, everyone!

Thursday, June 19, 2008

Published again!

I wanted to wait until I was sure my cards were in the magazine before I said anything. Well, they are! I was published a second time in Rubberstampmadness magazine! The July/August 2008 issue!


They put 2 of my cards in an article called Tools of the Trade mainly because my cards had lots of embellishments. I used the Cuttlebug and embossing folders, mini-brads, vellum, watercoloring, etc.


Before mailing off the cards, I took pictures of them:


It's so much fun to see one's own artwork in print. And the people at Rubberstampmadness are so nice to deal with. Send in your cards and get published!

Thursday, May 24, 2007

Shark card, but not a card shark ;)


Recipe:

Stamps: Silly Sealife, "Happy Birthday" from Savvy Stamps

Paper: Taken with Teal, Black, Real Red, More Mustard, white

Ink: Basic Black; Markers: Tempting Turquoise, Taken with Teal, Real Red, Ruby Red, Baroque Burgundy

Accessories: Cuttlebug Spots and Dots and Traffic Jam embossing folders, oval punch, 1/16" punch, 1/4" punch, circle cutter, silver brads, waterbrush

Techniques: watercoloring

The only hard thing on this card is the shark. It about drove me bonkers! I recolored it so many times, I lost count. And what I ended up with was nothing special, but it worked. I used markers and a waterbrush to do the shark. It was hard getting the red on him to match the red cs, but it's fairly close, I think. The frustrating thing is I forgot what colors I used. I made this weeks ago and thought my 45 yo brain would remember. Ha! What was I thinking?? I'll try to remember as best as I can.

For his back, I think I used several reds. Definitely used Real Red, but it was took pinkish to match the cs alone. So I'm pretty sure I added Ruby Red and probably a touch of Baroque Burgundy, but don't quote me! There was lots of blending!

For the belly, I think Tempting Turquoise was used some, and maybe some Taken with Teal. But I honestly can't be sure.

I should've done a shadow under him now that I look more carefully at the card. Next time, I will.

I mounted him on Taken with Teal that was sponged with black ink.

The half circle was actually cut with the circle cutter partially off the piece of cs. That kept me from having to cut the straight side later. I used Cuttlebug Spots and Dots and Traffic Jam embossing folders for the textured patterns. I used an oval punch for the word stamp. The word stamp came from savvystamps.com.

I used silver brads and punched black circles to create the rivet look. I first punched 1/16" holes in black cs, and then punched 1/4" circles over them.

The rest is hopefully self-explanatory.

Tuesday, March 13, 2007

Turtle watercolored card


Recipe:

Stamps: Simply Circles, Silly Sealife, Paint Prints, For the Love of Chocolate, Magenta mesh stamp

Paper: Always Artichoke, Black, Basic Grey "Blitzen Collection" designer papers, Glossy white

Ink: VersaMark, Basic Black, Baroque Burgundy, More Mustard; Markers: Always Artichoke, Baroque Burgundy, Old Olive, Apricot Appeal

Accessories: Cuttlebug Tiny Bubbles embossing folder, large circle punch, small (1&1/4") circle punch, small oval punch, 1/16" hole punch, Dimensionals, sponges, antique copper mini-brads

Techniques: watercoloring, sponging

Well, I'm a bit "early" this time! lol It's ONLY Tuesday. I am really happy with this card. Don't you just love it when your work gives you such pleasure?

Here is this week's Sunday challenge.

I did a little thinking outside the box on this one. Amy had the image feature as a square-ish rectangle and I decided to do a circle. I had been wanting to play with that Silly Sealife turtle for quite some time, so this was my chance to make him shine. Of course, I watercolored him! ;) I'm going crazy for watercoloring! Just love it!

My bigger sentiment didn't quite reach the vertical element to the left as Amy's does, but otherwise, it stuck pretty close to the plan.

To create this card I cut Always Artichoke cs so that it opened from the bottom. I stamped the big and small circles from the Simply Circles set around the edges in VersaMark ink. Then I sponged Basic Black over that to give it a softer look.

I then cut a piece of Basic Grey designer paper from the Blitzen collection and ran it through the Cuttlebug using the Tiny Bubbles embossing folder. I made sure the printed side of the paper would receive the concaved (inward) imprint rather than convex (outward). Then I mounted it on black cs.

I cut the other elements going across and down and matted them with black cs. The one to the left I stamped in Basic Black using a Magenta mesh stamp. Then I sponged it in Basic Black ink. I then used a 1/16" hole punch and made holes for the brads. I then affixed the brads to the piece and mounted it using Dimensionals.

For the turtle element, I stamped on glossy white cs twice. I punched out one of the turtles with a 1&1/4" circle punch. Then I watercolored the other one using Baroque Burgundy, Always Artichoke, Old Olive, and Apricot Appeal markers, cut him out carefully, and mounted him directly over the other turtle with Dimensionals and trimmed off the part outside the circle. I had to cut a tiny piece of a Dimensional to hold up his widdle head. :)

Next, I mounted the turtle(s) on the black circle and cut a 1&1/4" circle out of another piece of black cs. Then I positioned the bigger circle punch over the smaller punched hole right where I wanted it (hold the punch upside down so you can see where you're cutting) and punched that out. Then I mounted it to match with the bottom black circle and made sure the smaller hole was lined up with the white circle/turtle image (hope that wasn't too confusing).

I stamped the "delight" image from the Paint Prints set in Basic Black on glossy white and sponged it with Baroque Burgundy, More Mustard, and Basic Black. I masked a stamp from the For the Love of Chocolate set for the words "in life" and stamped it on Always Artichoke. I punched it out using the smaller oval punch and sponged it with Basic Black. Adhered all that on and was finished!

Lots of work, but worth the effort, I think.

Monday, March 12, 2007

Orange watercolored whale card


Recipe:

Stamps: Silly Sealife, Amazing to Zany, So Very

Paper: Not Quite Navy, Pumpkin Pie, Black, White glossy

Ink: Pumpkin Pie, Basic Black; Markers: Pumpkin Pie, Summer Sun, More Mustard, Close to Cocoa, Not Quite Navy, Bordering Blue

Accessories: Dimensionals, sm. oval punch, zigzag ribbon, water brush, Cuttlebug D'Vine embossing folder, Stamp-a-ma-jig

Techniques: Watercoloring

Yes, more watercoloring. It's so much fun. I can't help myself! And yes, I snuck black in this one, too, even though I tried to hold back. I just love the contrast against the black. What can I say?

I had actually intended this card to be yellow and orange. I was in a down mood from some real life issues and needed some cheering up and was using some orange and yellow gingham as a jumping-off point. Then I turned left and went for the zigzag instead. Despite the black and dark colors, I did find this card to be quite cheerful. How can it not be with that cute little whale? Now, if I could just learn to photograph well! Urgh! (Fixed it - just need to photograph in the early part of the day, NOT at night!)

I love the Silly Sealife set. It's just so precious! I need to pull out the Fishy Friends stamps so they can all make friends with each other, eh?

Monday, March 05, 2007

Purple octopus friend card


Recipe:

Stamps: Canvas, Silly Sealife, Amazing to Zany

Paper: Black (yeeees, again), Eggplant Envy, Glossy white

Ink: Basic Black dye, Versamark, CTMH Dutch Blue

Accessories: Markers: Eggplant Envy, Bordering Blue; Cuttlebug D'Vine embossing folder, circle punch, Black gingham ribbon, Black polka dot ribbon, Dimensionals, water brush

Techniques: watercoloring

I've been wanting to do another Silly Sealife image in watercolor ever since I did the whale. So here's the octopus. :)

On glossy white cardstock I stamped in black dye ink. After it dried, I used my Eggplant Envy marker for the reddish-purple parts and a CTMH ink call Dutch Blue for the bluer areas. I used the Bordering Blue marker for the shadows. I just kept adding and building and building and adding, blending with the water brush as I went. I left an area almost completely unpainted for the shine on the head, but I did put a slight amount of the blue there so it wouldn't be too stark. I built up the lower areas a bit darker to give some roundness to the image.

If you've never tried watercoloring, give it a go. It can be such fun!

Wednesday, February 21, 2007

Whale sketch challenge card


Recipe:

Stamps: Silly Sealife, Simply Circles, Riveting, Curvy Verses

Paper: Black, More Mustard, Tag from Basic Grey Blitzen Collection, white glossy

Ink: Basic Black dye ink, Versamark, More Mustard, Really Rust, Bordering Blue

Accessories: Black gingham ribbon, Dimensionals, 1/8" hole punch, Waterbrush, Stamp-a-ma-jig, post-it notes for blocking on word stamp, Inkworx art gun, black marker, 1&1/4" circle punch

Techniques: watercoloring

Here's my contribution to the SC112 challenge. I can't tell you how many times I goofed up that whale and word phrase part. Ugh! I spent waaaay too long on this card, but I'm happy with it, finally.