Showing posts with label Sizzix. Show all posts

Saturday, August 17, 2024

Hello Friend ๐Ÿ˜Š

Hi, there! It's been a while! I haven't stamped for a couple of years. I was a bit rusty making this card, but it's all starting to come back to me. The thing about stamping is it's a very expensive hobby to get into. But the stuff you buy lasts a good, long time - most of it, anyway. I have so many lovely older stamp sets, papers, dies, etc. to play with. I still even have my Stamp-a-ma-jig! Anyone else still using theirs? I mean why buy the 10-times-better newest gadgets when the old stuff still works just fine, right? 

I hope to be sharing more on here in the near future. Not sure if I'll be the only one visiting my old stamping blog at this point๐Ÿ˜„, but if you came by for a visit to see if I was here, thanks so much and please leave a comment to let me know!

Take care!

Recipe:

Stamps: Stampin' Up! Unfroggetable, Stampin' Up! Amazing to Zany

CS: Prima Doodle Deux decorative papers, White, Black

Ink: Memento Tuxedo Black,

Copics: BG11, BG13, E41, W1

Other: Cuttlebug Tiny Bubbles embossing folder, Taylored Expressions Chevron Border die, Sizzix Architectural Accents die, paper piercer, sponge mat, Stamp-a-ma-jig, googly eyes, Stickles Fruit Punch and Frosted Lace glitter glues, black gingham ribbon, foam tape

Tuesday, February 07, 2012

Hedgie friendship


Isn't this image adorable? Can Penny Black's hedgies be out-cuted? I don't think so! I love these images for coloring. They're great fun. I only wish they were bigger so I could color them longer.

Here's a peek inside. I added the ribbon as an afterthought, so it's not neatly tucked away. But I tried to make it look attractive anyway.

I love gatefold cards!


Cute little hedgie. This card was almost a St. Valentine's Day card as I almost used the Hugs and Kisses stamp from All Year Cheer, an old Stampin' Up! set. Instead, I took the friendship stamp from Close to My Heart's Geometric Thoughts.


Well, howdy-doo, I stamped, people! Throw a party! lol

Wednesday, March 03, 2010

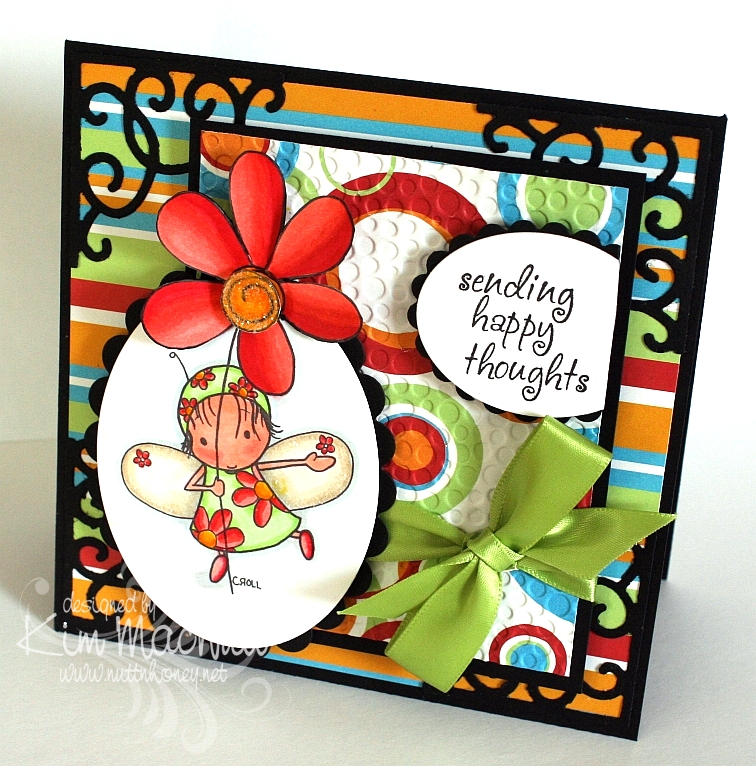
More Spring - Sending Happy Thoughts


Hello all! I am so wanting Spring to come. Can you tell? Ha!

This Tiddly Inks image grabbed my attention when I was surfing over at Etsy for digital stamps. Interestingly, she's called Spring HuggaBugg. She certainly does make one feel like it's Spring to look at her with her adorable flowery dress and her big flower. I loved coloring her.

I used the technique I posted about yesterday on the main image. It was a little tricky getting the die to line up properly after placing the trimmed flower out of the way before cutting the oval. I had to cut into the flower more than I expected, but I like it better that way. So it happily worked out.

I am loving my Copics! I know I say that a lot, but I can't help it! They are just so nice. And so forgiving. I like that!

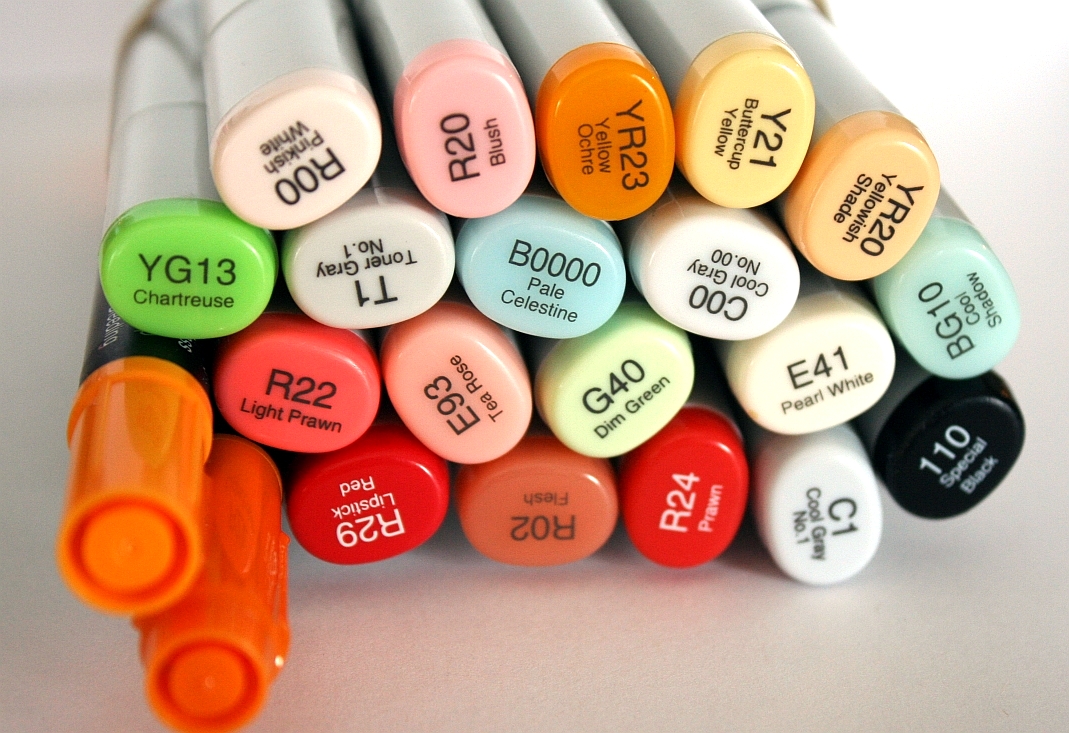
Here is a pic of the colors I used:


The black was used around the edges of the flower, carefully. I prayed my way through that part because I did it after the card was finished. Phew! I was relieved I didn't ruin anything!

It might be hard to see, but I used Crystal Snow fine white glitter on the center of the flower and on the edges of her wings. Just a little extra zing thrown in.

I used my homemade Bow Easy again to make the bow. It's getting easier each time. I don't need to look at the tutorial anymore!

I had started this card before I found out about this week's color throwdown colors, so I was tickled pink that I used colors very similar to them. A little serendipity in my week!

I did the Midnight Madness #43 sketch challenge over at the "priscillastyles" blog, but chose the simpler one of the two and embellished it differently, as I could not think of anything to put where the butterflies were on the more complicated version.

Hope your week is going well! We had snow yesterday and it's pretty much gone already. That's 2 snows this Winter in NE Georgia! Very unusual! Have a blessed evening!

Stamps: Spring HuggaBugg by Tiddly Inks, Sending Happy Thoughts from Hero Arts CL305

CS: Black, Celebration AC Patterned Paper by American Crafts, Papertrey Ink Stamper's Select White

Inks: Versafine Onyx Black, printer

Copics: B0000, BG10, G40, YG13, Y21, YR20, YR23, E41, E93, R00, R02, R20, R22, R24, R29, C00, C1, T1, Special Black 110

Other: Cuttlebug Tiny Bubbles embossing folder, Nestabilities Classic Oval Small, Classic Oval Scallop Small, Sizzix Architectural Accents die, SU Pumpkin Pie marker, SU Summer Sun marker, 3D-Dots, green satin ribbon, Crystal Snow fine white glitter, glue pen, Diamond Glaze to glue down bow


Wednesday, June 24, 2009

Just Saying Helloooo


Happy Wednesday to you all!! I am offline for the week, but I wanted to share with you this card I made just for the fun of it. Way back when I stamped mainly for holidays, but sometimes it's fun just to stamp for stamping's sake, isn't it? I try to do that more and more these days.

I just love this cute owl from the Hero Arts set, "Sending Happy Thoughts"! He would look even cuter with bigger googly eyes, don't you think?

NIFTY TIP ALERT!! I stamped the saying over him in a strange way. I bent it into a curve and put it on my acrylic block and then stamped. Cool, huh? I saw someone do it and thought how neat that was, so I tried it myself. Some clear and unmounted stamps can't bend very easily, but some are quite flexible!

I sponged Tim Holtz's Distress Ink Vintage Photo on the striped middle area to cover the cracks in the paper after running it through the Cuttlebug using the Forest Branches ef (thin papers will do that).

I used one of those Sizzix Architectural Accents dies on the corners of the card. What I did was, after running the die through the Cuttlebug 4 times to make 4, I ran the die cuts back through the Cuttlebug using the rubber mat and several pieces of cardstock to flatten them. That way they would match once two of them were flipped over to mirror the other two. It worked pretty well!

For the inside, I carried the theme of the Spots and Dots ef, the polka dot ribbon and the Mellow Deciduous dp. The saying is from the same set.


I will be sharing one more card this week and then I'll see you on the weekend! It's been really hard getting in everything I want to do online in the short time I allow myself, so some things have fallen through the cracks, I'm sorry to say, like time to blog hop. Still trying to figure out how to remedy that or if it can even be remedied. I'm always hopeful. Hope is one thing we always have!

Blessings on your day!

Recipe

Stamps: Hero Arts "Sending Happy Thoughts" (CL305)

CS: Chocolate Chip, Basic Grey Mellow (Deciduous) and Stella Ruby, black, Canson watercolor paper, white

Inks: Versafine Onyx Black, Chocolate Chip, Tim Holtz Distress Ink Vintage Photo

Markers: Creamy Caramel, Close to Cocoa, Really Rust, Ruby Red, Copic Special Black (110), Old Olive, Always Artichoke, Summer Sun

Other: Cuttlebug Spots and Dots, Forest Branches and Mesh embossing folders, Nestabilities Classic Circle Small, Scalloped circle, Sizzix Architectural Accents die, sponge dauber, 3D-Dots, black polka dot ribbon, Xyron 150 Create-a-Sticker (permanent), googly eyes

Thursday, May 28, 2009

Hi There! Penny Black cuteness and an award!


Good evening!!

I have loved Penny Black stamps ever since I saw them for the first time over 7 years ago. But do you think I ever bought one?? Why I hold off on getting things I love I do not know.

Well, I went into Archiver's yesterday. Need I say more? Penny Black is now offering their adorable images in clear stamp format and in sets!! Now I have no excuses. I was totally taken with the Micey Day set. I couldn't wait to get them home and color them!

And do you know what I found to be a perfect mouse-y color? True Thyme. Remember True Thyme, one of those Stampin' Up "In Colors"? It is PERFECT. Perfect Perfect Perfect. I hardly ever use that color even though I like it. But I can see that there will be more opportunities now that I have mice to color, and cats and dogs! (more on that when the time comes) If you have any True Thyme ink and you have any animal stamps you'd like to color, I recommend it as a wonderful color choice!

I want you to know that I could not get the colors adjusted right in these pics. The purples are redder than they really are and the blues are bluer than they really are. I used Pale Plum and Perfect Plum and Bordering Blue and Brocade Blue to color with. So try to imagine that when looking at these.

I was so taken with Tosh's Wisteria card and Amy's also, that I grabbed a Basic Grey Wisteria pad while at Archiver's. It's colors are just perfect for the inks I chose.

This sketch is from this week's Mojo Monday (week 88). I went a bit outside the box and used the Labels One Nestabilities dies to create my 2 columns behind the circle. I hope you can see the tiny greeting to the left of them. I bought that in a set by TAC years ago and can't recall the name. If anyone knows it could you educate me so I can write it on the stamp storage box they're in? I thought it went so well with this image. So sweet!!

You'll notice, no Cuttlebug embossing! I know, hard to believe! I just decided to skip it for a change. I thought there was enough busyness on this card already. I did add the Sizzix Architectural Accents die cuts, though. The corner on the top left just needed something. Then I felt it needed to be balanced on the bottom right.

I had so much fun watercoloring this image! I used Versafine Onyx Black ink on Canson watercolor paper (found at Hobby Lobby). Then I colored with markers, water brush and ink pads.


In case it's hard for you to see, I wanted to point out that I took a scissors blade to the edges of the Wisteria papers as I wanted a really rough edge on them. The thread cutter does a nice job for a light distressing, but the scissors really rip that edge!

Now, on to the award! Sandee over at Simply Southern Sandee has awarded me the Exalting Christ award! This is my second time receiving it and I feel honored that Sandee would pick me as one of her recipients! Thank you, Sandee!! You're a dear!

Well, thanks for looking and have a wonderful day tomorrow! Can you believe that the weekend is already so near?

Stamps: Micey Day set by Penny Black, "hi there" sentiment by TAC

CS: Black, Basic Grey Wisteria, Canson watercolor paper

Inks: Versafine Onyx Black, True Thyme

Markers: Pale Plum, Perfect Plum, Bordering Blue, Brocade Blue, Mellow Moss

Other: Nestabilities Labels One, Standard Circles Large, Standard Circles Small; Sizzix Architectural Accents die, Basic Grey Porcelain brads, 3D-Dots, Sticky Doos, water brush, black rick-rack ribbon, sewing machine, Stamp-a-ma-jig, Xyron 150 Create-a-Sticker, scissors for creating rough edges on dp, Inkssentials opaque white pen (for highlights on cup handle)

Friday, May 15, 2009

Grand Old Flag


If I told you how many hours I spent trying to get this card done, you would fall over in disbelief. But it's done, praise God! This was one prayed-for card!

Sometimes it's that way when I sit down to stamp. Other times it comes right to me and everything works. But most of the time I do struggle a bit, at least, to get it to where I like it.

This card actually started yesterday. It's gone through so many metamorphoses that I don't think much of the original idea is even evident in the finished product at this point. It was to start with the flag stamp from the God Bless America set by Our Daily Bread Designs.

I tried many different ideas and color schemes and got closer to the finish line once I picked those Sizzix Architectural Accents corners and a piece of Ruby Red card stock. I DTPed the RR cs with Ruby Red ink and sponged the edges with Versafine Onyx Black ink and voila! I was inspired! I don't know if it's sacrilegious to have a bit of an Oriental theme for an American flag card, but I like it.

Nifty tip alert! The sandwich I use for this particular Sizzix die in my Cuttlebug is A+1 piece of scrap cs+B+die (facing up)+cs+B. Basically, it's the sandwich for the embossing folders plus an extra piece of cs tucked in between the A and B plates to add just a bit of extra thickness. If you use designer paper, the extra piece of cs might not be necessary. Experiment on scraps to find the best sandwich for your machine.

To get those die cut corners to stick I ran them through my Xyron Create-a-Sticker (Model 150) using permanent adhesive and then used a rubber eraser to remove the goo that was visible once they were positioned into place.

For the flag, I stamped it in Versafine Onyx Black ink on white cs and colored it with Ruby Red and Night of Navy SU markers. Then I DTPed it with Tim Holtz's Antique Linen Distress Ink. While it was still damp I crumpled it up and spread it out. This caused it to rip a bit which I liked. It gave it an old feel. Old, worn flags are the dearest.

The Pledge circle was stamped in Versafine Onyx Black on Creamy Caramel cs and then DTPed with Antique Linen ink. Then it was sponged with the black ink around the edges.

TFL and have a wonderful weekend!

Stamps: I Pledge Allegiance single stamp and God Bless America by Our Daily Bread Designs

CS: Black, Ruby Red, Creamy Caramel, white

Inks: SU Ruby Red, Versafine Onyx Black, Tim Holtz Antique Linen Distress Ink

Other: Cuttlebug, Sizzix Architectural Accents die, Nestabilities Large Pinking Circles, Standard Circle Small and Long Classic Rectangles Large, sponge daubers, SU Ruby Red marker, SU Night of Navy marker, gingham ribbon, Sticky Doos (for flag to raise up high), 3D-Dots, Xyron Create-a-Sticker Model 150 with permanent adhesive, rubber eraser

Friday, May 01, 2009

ODBD May Release Day!! Blessed is the nation...


Today is the day if you've been wanting to purchase some great patriotic stamps with a Christian bent for your 4th of July cards! Our Daily Bread Designs has some nice new sets!

Not only is ODBD releasing new stamps, but there's also a sketch challenge for May! Yes, ODBD is having a sketch challenge! If you choose to play, please watch the ODBD blog for details. The info you need will be posted on Saturday, May 2nd.

This card is my first for the sketch challenge. I'm using one of the sentiments from the In God We Trust May release.

Unlike most patriotic cards, this one has very muted reds, whites and blues. I actually did not intend that. It just happened. I actually started with very vibrant versions of those colors. And I just wasn't happy with anything I was doing. So I dug into some new designer papers Kelley is now carrying in her store. and found some great choices. Who says you must use only bright colors on a patriotic card?

The ones I used are not specifically patriotic, but still work. They're from Memory Box. The biggest and smallest pieces are from the same paper taken from the Poppyfinch collection. The bigger one was just sponged a lot with ink and looks more muted. The reddish piece is from the Rhubarb Tart collection. The oval piece is from the Basic Grey Granola collection. Kelley doesn't carry that one, but she does carry several Basic Grey papers and is expecting more in!

I used the Cuttlebug Tiny Bubbles embossing folder on the biggest piece and then sponged Tim Holtz's Vintage Photo and Black Soot Distressed Inks very lightly over the raised part. Then I sponged some SU Bashful Blue ink over that. I just recently bought some Tsukineko Sponge Daubers after avoiding them for years because of the cost. I LOVE them! They are so much nicer to use than the big pieces of cut-up sponges I've been using all these years! I should've given in sooner!

I sponged a bit of the brown and black inks around the reddish piece (although, it's not terribly visible) and then used SU's spiral punch on one side.

The smallest piece and the piece with the Scripture have paper piercing done with the Ornare Decorative Corners piercing template.

I did the scrolled corners using my Cuttlebug and a Sizzix Sizzlit die from the Architectural Accents set. Boy was it hard getting the pressure right to cut them out! Too much and it feels like you're gonna break the die. Too little and you can't punch it out completely. Oye!

The cross is a sticker from EK Success Jolee's Boutique. I found it at Target. I sponged it with the brown, black and blue inks and added 2 small pearls to the one in the center which came with the sticker. Kelley doesn't sell this particular cross, but she has some similar ones in her store.

Well, thanks for looking and I hope you play in the sketch challenge! At SCS please put in the keywords: ODBDSC03 and ODBD.

Stamp: In God We Trust by Our Daily Bread Designs

CS: Black, Memory Box Rhubarb Tart and Poppyfinch, Basic Grey Granola

Inks: Versafine Onyx Black, Tim Holtz Distressed Inks Vintage Photo and Black Soot, SU Bashful Blue

Other: Cuttlebug Tiny Bubbles embossing folder, Nestabilities Classic Oval Large and Small, Ornare Decorative Corners piercing template, Sizzix Sizzlits Architectural Accents, Pearls, EK Success Jolee's Boutique cross sticker, SU spiral punch, 3D-Dots, Tsukineko sponge daubers