Showing posts with label Cuttlebug - Polka Dots. Show all posts

Wednesday, January 01, 2014

Christmas wedding card

I have never made a wedding card with a Christmas theme before, so this is my first time trying to combine the two. My daughter's fiance's aunt (got that?) asked me to make her a card with this in mind. So here's what I came up with:


I had a whimsical saying stamp from The Angel Company that went perfectly with the wedding cake from SU Sweet Treats. All I had to do was use green and red and make it a bit festive and it would work. The tricky part was the inside sentiment. I didn't have one in a similar font, and had I been more together I probably could've hunted down the font and made my own sentiment. Oh, well. As it was I was in a hurry to make this card in the midst of all the painting I was doing. Which is now why I'm only posting this in January, weeks after making the card.

To festive it up I used gems. They always jazz up a card. And I have them in my stash.


Another way I jazzed it up was to use a glimmer spray on the cake itself. I blocked the red ribbon and the flowers so it would only go on the cake. I did this by making a copy of the image and cutting out the parts I wanted to get glimmer spray on, leaving the rest to cover the other parts.


For the inside sentiment I used the I Corinthians 13 stamp from Our Daily Bread Designs because every married couple needs to know what love truly is.


I also carried some of the elements from the front to the inside.

I enjoyed sharing this card with you. I hope you have a marvelous new year filled with many blessings!

Stamps: SU Sweet Treats, TAC wedding saying, Our Daily Bread Designs I Corinthians 13 sentiment (inside)

CS: White, Red, SU Old Olive, Black0

Inks: Brilliance Graphite Black, SU Real Red

Other: Cuttlebug Polka Dots and Birds and Swirls embossing folders, Nestabilities Scallop oval, and regular oval dies, SU Scallop Trim border punch, various Copic markers, glimmer spray, red gingham ribbon, clear ep, foam tape, gems, 1/8" hole punch

Wednesday, October 16, 2013

Paris in the Spring birthday card

Well howdy there! Yes, it's another card from me! Amazing, I know. I'm feeling such a strong desire to stamp right now. It's wonderful! Almost every day I stamp and create a little. I love it!

This card is more what I normally do, but you'll be seeing me go back to my stamping roots in the near future. I've got another card I'll post soon and I'm almost finished with a third. My mojo is back, y'all, and it's all because I am playing like I used to!

I had actually made parts of this card many months ago, and was re-inspired to finish it whilst going through my cardstock pile and finding pieces of cards I had started. Do you have a cardstock pile that forms every time you make a card? I usually do, and it normally grows with each project, gathering dust in the process. But I got it all put back and now have my cardstock within easy reach so I can put scraps in their proper place. I keep a box like this nearby for smaller scraps so I am more likely to grab them instead of reaching for a new sheet. It works! I feel so good using my scraps up!


I realized how perfect this saying from SU Loads of Love Accessories was with this image from SU Paris in the Spring.

The middle flower and the smallest flower were inked up with a Copic marker. It was so easy to make the white flowers into whatever colors I wanted and was much less messy than pressing the flowers on an ink pad (my old way) which soaks up a lot of ink.


All coloring was done with Copics.


See the wheel stamping I did below? I have totally ignored my lovely wheel stamps for far too long! Btw, you can also see that I started to write in the card before I realized I hadn't photographed it yet. Oops! It went in the mail to my sister today!


More Copic coloring. I did a little doubling and tripling up on the colors to make the images more whimsical.


Tried hard to copy the outside image coloring inside. Considering that the outside image was done months ago, I found it a bit challenging. But the FUN kind of challenging!


Well, I hope you enjoyed this birthday card I made! Thanks for coming by!

Stamps: SU Paris in the Spring, SU Loads of Love Accessories, SU Swirl Style Wheel, Fiskars Make a Wish Quotes

CS: SU True Thyme, Tim Holtz Idea-ology Paper Stash: Lost and Found, White

Inks: Copic markers, Memento Tuxedo Black, Versafine Onyx Black, VersaMark, SU True Thyme

Other: Martha Stewart Arched Lattice border punch, Nestabilities oval die, Cuttlebug D'Vine Swirl and Polka Dot embossing folders, Cloth flowers, Gems, Grosgrain ribbons

Monday, September 30, 2013

A little stamping done!

After a long break from doing anything stamping-related I recently made some cards for family and a friend. I've not been following the stamping trends or buying anything new, so I'm clueless as to what is currently popular. Just trying to be content using what I already have. It's been very enjoyable and I hope the urge lasts.

This one was for a good friend of mine. I took a white pompom and colored it with a yellow Copic marker for the hat top. I used black string to give the balloons a little dimension, and also popped out the left balloon with a dimensional dot. I did a nifty stitch on the ribbon that makes me think of a heartbeat and zigzags just to jazz the edges up a bit. Let me just say, corners are so hard to stitch!


I could not get the colors in the upper and lower pics to match, so please forgive the differences. You can see the pompom, string and the balloon more closely below (and every stray bit and boo-boo that I never catch until after I look at the pics!)


I made this one for my hubs last year for his birthday, but never posted it. Probably should've avoided the overuse of the Mesh texture. Oh, well. I had fun doing the crazy sewing stitches all over the place!


Squiggle squiggle! Love it!


And this one I made him this year. More guy-ish for sure, and he loves classic cars. I made mine to look kind of like a rainbow trout. I don't know why! I just did!


Still love using LOTS of texture on my cards. All coloring was done using Copics.


I went wild with my sewing machine on all of these cards, trying different stitches. Turning corners was tricky, so I had to kind of ad lib because of what I ended up with. I threw in the gems in a funky way to play along with the jumpy stitches. It sort of works, I think.


So that's all the stamping I've done so far, but I have another birthday I need a card for, so there's more stamping in the near future.

Not sure if anyone still comes here anymore, but if you do, thanks for stopping by!

Sunday, September 09, 2012

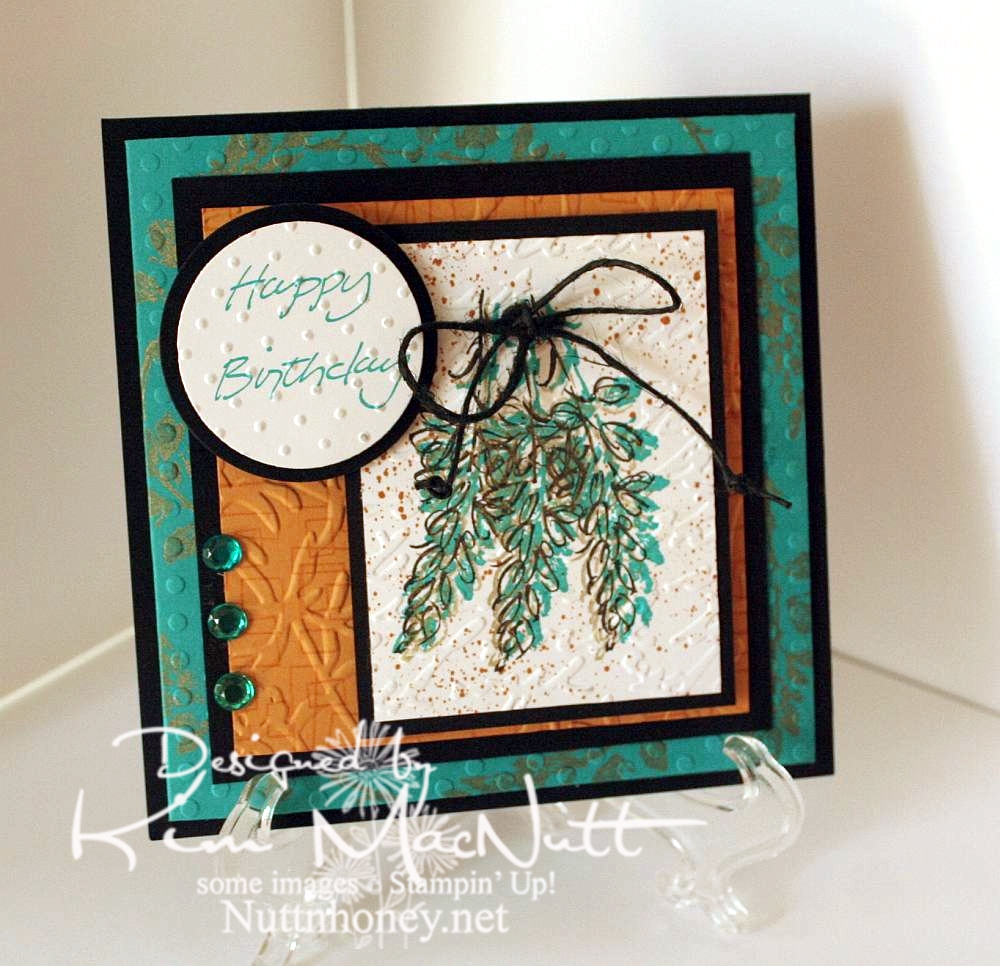
Petal Prints: An old favorite reCASEd

I needed a card for my mother-in-law's upcoming birthday. While looking through my stash I came upon this card that I had made quite a few years ago:


I thought that since my style has changed a bit since then, why not do an updated version for her? So here's what I came up with:


I left out the oriental symbol and did a little cuttlebugging - okay a LOT of cuttlebugging. ;)

For the image, I stamped 3 times with a shadow stamp from SU Petal Prints (long retired, I'm sad to say) using SU Taken with Teal ink Then I took the matching outline stamp and stamped over each one with Encore Gold. Then I stamped each one again with Versafine Onyx Black. Then I used my air art gun and a More Mustard marker and spritzed the image. When it was dry, I poked holes on either side of the grouping and ran a black hemp cord through and tied it in a bow. I then made little knots on the ends to oomph it up a bit.

On the Taken with Teal cardstock I stamped the same shadow stamp in Encore Gold around the edges. Once it was dry enough I embossed it using the Polka Dots folder.

For the SU More Mustard cardstock I stamped the boxy border from another long-retired SU set called Smorgasborders in VersaMark ink. Then I ran it through the Cuttlebug with the Floral Screen embossing folder (I inserted the cs in the folder upside down). I used the Script embossing folder over the image and the Swiss Dots folder over the greeting (from SU Simple Sketches), which was stamped in Taken with Teal.

Thanks for having a look! I made another card yesterday for a friend whose birthday is Monday. I'll post that one once I get a decent pic taken of it. September is a big birthday month around here!

Have a blessed Sunday!

Recipe:

Stamps: SU Petal Prints, SU Smorgasborders, SU Simple Sketches


CS: Black, Taken with Teal, More Mustard, White


Inks: Taken with Teal, Encore Gold, Versafine Onyx Black, VersaMark


Other: Polka Dots, Floral Screen, Script and Swiss Dots embossing folders; circle Nestabilities dies, black hemp cord, teal gems, air art gun, More Mustard marker, foam mounting tape

Friday, May 18, 2012

Sweet Herbs

I got the urge to make a card and Sweet Herbs was calling my name. If there's one stamp I love to color it's the potted herbs stamp from Sweet Herbs.


For this image I used a lot of the Copic Warm Grays to give it a shadowy look. I very lightly used a little Special Black 110 to give the darkest shadows on the pots, then blended it with the darker grays.

For the pots I started with a light warm brown and added an light orangy color over it. Then some more brown, then more orange, then I worked on it with the warm grays. Fun stuff!

For the plants I stayed in the grayer, more muted greens and tried to mimic the natural colors of the flowers.


Inside, I couldn't think of a word stamp to use so I've left it blank for now. You wouldn't believe how much trouble those corners were!

It's not really visible in my pics, but I used the Cuttlebug Polka Dots embossing folder on all the designer papers except the one under the front word phrase.


I might use this stamp again soon because I just need to color some more! Thanks for looking!

Recipe:

Stamps: SU Sweet Herbs

CS: Black, K&Company K-ology Hannah 6"x6" designer paper, White

Inks: Memento Tuxedo Black, SU Old Olive, Tim Holtz Distress Inks Antique Linen and Vintage Photo, Versafine Onyx Black

Other: Cuttlebug Polka Dots embossing folder; Nestabilities Long Classic Rectangles, Long Scalloped Rectangles, Standard Circle Large, Blossom, and Large Pinking Circle dies; Copic markers, dark yellow gems, beige satin ribbon, foam tape, sponge dauber