Showing posts with label SU Scallop Trim Border punch. Show all posts

Friday, September 20, 2024

Botanicals Happy Birthday Friend

Happy Friday! 🌞I am so enjoying getting back into making cards again! It's like Christmas!

This card is for a dear friend whose birthday is this month. I actually have two friends with September birthdays, and I'll share the other card once she has it in her possession.

I post my cards on this blog mainly to inspire MYSELF! 😄 But of course, I hope it inspires others, too! I learn cool techniques and then forget about them. So I often look at what I've done in the past to remind myself of them, to re-learn them, basically. Like stamping on cardstock with watermark ink and then embossing it. Such a cool look! I do that all the time, or used to anyway. But I had forgotten all about it until I started looking at my older cards for inspiration. 

Botanicals is one of the first stamp sets I bought from Stampin' Up! back in the early 2000's. All but the "Happy Birthday" stamp and the background stamp on the green paper are from the Botanicals set. It's a classic set that never grows old. 

One thing I love doing is dimensionalizing my cards. I am in love with foam tape! You can do such cool things with it. I must not be alone because while I was at Michael's the other day I saw a 12-inch wide roll of it! 


I'm not keen on sinking $21 into such a thing, but it made me happy to see that it comes in such vast quantities! I mean, look how cool that stuff is! You can pop out anything you like with it. 


My cards tend to not only be dimensional, but also textured, either visually or physically. It just thrills me to add texture or movement of some kind to my cards. 


On this one I popped out the poppy flower, bud, and pod. To add interest I put some Fruit Punch Stickles on the flowers and Peeled Paint Stickles on the leaves and pod. And I don't know why, but I get a thrill putting holes on my cards. Like the ones on the scalloped piece. They're not perfect. But I find that look more endearing than a perfectly-holed die that cuts them for you. Dies are expensive. My hole puncher is not. And I already own way too many dies as it is. Plus, punching holes is very Zen!


For the inside I used two inks to create a marbled effect on the saying, although I'm not sure it's visible in the picture. I inked the stamp with a lighter red, and then touched it here and there with a darker red. Then I breathed on it to moisten the ink and stamped it.  It gives a cool mottled effect. I used the Stamp-a-Ma-Jig to line up all the stamps inside the card. The bottom collage stamp was stamped twice to get a continuous look. It's not perfect, but it's tricky with such a stamp as this that has so many things to line up.

Well, that's about it! Thanks for coming by for a visit!

Recipe:

Stamps: SU Botanicals, SU Canvas, Savvy Stamps "Happy Birthday"

Papers: Prima Doodle Deux, Swirl Vellum, White, Black, Olive

Inks: Versamark embossing ink, Memento Tuxedo Black, Tim Holtz Black Soot Distress Ink, Papertrey Ink Pure Poppy, Tim Holtz Distressed Ink Abandoned Coral

Copics: 110, R30, R32, R35, YG95

Other: Cuttlebug Argyle embossing folder, Nestabilities Classic Oval Scallops - Large, Classic Ovals - Small, SU Scallop Trim Border punch, large oval punch, small oval punch, black gingham ribbon, Stamp-a-Ma-Jig, hole puncher, foam tape, Stickles (Fruit Punch, Peeled Paint)

Wednesday, January 01, 2014

Christmas wedding card

I have never made a wedding card with a Christmas theme before, so this is my first time trying to combine the two. My daughter's fiance's aunt (got that?) asked me to make her a card with this in mind. So here's what I came up with:


I had a whimsical saying stamp from The Angel Company that went perfectly with the wedding cake from SU Sweet Treats. All I had to do was use green and red and make it a bit festive and it would work. The tricky part was the inside sentiment. I didn't have one in a similar font, and had I been more together I probably could've hunted down the font and made my own sentiment. Oh, well. As it was I was in a hurry to make this card in the midst of all the painting I was doing. Which is now why I'm only posting this in January, weeks after making the card.

To festive it up I used gems. They always jazz up a card. And I have them in my stash.


Another way I jazzed it up was to use a glimmer spray on the cake itself. I blocked the red ribbon and the flowers so it would only go on the cake. I did this by making a copy of the image and cutting out the parts I wanted to get glimmer spray on, leaving the rest to cover the other parts.


For the inside sentiment I used the I Corinthians 13 stamp from Our Daily Bread Designs because every married couple needs to know what love truly is.


I also carried some of the elements from the front to the inside.

I enjoyed sharing this card with you. I hope you have a marvelous new year filled with many blessings!

Stamps: SU Sweet Treats, TAC wedding saying, Our Daily Bread Designs I Corinthians 13 sentiment (inside)

CS: White, Red, SU Old Olive, Black0

Inks: Brilliance Graphite Black, SU Real Red

Other: Cuttlebug Polka Dots and Birds and Swirls embossing folders, Nestabilities Scallop oval, and regular oval dies, SU Scallop Trim border punch, various Copic markers, glimmer spray, red gingham ribbon, clear ep, foam tape, gems, 1/8" hole punch

Wednesday, March 24, 2010

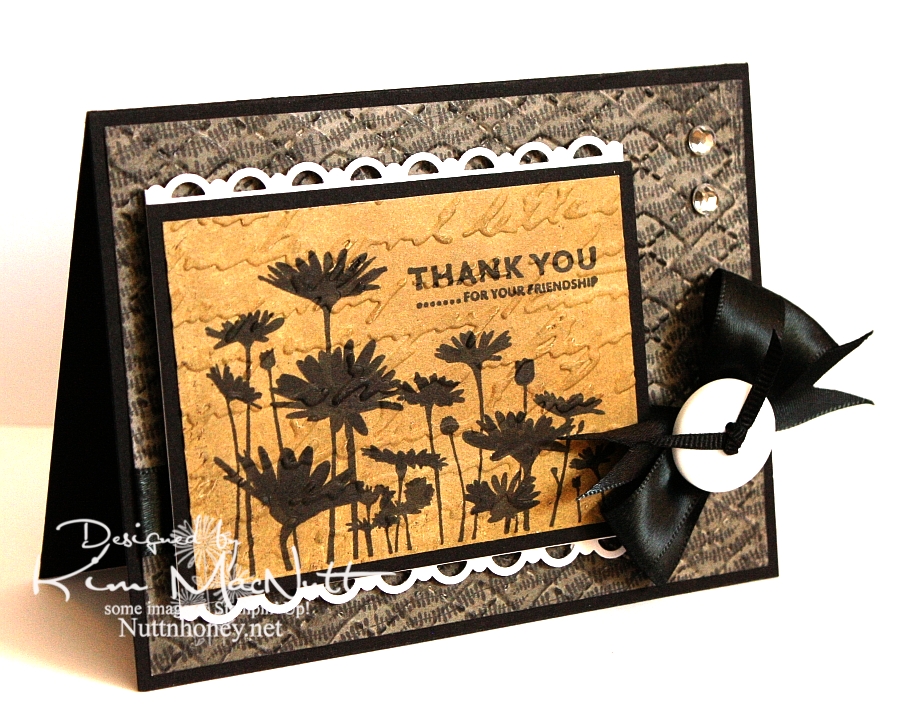
Thank you for your friendship


I just recently got a Stampin' Up! order in, so I used a few things from that order on this card: the stamps, the punch, and a marker.

I haven't done a strictly Stampin' Up! card in a long time! One set I've liked since I first saw it is Upsy Daisy. It's just one image and 3 sentiments, but that one image really has impact. I'm a sucker for really nice flower stamps and silhouette flowers really grab me.

I wanted to do a card in monochromatic tones. That suits my mood right now. I wanted something elegant. And I really wanted to stamp that flower field in black to maximize its silhouette effect. So that's how this card got started.

After running the Basic Grey Granola paper through the Cuttlebug using the Argyle embossing folder, I sponged black ink over it. After stamping and coloring in the flower image (I didn't get as good ink coverage as I had hoped and had to fix it with my SU Basic Black marker), I ran it through the Cuttlebug using the Script folder and then sponged Antique Linen Distress Ink over it.

I used my new SU Scallop Trim border punch to create a lace effect on top and bottom of the focal piece. I have to say that I love this punch! It cuts beautifully! I think EK Success makes it, and I am thinking that I need more of their punches now! I wish Martha Stewart would give her punch business to them. I love how the punch locks closed for easier storage.

I once again made the bow using my homemade Bow Easy. It's a double bow and unfortunately, I didn't check its position before snapping this shot. I took way too many pics of this card trying to get the lighting right to bring out the natural colors, so I'm not up to a retake just now.

Have a lovely day and thanks for looking!

Stamps: SU Upsy Daisy

CS: Black, Basic Grey Granola designer papers, PTI white

Inks: Versafine Onyx Black, Antique Linen Distress Ink

Other: SU Scallop Trim border punch, Cuttlebug Script and Argyle embossing folders, black satin ribbon, thin, black grosgrain ribbon, homemade Bow Easy, clear gems, white button
(Basic Grey), SU Basic Black marker, Stamp-a-ma-jig, 3D-Dots, foam mounting tape, sponge daubers