Showing posts with label SU Curvy Verses. Show all posts

Wednesday, May 30, 2012

More Sweet Herbs

I'm just finishing up the last of the cards I made for my columbine seed recipients. I'm sorry it's taken me so long, but I hope the wait was worth it. I wanted to give each seed recipient a card, so I started looking through my stash and, as usual, took the long way round about doing things. Instead of picking already-made cards, I decided to make some new ones. I did use one I already had, but the rest are new. I just can't help myself. ;-P

This is one I finished last night. It kind of came together at the last minute and it was a bold move that actually gave me the inspiration. I had colored the Sweet Herbs stamp and was going absolutely nowhere with it when I started sponging Vintage Photo Distress Ink on the edges. Then I messed up and just covered the whole image in Vintage Photo ink! Well, that got me going and I went wild with Vintage Photo sponging all over the card! I hadn't even intended on using it on the Sweet Herbs piece, but once I did I was thrilled with its vintage-y look and then couldn't stop.
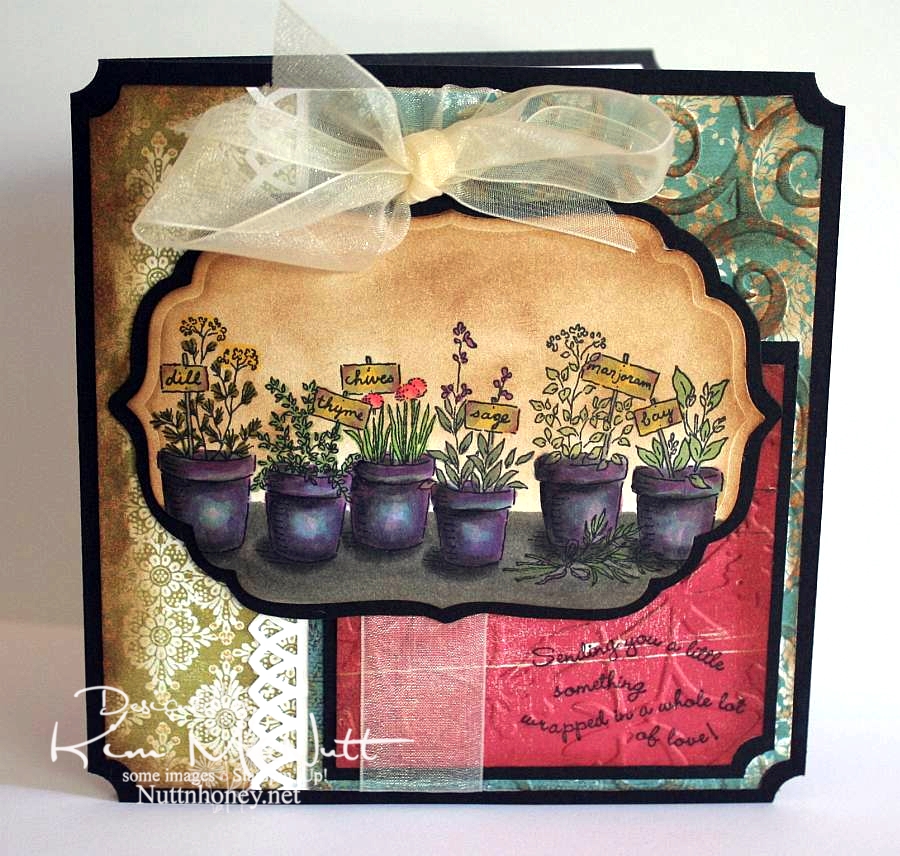


What I thought was the coolest thing ever was the aqua blue paper done with Cuttlebug's D'Vine Swirls embossing folder and then sponged with Vintage Photo ink on the raised parts. Bam! Zow! I was happy! Gotta do more of that!

And wouldn't you say I've gotten my money's worth out of that Stampin' Up! Ticket Corner punch? I am addicted to using that thing! Isn't it funny how we keep grabbing the same things for almost every card we make, or am I the only one?

So, I think I need to get back to sponging. I love the look and it unifies the whole card.

Btw, have you seen the movie, Her Majesty, Mrs. Brown with Dame Judi Dench and Billy Connolly?


Wow! Loved that film! It's on Netflix streaming if you have it. Both actors were amazing! I always love Judi Dench in anything she does, but I had no idea Billy Connolly was so good at serious acting. I knew he was a comedian, but that's all.) This is a great story about a man's loyalty to his queen. (As an aside, there is some male nudity in one scene where Billy and his brother are rushing out in the water to swim - just an fyi.)

Thanks for looking, and seed recipients be watching your mail!

Recipe:

Stamps: SU Sweet Herbs, SU Curvy Verses

CS: Black, White, various deco papers

Inks: Memento Tuxedo Black, Versafine Onyx Black, Tim Holtz Vintage Photo Distress Ink

Other: Cuttlebug D'Vine Swirls and Floral Screen embossing folders, Martha Stewart Arch Lattice border punch, SU Ticket Corner punch, Nestabilities Labels Four die, sponge dauber, various Copic markers, dimensional stickers, cream organdy ribbon

Wednesday, March 18, 2009

Floral Thank You


As I mentioned in my last post, this card is for Susan, the receptionist at my physical therapy place. Now that I am done with my therapy I want to thank the 2 ladies who made my therapy experience such a good one.

Once again, I loved playing with the Basic Grey Archaic papers. They are just my style. I love their aged look. It might seem a bit quirky to mix floral images with that top stony-looking paper, but I like it. Just don't ask questions about why, because I don't know why!. :-P

I used the Martha Stewart Embossed Zigzag punch on white cs. There is an easy way to get your punched area to line up properly. Cut the piece you want to punch. Then start in the center of your paper and work out to the right and then to the left (or vice-versa). I learned this the hard way. Martha probably mentioned it on the packaging, but that was in the trash so fast I hadn't enough time to read it. I just wanted to USE the punch! Lovely, it is. I added 2 different-sized pearl blingies as you can see. Just picked this pattern randomly. I also ran a line of the tiny ones along the brown ribbon above the punched piece. Unfortunately, it's a bit crooked, but I am letting it go to keep my perfectionism tamped down.


I stitched the 2 Archaic papers to the black cs by first putting a couple of short lines of mono adhesive on them to keep them still. Then I stitched. The same was done on the floral piece. You don't need to put adhesive around the edges. In fact, if you do you will have one sticky sewing machine needle. If that happens, just clean it with Goo Gone and it will be good as new.

Speaking of the floral piece, I stamped a flower from Stampin' Up! Petal Prints by coloring the stamp with markers, huffing on it and stamping. Then I stamped the shadow image for the flower with Basic Black ink using the Stamp-a-ma-jig to align the black image slightly to the left so the other colors would be visible underneath. I made a random pattern of the flowers.

I then spritzed the whole thing with water to soften the ink edges a bit. Then I let it dry thoroughly and ran it through the Cuttlebug using the Tiny Bubbles folder. I really tortured that poor paper! THEN I spritzed it with my one and only (so far) Copic marker (Special Black) and THEN I touched up the flowers with some Twinkling H2Os which I hadn't touched in so long. I glued it down to some Always Artichoke cs and then black and stitched that sucker. Yes, it got quite a workout, as did I!

The 3 antique brass mini-brads were one of the first things I added. I hope they don't clash with the pearls, but you know what they say: "pearls go with everything", right? And I think it works. You could say this is my "outside-the-box" card thanks to my choice quirky combinations.

On the main Chocolate Chip cs I stamped the SU Canvas background stamp in Chocolate Chip ink. I think it adds a nice "texture". I love that stamp and can't believe it's already retired. Are they crazy?? I can think of some stamps that I wouldn't mind seeing go, but Canvas??

The inside is yadda yadda yadda, you know the directions if you saw my last few cards. Basic Grey Archaic paper, a stitched smaller piece, on and on. Oh yeah, I accidentally forgot and wrote in this card before I took pics. Let's just say the handwriting adds a "homey touch". ;)


Phew! Can't believe I got this up tonight! Thanks for looking! Tomorrow I need to get these cards mailed out. Blessings!

Stamps: SU Petal Prints, SU Curvy Verses, SU Canvas

CS: Chocolate Chip, Black, Basic Grey "Archaic", White, Always Artichoke

Inks: Chocolate Chip, Basic Black

Markers: Chocolate Chip, Close to Cocoa, Creamy Caramel. Mellow Moss, Always Artichoke

Other: Cuttlebug Tiny Bubbles embossing folder, Martha Stewart Embossed Zigzag punch, Sewing machine, Pearls, Greenish-brown grosgrain ribbon, Black gingham ribbon, 3D-Dots, Antique brass mini-brads, Stamp-a-ma-jig, Burnt Umber and Iridescent Oyster Twinkling H2Os, Copic Special Black marker, Inkworx air art gun

Friday, January 23, 2009

Petal Prints Thank You


Petal Prints is one of my favorite sets. I imagine by now that it is retired. Too bad. That set, in my mind, is a classic and will never grow old. Sometimes I just have to pull out an old favorite and play.

I had my sewing machine set up for another reason and figured it was high time I used it on a card. If it wasn't such a hassle to set up I'd use it more often. Someday I hope to have it in me to rearrange my study so that I just have to slide my chair over and voila! I can stitch on my cards.

Notice no red on this one? Couldn't help the orange. That paper was calling to me. It's from the Pocket Full of Posies matstack from DCWV. I love the papers in that pad. They're good and thick and the colors are vibrant.

This card went through many anguishing changes. I was actually going to do the Mojo Monday sketch for this week and just couldn't get it to look right to my satisfaction. It was blah and dull and I wanted to jazz it up some. I won't go into all the details, but I found that turning the card on its side and messing with the design sketch a bit helped me get a happy result.

I started with a black cs base. I stitched the line around the orange designer paper before adhering it to the black. I also added the ribbon beforehand, but not the bow. I added that later.

For the circle I used 2 Nesties, a regular circle and a scalloped circle. Then I glued them together and ran the whole piece through the Cuttlebug using the Tiny Bubbles folder. The blue paper is by K&Company from the 6" x 6" Addison pad. I used Sticky Doos to pop it up on the card.

The main piece was the hardest part to get right. I had a few boo boo pieces I had to toss aside. But I finally got it right. I used SU and CTMH markers to color the stamp from SU Petal Prints. Then I huffed on it and stamped. I did that three times. Then I just kept stamping around on the paper with the remnants of ink left on the stamp to fill in. Then I used my SU Basic Black marker in the Inkworx Air Art gun and spritzed black ink here and there. Then, once it was dry, I stamped the word phrase using the Stamp-a-ma-jig to put it right where I wanted it. The black ink used was Mementos Tuxedo Black.

I decided to stitch around the flowers after I was done. I used a combo of Mono Multi glue and Sticky Doos to put the flower piece on the card to keep it level as it overlapped different elements on the card. Then I added the blue rhinestones with Mono Multi. The bow was added last, also with Mono Multi.


For the inside of the card I added white cardstock with flowers similar to the ones on the outside. I spritzed them with the black marker, as well. It looks like one corner of the white cs has come loose, but it's just the shadow of the black cs making it look that way.

Thanks for looking!

Stamps: SU Petal Prints, SU Curvy Verses

CS: Black, Pocket Full of Posies matstack designer paper from DCWV, K&Company Addison designer paper, White

Ink: Mementos Tuxedo Black

SU Markers: Tempting Turquoise, Taken with Teal, Mellow Moss, Old Olive, Basic Black

CTMH Markers: Sunflower, Autumn Terra Cotta

Other: Sewing machine, Nestabilities circle and scalloped circle, Cuttlebug Tiny Bubbles embossing folder, Inkworx Air Art gun, Stamp-a-ma-jig, Black polka dot ribbon, Blue rhinestones, Sticky Doos, Mono Multi

Wednesday, February 21, 2007

Whale sketch challenge card


Recipe:

Stamps: Silly Sealife, Simply Circles, Riveting, Curvy Verses

Paper: Black, More Mustard, Tag from Basic Grey Blitzen Collection, white glossy

Ink: Basic Black dye ink, Versamark, More Mustard, Really Rust, Bordering Blue

Accessories: Black gingham ribbon, Dimensionals, 1/8" hole punch, Waterbrush, Stamp-a-ma-jig, post-it notes for blocking on word stamp, Inkworx art gun, black marker, 1&1/4" circle punch

Techniques: watercoloring

Here's my contribution to the SC112 challenge. I can't tell you how many times I goofed up that whale and word phrase part. Ugh! I spent waaaay too long on this card, but I'm happy with it, finally.

Thursday, February 15, 2007

Butterfly sketch challenge card


Recipe:

Stamps: Bold Butterfly, Cool Cat, Curvy Verses, Filigree, Leaf Prints wheel

Paper: Black, Tempting Turquoise, Gable Green, white

Ink: Versamark, Basic Black

Accessories: Gable Green marker, Tempting Turquoise marker, Dimensionals, black mini-brads, Stamp-a-ma-jig, post-it notes (for blocking), water brush, water spritzer

Techniques: Watercolor Misting, Blocking

I haven't stamped much at all in the last many months. But I'm getting back into it and here's my newest creation. It was in response to Amy Westerman's Super Sketch Sunday challenge. I did a lot of popping out of images because I love dimensional cards. To me, they come alive when popped out. I used the Stamp-a-ma-jig and blocking to do the word phrase. I did the watercolor misting technique on the butterfly by coloring with markers on the shadow stamp. Then I spritzed with water and stamped. I used the water brush and the markers to add more color as I wasn't satisfied with the results.