Showing posts with label Taylored Expressions stamps. Show all posts

Wednesday, April 21, 2021

Christmas Cards in April?

Well, hello there! It's been awhile since I've posted here. I've made numerous cards since my last post in 2019 (!!), and will try to post them all here in the near future, even though I may be the only one looking at them at this point! 😏

These cards are the ones I made for my family for Christmas 2020. I made, I think, about 8 of these. 


I had run out of the lime green cardstock midway, so some were done in red. Thankfully, I didn't run out of the red!


I've done this card style before. But this time I went a bit more elaborate by making my own "snow" out of white embossing powder, glitter and clear Glossy Accents. I just mixed them up as I went. Because I didn't have a lot of white embossing powder on hand, I couldn't cover everything I wanted to with my "snow". But what I did cover turned out pretty good. 


I also did a lot with glitter gels. I used Stickles to accent many of the pieces. 


Stamping, coloring and cutting out all the little pieces was very gratifying, although I did get a bit weary of it toward the end. 


And here's what things tend to look like when I'm creating.


I used one of my favorite old Cuttlebug embossing folders, D'Vine Swirls, to create the snow effect. I have more than gotten my money's worth from that thing!  And I stamped all the snowflakes on the red and green backgrounds with white pigment ink using a stamp from my old Stampin' Up! Flaky Friends set.


I colored everything with Copic markers. And here they are, once again, finished and ready to give away.


I wish my background cardstock would've been long enough to make one more bend at the back. It would've held the gingerbread house more upright. But alas, I did not have the 12"x12" kind, just the normal size.


I realize that no one is really interested in Christmas cards in April, but I am posting it while the urge hits, so I guess it's Christmas in April on my blog. Sorry about that.

I hope you have a lovely day, and thank you for coming by for a visit. Please let me know if you've stopped by so I can know you were here. Take care.

Stamps: Taylored Expressions Season's Sweetings, Taylored Expressions Home Sweet Home, SU Flaky Friends

CS: All cardstock is from Papertrey Ink.

Inks: Memento Tuxedo Black, Colorbox Frost White pigment ink, Copics

Other: Cuttlebug D'Vine Swirls embossing folder, paper piercing tool, foam tape, Stickles glitter gels, white embossing powder, white glitter, Inkssentials Glossy Accents clear dimensional medium, Paper Shapers small and large oval punches

Sunday, January 24, 2010

Cuppie Birthday!


Hello! Yes, more stamping! I'm on a roll, I think! 

This sketch design is the same Mojo Monday sketch as the last card I made (from Week #122). It's a good, simple sketch. I find I prefer the simpler sketches, as they give you more freedom to play. 

The colors I chose were from this week's color throwdown (#76) at The Color Throwdown blog, except that I don't have Melon Mambo. So I used Positively Pink. I think we all need a little Spring, yes? 

I hadn't played with my birthday cuppies in awhile and needed a birthday card. So out they came. I thought the colors worked well with these bright, cheerful stamps, don't you? 

Speaking of cheerful, there's nothing like a dog to cheer you up on a miserably gray and dreary day. We are loving our sweet Basset girl! We left her alone for the first time today so we could go to church. She woofed at us in her crate as we were leaving, voicing her concern that maybe we had unintentionally forgotten her. I was a little worried. But she was just as we had left her when we got back, and oh, the happiness at seeing us! Dogs are the best, aren't they? 

One thing you might notice on this card is that I didn't use any designer paper. Lately, it seems I reach for the dp first thing and I was getting kind of tired of the routine. So I determined that I was only going to use card stock this time. I have to admit that I enjoyed staying away from the dp for a change. It used to be the norm before all this dp hit the market. Remember how we used to stamp a lot more on our cards? The dp revolution changed that. I kind of miss the old way sometimes. Do you? Or maybe you still rely heavily on cs. Of course, I still had to busy it up, didn't I? ;) 

I used the retired (still shaking my head over that one) SU Canvas background stamp on the Positively Pink and Old Olive cs's and then cuttlebugged the PP cs with the D'Vine Swirls embossing folder to add even more interest. 

You probably can't see it very well on the So Saffron cs, but before cuttlebugging it I stamped the pile of cuppies from the Sweet Celebration set by Taylored Expressions upside down and right-side up in VersaMark ink. Well, I think the rest is pretty self-explanatory and I must get ready for school tomorrow. I have some prep work to do for the kids' schedules (we homeschool) and it is late! 

Have a lovely Monday and thanks for coming by for a peek! 

Stamps: Sweet Celebration by Taylored Expressions, SU Canvas 

CS: Papertrey Ink True Black, SU Positively Pink, SU Old Olive, SU So Saffron, PTI White 

Inks: Versafine Onyx Black, VersaMark 

SU Markers: Creamy Caramel, Pumpkin Pie, Apricot Appeal, Bordering Blue 

CTMH Markers: Pink Carnation, Topiary 

Other: Cuttlebug D'Vine Swirls and Spots and Dots embossing folders, Nestabilities Classic Oval Scallops Large, Classic Oval Large, ticket corner punch, black gingham ribbon, yellow gems, Black Micron archival pen (for stripes on candles), 3D-Dots, Stamp-a-ma-jig, paper piercing tool, sponge mat

Tuesday, December 08, 2009

Let It Snow!


It's been awhile! Don't worry. I'm not secretly stamping and not sharing. I truly have not been stamping in weeks. I thought I had better stamp something before I forget how to!

I had been wanting to try out my homemade Flower Soft (shaved Styrofoam). I had bought the least expensive piece of Styrofoam I could find and shaved the whole thing and put it in a jar. Now all I have to do is stain some of it with re-inkers if I want colors (as I was experimenting with it I found that it was very important to let it thoroughly dry before applying.).

This go-round is easy since I wanted to use some for snow. So I just glued some down, no dyeing needed. It's a lot messier than real Flower Soft, but it's so much cheaper that the hassle is worth it, IMO. If you'd prefer the real thing you could just get the white Flower Soft and dye it. I presume you can anyway. Can't speak from experience, though.

I know it's snowing in many parts of the country, but we've not had any yet in my part of Northern Georgia. There was the threat of it this past weekend, but none fell in our area. I was actually thankful for that as our two youngest daughters were in a local Christmas parade Saturday and I was a tad worried they'd get damp. It was quite cold with a blasting wind, so that would not have been good. Instead, we got to enjoy beautiful sunny weather, albeit a bit frigid.

So snow is on my mind - fires in the fireplace, hot chocolate, the smell of wood smoke, bundling up - I love these things. But I neglected to bundle up my little cuppy on my card, I'm afraid. Should I make him a little scarf? I hope he's not too uncomfortable surrounded by all that fake snow! ;)

Did you catch the reindeer theme? I used some reindeer paper from Basic Grey's Blitzen collection and carried the theme with Rudolph the Red-Nosed Cuppy. hee Wish I had some tiny bells I could add. Wouldn't that be cute?

So, are you done with your Christmas shopping yet? Me, neither. But I am pretty much done with the gifts I have to mail. So I feel fairly accomplished there. This Christmas seems to be bounding up at breakneck speed! I won't remind you about how many days away it is because I doubt you want to know either!

Well, hope you have a lovely Tuesday, and if I don't get any more posts put up before Christmas, may it be a merry one for you and your family! TFL!

Stamps: Taylored Expressions Season's Sweetings and Home Sweet Home

CS: Ruby Red, Basic Grey Blitzen collection, black, white

Ink: Versafine Onyx Black

Other: Nestabilities Labels Four, Cuttlebug D'Vine Swirls embossing folder, homemade white Flower Soft (shaved Styrofoam), Flower Soft glue, black gingham ribbon, 3D-Dots, red gem, sponge mat, paper piercer, ticket corner punch

Tuesday, August 18, 2009

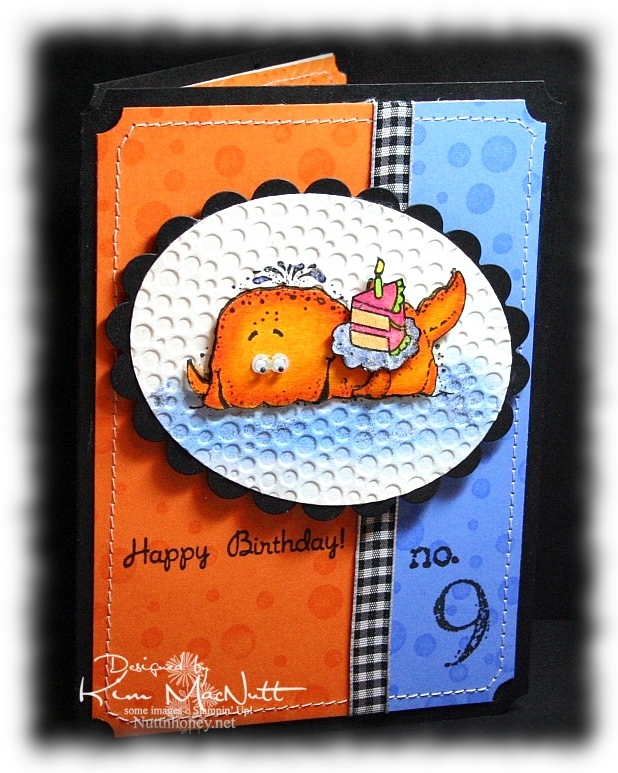
Whale Birthday


Wow, has it really been 17 days since I last posted here?? Well, my mojo just wasn't moving much in those 17 days and the only thing that got me stamping was my littlest's upcoming birthday. I just haven't been in a creative mood lately. I've not even been crocheting much which is odd for me because I love it. I think this whole national health care situation has been weighing so heavily on my mind that it's been hard to relax and do anything fun. Plus, it's so hot and huuuuumid. And the garden has been keeping me busy with the little energy I have in this heat. I canned tomatoes and homemade pizza sauce yesterday. It about did me in! I wish the garden didn't flourish in the hottest part of the year!

So anyway, I made this card for my littlest who just LOOOOOVES fish of any and every kind. When she checks out books at the library, they are almost all about fish and the sea. I knew that I would use either SU Fishy Friends or SU Silly Sealife on her card. I went with Silly Sealife's whale. He's always fun to color.

And for once, I actually stamped the background rather than use a designer paper. I used to use VersaMark ink on pretty much every card I ever made until I fell in love with designer paper.


For the whale, I used Canson watercolor paper and stamped the whale with my favorite black ink: Versafine Onyx Black. Then I colored with SU markers and a few CTMH markers. I started with a darker color (Pumpkin Pie) on the edges. Then I used Summer Sun to blend toward the center. Then I recolored the edges and the inside to strengthen the colors. No water brush. I just used the markers to blend. Works perfectly on watercolor paper!

I used a Post-It note to block the whale while I sponge-daubed Bashful Blue and Ballet Blue inks on the "sea". Then I rubbed a glue stick over parts of the sea and sprinkled blue glitter here and there. I colored the water spouting out of his head with a Bashful Blue marker and glued a bit of blue glitter there, too. "Glued a bit of blue glitter". Say that 5 times fast! lol


The cake is from the Taylored Expressions set "Sweet Celebration". I also used the cake on the inside (see above). I blocked the cupcake part of the image so I could just get the cake inside.

The dimensions of this card are approx. 4.5" x 6". It was made to fit an invitation envelope measuring 4.75" x 6.5". I bought some at WalMart just to have a different size to create with.


Can you guess where our littlest wants to go on her birthday? The Georgia Aquarium, of course! We'll probably go by The Varsity for lunch beforehand. Can't wait!

TFL and have a blessed week! I hope my mojo returns soon! This place has been too quiet!

Recipe

Stamps: Stampin' Up! Silly Sealife, SU Collage Alphabet Numbers, SU Simply Circles, Taylored Expressions Sweet Celebration

CS: Black, Pumpkin Pie, Ballet Blue, Canson watercolor paper, white (inside)

Inks: VersaMark, Versafine Onyx Black, Bashful Blue, Ballet Blue

Markers: Pumpkin Pie, Summer Sun, Bashful Blue, Apricot Appeal, Yoyo Yellow, CTMH Bubblegum, CTMH Citrus Leaf

Other: Cuttlebug Tiny Bubbles embossing folder, Nestabilities Classic Oval Scallops Large, Classic Oval Large, Stamp-a-ma-jig, googly eyes, blue glitter, Frosted Lace Stickles, sewing machine, black gingham ribbon, 3D-Dots, ticket corner punch, sponge dauber

Wednesday, March 11, 2009

Cupcake Birthday


This card is going to be for my niece's 22nd birthday coming up next month. It all started with the gatefold idea. I wanted to play around with my Scor-Pal again and I wanted a gatefold card.

Btw, the green cs is SU Gable Green. I scored it (see next paragraph) and then applied Green Galore ink direct-to-paper. I let it dry thoroughly before proceeding.

To make the scored lines meet up pretty closely, I opened the card all the way out and scored the outside of the card from the top left corner to the bottom right corner in half-inch increments. Then I went from top right to bottom left the exact same way. It worked pretty well. The measurements of my card (the green part, anyway) are approximately 5" x 10" with the front panels scored at 2.5" and 7.5". It's not exact, but very close. The black cs behind it makes the width 5 & 1/4", which will still fit just fine in a 5.5" x 5.5" envelope.

I used a corner punch generously on the card. I stitched around the front panels and on the inside panels with white thread on my sewing machine. There's something satisfying about sewing on cardstock. To aid the stitching, I put a little glue down the back centers of the panels and stuck them together, and then ran them under the sewing machine. This kept the cs together while I stitched.

For the cupcake scene I stamped in SU Basic Black ink on 3 pieces of cs. I put one through the Cuttlebug using a circle Nestie and cut the cake out of one and the cupcake/ladder out of another and just the cupcake out of the third. I colored the topmost pieces with Prismacolor pencils and popped them out with 3D-Dots. Then I used several colors of Stickles on several parts (see recipe below). I also drew a horizon line behind the scene with a black pen.

I cuttlebugged two different elements on the card. I used the Mesh folder for the black scalloped circle and Script for the "front door panels". For the word sentiment I used Green Galore cs and ink. I dtp'd the ink onto the cs and cut it out and mounted it on the black.


I used the turquoise Stickles here and there on the front panels to connect the aqua gems I later added and the turquoise on the cupcake.


I used a 1/2" Velcro dot to keep the card closed, securing one part behind the scalloped circle and the other on the front left panel.


As you can see, I stitched inside the card by gluing the black and designer paper panels together and then running them under the sewing machine.


The designer papers I used are from the Pocket Full of Posies collection by DCWV.

Hope that covers it. If I've left anything important out please let me know. TFL!

Stamps: Taylored Expressions Sweet Celebrations

CS: Black, Gable Green, Pocket Full of Posies by DCWV, White, Green Galore (for sentiment)

Inks: Basic Black, Green Galore

Other: Cuttlebug Script and Mesh embossing folders, Nestabilities circles and scalloped circle, Scor-Pal, Prismacolor pencils, Sewing machine, Aqua gems, Red gem; Stickles in Yellow, Lavender, Orange Peel, Xmas Red, and Turquoise; 3D-Dots, Black pen, Corner punch, Sakura glue pen

Thursday, January 29, 2009

Cupcake Sweet Friend


Another no-red card. But orange seeped in again. It's such a refreshing color, especially this time of year.

This card was one of those cards that start out so differently than I had intended. It was full of mishaps and detours. For instance, I hadn't intended it to be on a black base. I was actually going to make it white. But after goofing up part of the white on the front I had to cut it down and use another background.

I knew I wanted to use this designer paper from Pocket Full of Posies by DCWV. I love the softness of the green and the little sparkles that are unfortunately not visible in the pics. (Actually, I can see the glittery-ness now that I am looking at it on my laptop. Go figure.) And I knew I wanted a clean-looking card, thus the (original) white base. I had originally not intended to use any black. But once I put that polka dot ribbon against the other elements I was smitten with the look.

I can't believe I didn't do any dry embossing on a large scale like I usually do. I did emboss the oval after cutting it out using an oval Nestie. I also cut out the scalloped oval with the Cuttlebug, but that's all the cuttlebugging I did.

I used my favorite Martha Stewart punch - Doily Lace - twice to give a layered look. It always looks so smart in white.

The cupcake is heat embossed using Brilliance Graphite Black ink and Judikins Detail Black ep. The coloring-in was done using Prismacolor pencils. You can't see it, but I originally made the white oval with another cupcake on it. I didn't like the way it turned out so I did another one, cut it out, and glued it over the other one. Saved me the hassle of redoing the oval cutting and embossing.

I had not meant to put a bow on the oval, but right when I was finishing up the original card, I realized that I had laid my hand on my Stamp-a-ma-jig with wet black ink on it and messed up the finished oval. Ugh! Rather than start over, I sanded the cardstock to remove as much of the dried ink as I could. Then I punched a hole over it and added the ribbon. Worked well enough.

The black polka dot ribbon actually conceals another boo boo that I made trying to run a line of paper-pierced holes along the white cs over the designer paper.

One thing I wish I would've done differently is heat emboss the word stamp, or at least use the Brilliance ink. I used Memento Tuxedo Black and see now that it's not as dark as the Brilliance ink.

I used Sticky Doos to pop out the ovals and the designer paper.

I think that's about it. Do you ever have cards that are so much trouble to make?


Recipe:

Stamps: Inkadinkado Birthday Cupcake, Taylored Expressions Sweet Celebration

CS: Black, White, Pocket Full of Posies by DCWV, Bashful Blue

Inks: Brilliance Graphite Black, Memento Tuxedo Black

Other: Cuttlebug, Oval and scalloped oval Nesties, Martha Stewart Doily Lace punch, Sticky Doos, Judikins Detail Black ep, Stamp-a-ma-jig, Black polka dot ribbon, 1/4" Blue organdy ribbon, Prismacolor pencils

Monday, November 24, 2008

Dad's Pickup - CC193 and TECC43


I am in a mad dash to get this done and up before I go in for surgery tomorrow. I tore my rotator cuff several years ago and am finally getting it fixed. I can't wait for this pain to be gone. I've lived with it for far too long. Stamping has even become difficult.

Anywho, I had a couple of cards I needed to do before the surgery since I won't be doing any stamping during my recovery (at least that's what I'm assuming). I got one done yesterday and the other I'm not sure will be done by tonight. Ugh! Nothing like waiting until the last minute. I might end up having to buy a pre-made for that one.

My dad turns 70 on December 11th. He's retired, and he and my mom run a little ranch in Texas with longhorns and donkeys and chickens. Well, when he retired and went into the longhorn business he needed a good pickup truck to haul hay in and take trash to the dump and haul the cattle trailer and...you get the picture. He ended up getting a really nice one that looks kind of like the modern version of the one on this card. So I had fun making up this card just for him.

He was telling me yesterday that he had had to milk one of the longhorns recently when her newborn calf got sick. He penned her up in the shoot they use for vetting purposes and milked her! What a guy! At first, she didn't know what in the world he was doing to her, but the next time she really liked it. lol We women who've breastfed can relate, yes? That relief we felt after the baby nursed was sheer bliss.

Back to the card: I went with Color Challenge 193 on SCS using Real Red, Basic Black and Kraft. Perfect for my dad's card. I used Taylor's TECC43 design sketch, as well.
For the black base I used the corner punch on the corners and then used my paper piercer to add holes along the edges. For the red piece I cut the cs, did direct to paper with Real Red ink, ran it through the Cuttlebug using the Distressed Stripes embossing folder sideways (notice the stripes don't go up and down? I liked it that way) and DTP'd it again with Real Red ink and attached it to the black.

For the Kraft piece I stamped it with the truck from SU Classic Pickups in Basic Black ink, then DTP'd it with Creamy Caramel, punched the corners, did a more spaced-out hole pattern (I put a hole at each end, then one in the middle of those, then one in the middle of those, etc.), and attached it to a piece of black cs.

I stamped the truck again on white cs and colored it first with a Real Red marker, but found that my Prismacolor pencils were superior to the markers for this particular image. I used a Silver pencil and then a Light Umber to do the metal on the truck (the Light Umber softened the Silver a bit). I used Crimson Red to go back over the truck body and used Black for the tires and to highlight some parts of the body. I also used the Light Umber for the windows to recede them a bit. I cut the truck out and then I put Diamond Glaze on the windows to imitate glass. I used Sticky Doos to pop it out on the Kraft piece.

For the word stamping I used the "Happy Birthday" stamp from Taylored Expressions' Sweet Celebration set. But I stamped it crooked! Oops! Do you think he'll notice? The "DAD" part was stamped using CTMH Storytime upper case alphas. Then it was punched out, paper pierced and mounted onto a black punchie. I popped it all up as you can see below and did lots more paper piercing because I can't get enough of it! What is the allure, I wonder? Oh, who cares! I like it!


No pics of the inside, but all I did was DTP some Real Red cs with Real Red ink and punch the corners to keep the theme going. I also paper pierced around the edges of the black back of the card to match the front.

Thanks for looking!

Stamps: SU Classic Pickups, Taylored Expressions Sweet Celebration, CTMH Storytime upper case alphas

CS: Black, Real Red, Kraft, White

Inks: Real Red, Basic Black, Creamy Caramel

Other: Cuttlebug Distressed Stripes embossing folder, Corner punch, 1" and 1.25" circle punches, Paper piercer, Spongy mat from Mat Pack, Sticky Doos, Diamond Glaze, Various Prismacolor pencils, Real Red marker

Saturday, November 08, 2008

OCC Challenge Christmas Cupcake Scene

Hey, I stamped today!

I made one of my rare stamp purchases recently after seeing Taylored Expressions' newest releases just out in time to get those Christmas cards going. I must say that it is not very often that I gasp when I run across stamp sets. But I did when I saw Taylor's adorable Christmas stamps. Those cute cupcakes just did me in. And I LOVE the quality of her stamps. They are easy to use, deeply-etched pink rubber with EZ Mount cling foam that lasts forever. They're die-cut, so no trimming of any kind. They have the coolest pages they sit on when not in use. Very high quality. You would LOVE her stamps. Trust me.

The OCC blog has a challenge going on that fit perfectly with what I wanted to accomplish on this card. It's from this Martha Stewart cupcake design. You can use any of the elements for inspiration. I chose to use the colors, a cupcake theme, and the polka dots in my scene. Btw, I got the main design inspiration from Teresa over at Flickr. Her accordion card scene thrilled me so much that I just had to somehow duplicate it.


I went with a Real Red background. The card is scored every 2" on a 10" X 5.5" piece of cs. Don't ask me how this is supposed to fit in an envelope. I don't know! lol

I cut 3 strips of 2" cs in white and drew wavy lines with a pencil to create the "hills". Then I used an X-Acto knife to cut the lines (scissors would work, as well). I erased the pencil marks and then ran the white pieces through the Cuttlebug using the Swiss Dots embossing folder. Then I adhered them with Sticky Doos (like Dimensionals). I stamped the snowflakes from Taylored Expressions "Home Sweet Home" using white craft ink. I'd recommend doing this before putting the white pieces of cs on. This was an afterthought so mine is a bit different because of it.

I used the paper piercing tool to add a nice pierced line along each hill. Me and my paper piercing, I tell ya! Can't get enough! I did try to use a bit of self-control this time, though. ;)

I colored all the images with SU markers (colors listed below). After they dried I cut them out and used 2-way glue on the cupcakes' faces and sprinkled a nice soft white glitter over them. Then I carefully scraped away the glitter from the eyes, mouths and noses with the point of my X-Acto knife so they would stand out better. I was also able to remove most of the stray glitter with it.


For the trees (from Taylored Expressions "Season's Sweetings") I colored them with markers and then inked them completely in VersaMark. Then I sprinkled Heat & Stick powder over them and heat set. Then I poured the same glitter I used on the cupcakes all over the trees' surfaces and tamped off.


I adhered all the images with Sticky Doos (what a name!). The word stamps were from the Home Sweet Home and Season's Sweetings sets. I stamped them in black ink on white cs, punched them out, mounted them on punched-out colored cs, and paper pierced around the edges.

Edited to add: I took a pic of the card folded up per a friend's request. If you make this card and want to mail it in a standard A2 envelope, I'd recommend making the card only 5" wide rather than 5.5" so it won't buckle in the envelope (that is, if you 3-D yours as much as I did mine! ;).


I really love the colors in this card. Very happy and Christmas-y. Hohoho! Thanks for looking!

Stamps: Taylored Expressions "Season's Sweetings" & "Home Sweet Home"

CS: Real Red, White, Green Galore, Bashful Blue

Inks: Basic Black. Colorbox Frost White (craft), VersaMark

Markers: Gable Green, Bashful Blue, Real Red, Only Orange, Summer Sun, Basic Black

Other: Cuttlebug "Swiss Dots" embossing folder, Paper piercer, Sticky Doos, Large and small oval punches, Snow White Mist glitter, Heat & Stick powder, 2-Way glue, Pencil, X-Acto knife