Showing posts with label Crop-a-Dile. Show all posts

Thursday, May 10, 2018

You're a Classic

My son is an avid classic car guy. He owns 2 old pickup trucks that he is restoring. So for his birthday I thought I'd pull out the old Stampin' Up! set Classic Pickups to make his card.


I sponged different inks on the tags before stamping the truck image. I also stamped the saying before dry-embossing the paper:


I did a double version of the truck image to pop it out. And I popped out the tags as well (all with foam tape).


I did a pitiful job on setting the big eyelets inside the card. Even with the Crop-o-Dile it's hard for me. I'm probably not using it properly. Maybe I should use my trusty old eyelet setter.


Thanks for looking! Have a great day!

Stamps: SU! Classic Pickups, SU! Birthday Greetings, The Angel Company (inside center saying)

CS: Black, White, Basic Grey Granola papers, white tags

Inks: Tim Holtz Distress Inks in Antique Linen, Vintage, and Black Soot; Memento Tuxedo Black, Stampin' Up! Night of Navy

Other: Cuttlebug Tiny Bubbles embossing folder, Sponge for direct to paper inking, Crop-o-Dile, large, brown eyelets, brown mini-brads, foam tape, brown leather string

Tuesday, January 09, 2018

Grandson Birthday Card

I can't say it enough...It feels good to be stamping again! I made a sort of new year's resolution that I wanted to start making cards for family and friends on their special days like I used to. And so far I'm sticking with it. The first birthday of the year is for one of my grandsons. It's his 17th.

I just pulled out a bunch of sort-of masculine papers and got busy. The only parts that I stamped are the car and the sayings inside and out. The rest is the way the paper came.

I did the gatefold design again (my favorite, apparently!) with the black cardstock measuring 5"x 10" and scored at 2.5" and 7.5". 


I had so much trouble trying to figure out what the front should look like. Then I looked through my punches and grabbed the Stampin' Up! Spiral Punch and edged one side with it and voila! I was inspired! It was not easy going through 2 layers of paper at once! I had to bear down hard to get it to go through!

 I then grabbed my Crop-a-Dile (is anyone still using this great tool?) and made 3 holes and added rivets. 


Then I realised that I would now have an issue with the inside paper showing through the holes to the outside. And there would be those ugly holes inside. So I made holes on the inside and then pressed 3 rivets with the Crop-a-Dile and glued them on the inside to cover the holes. It worked to fix the problem.


I used the SU Ticket Corner Punch to add some visual interest to the greeting piece. And I used black Velcro dots to help the card stay closed.


Inside the card I made a cellophane pocket to put a gift card in. I took an A2 clear envelope and trimmed it to fit the back of the center piece. I glued it down on all 4 sides and added 2 pieces of designer paper to hold it down and dress it up. It opens from the side. You can see the cellophane envelope in the picture below. The saying underneath was stamped before adding the gift card window.


It worked pretty well! I did have to trim the gift card a bit to get it to fit inside because it was too long, but otherwise there were no issues.

 And this is what my stamping area looked like when I was finished. I'm a messy stamper! But I do clean it up when a project is done!


April will be the next month with birthdays. Until then, I'll be working on some friendship cards. I hope you have a good week, and thanks for coming by!

Monday, October 28, 2013

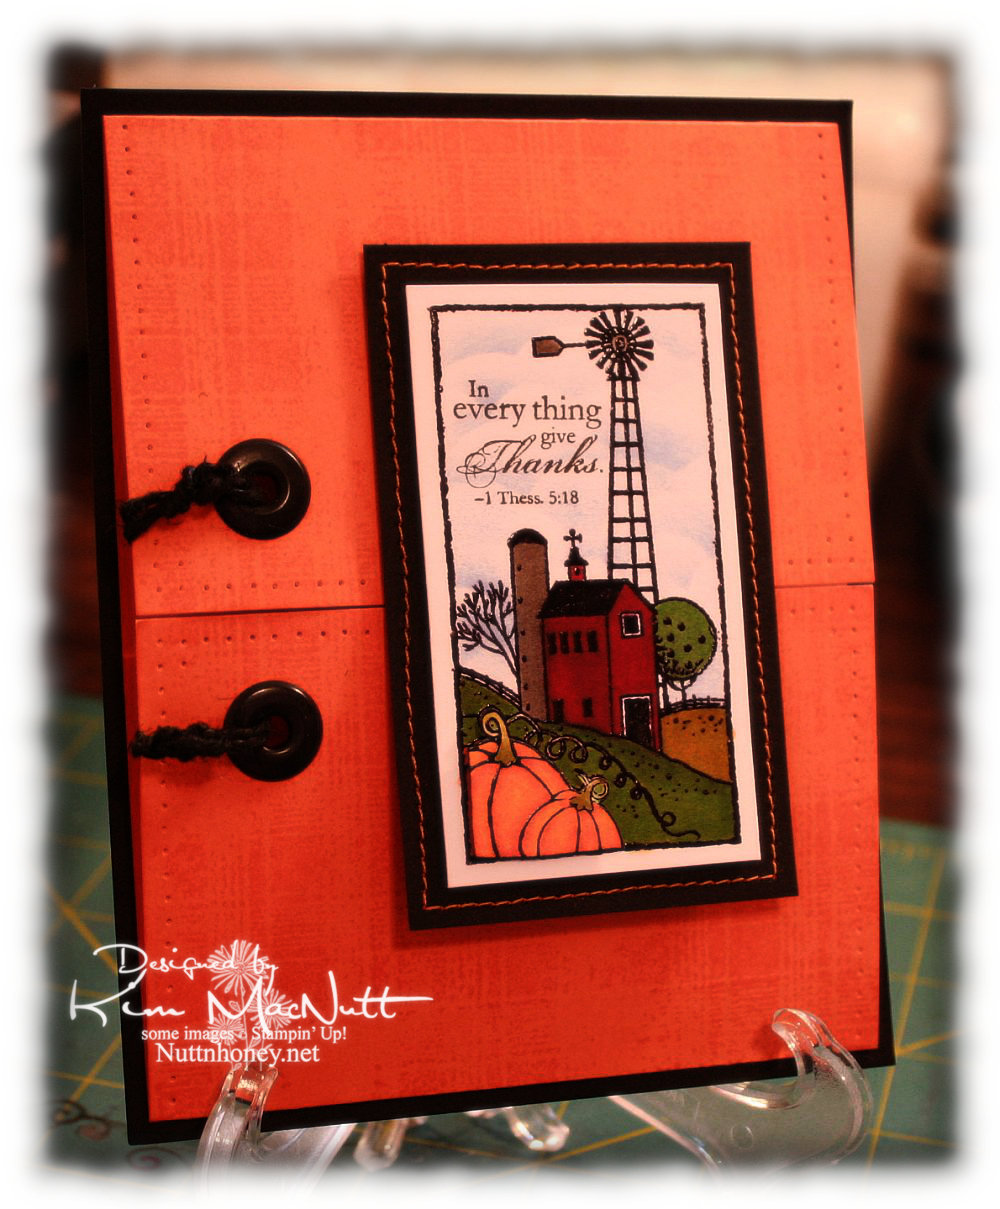
In Everything, Give Thanks...

Hey, ladies! Hope you are well. I stayed home from church yesterday because of my monthly yuck and felt just a little bit like stamping. But you know how it is when your whole body is miserable and it's hard to think straight. So I went simpler than I usually do. NO Cuttlebugging! Hard to believe I actually resisted the embossing folders! But I wanted to do a card that wouldn't tax me too much and that had an autumn theme. I don't give Halloween or Thanksgiving cards, so this was strictly for pleasure again, and really, to test my newly-made cloud template!!!!!!

I had colored the image the night before while watching The Stratton Story with Jimmy Stewart. Amazon has these 4-pk. sets of old movies for dirt cheap and I had bought one with Jimmy Stewart movies. The Stratton Story is a true story about a famous baseball player who loses his leg in a hunting accident and struggles to persevere and rise above his handicap. A very good and satisfying film with a wonderful ending.

I folded this one like a gatefold card, but turned it on its side. All I did was stamp the SU Pumpkin Pie cardstock with the old SU Flannel Plaid background stamp to go along with a cozy autumn theme. I hope you can see it. I used VersaMark ink so it's very light.


I wanted to do something with jumbo black eyelets, and was going to tie them together with some black hemp twine, but then I thought it would complicate the opening so I turned the twine to the side and wrapped it around to the inside. I did a simple paper piercing design around most of the edges and left the top and bottom plain. I glued all of this onto a piece of black cardstock.

I had a lot of fun coloring the image from the old SU set Country Pleasures. I realized that I did not recall ever doing a card with this set! That's a pity because the images just cry for Copics! I heat-embossed with Brilliance Graphite Black ink and clear ep. I made 2 images and cut out the pumpkins on one and popped them out on the other. I stamped a saying from SU Happy Harmony within the image using Memento Tuxedo Black. It was perfect for the autumn theme I was trying to create. Unfortunately, it stamped just a tad crooked, but I was not about to scrap it and start all over! No, sir!

Btw, the colors are actually truest in the top pic. The bottom pic is more muted than on the real card. It's so hard to get pics right! The lighting is always changing, and certain colors just don't photograph well, especially reds and oranges.


As you can see in the top pic, I did clouds in the sky and used my newly-made cloud template!!


I cut out some cloud-like Nestabilities dies and glued them together in cloud-like formations. The clouds in the scene are actually a bit darker than the top pic shows. But only a bit. I sponged SU Bashful Blue ink for the clouds. They're happy-day clouds.

When I think of all the clouds I've missed out on because I was stuck on the idea that I had to buy a template, well.......I'm just glad that I can now make my own for free! And I can keep changing them!

Thanks for coming by and checking out my latest creation! I'm a happy stamper once again and it feels good to be getting into the stamps and ink! I'm not sure how interested people will be in seeing me use mostly old stuff, but I am finding great contentment in it and will continue to look for new ways to use it. I have so many sets I've hardly or never used! Such a shame!

Stamps: SU Country Pleasures, SU Flannel Plaid, SU Happy Harmony

CS: Black, SU Pumpkin Pie, White

Inks: VersaMark, Brilliance Graphite Black, Memento Tuxedo Black, various Copic markers

Other: Cloud template, black jumbo eyelets, black hemp twine, sewing machine, paper piercing tool, foam tape, sponge, Crop-a-Dile (to cut and set eyelets)

Thursday, May 26, 2011

I like your style, Donna!


I'm trying to make more time to play lately. I've found that if I don't make time I will have none. There are always things I "need" to be doing, but a little fun now and then is what keeps one sane, amen?

This card was inspired by Donna Mikasa's creation found here. It doesn't really look like her card, but her colors inspired me. The red, yellow and green on the brown was what excited me. ALL her cards excite me. She's a card-making genius. But the colors on this one especially grabbed me. Thank God for inspiration! Where would we be without it?

I had a dickens of a time trying to photograph this card for some reason. Taking it outside seemed the only solution to making it look good. Inside pics all looked washed out. So it looks brighter than it really is. And shiny ribbon is just murder on a photo shoot, ya know?

I took the main brown piece and stamped the big image from Stampin' Up! I Like Your Style in black ink and let it dry. This was white card stock, btw. Then I did direct-to-paper inking all over it using Vintage Photo distress ink. Then I crumpled it up, smoothed it out, and did more inking to simulate creased leather. I used large eyelets to hold it down on the black cs underneath. I used a Crop-a-Dile to apply the eyelets.

For the dress forms I stamped in Memento Tuxedo Black ink and colored with Copics. Then after they dried I cut them out and sponged them with Vintage Photo ink. Same with the tag. I used pop dots to adhere them. The flowers are actually green and the hearts are yellow and green, but the sponging kind of washed them out. But that was intentional. ;)

Hoping to get more stamping done now that I'm forcing myself to play!

Thanks for looking!

Stamps: SU I Like Your Style

CS: Black, white

Inks: Memento Tuxedo Black, Tim Holtz Vintage Photo Distress Ink

Copics: R29, YR12, YG13

Other: Black organdy ribbon, paper piercing tool, sponge mat, corner rounder punch, spiral punch, foam tape, pop dots, large black eyelets, sponge dauber, Crop-a-Dile

Monday, July 27, 2009

Howdy Octopus!

Well, hey there! Did you wonder why it got so quiet here all of a sudden? Well, I have been busybusybusy! Blackberries are coming in like crazy and I've been picking and picking! I tried my hand at yogurt making the other day and put up some pickles from the garden today. The daily stuff doesn't go away just because I have other things to do, so I am swamped with work. But I love it! Homemaking is such a satisfying occupation for me. I'm so thankful I can put so much of my energy into serving my family. I love being busy around the house. I am leaving the computer off a lot now, so I am much more productive with my time. It makes me happy to have a contented hubby and kids.


This past week I actually got some stamping done! I have 2 cards to share. One in this post and one in a future post, as yet uncreated.

Usually my creative muse will start with stamping an image and coloring it. That's what happened this week. The Silly Sealife set was calling to me and I just had to stamp that adorable octopus! I love coloring that cute little thing! It's so satisfying.

I pulled out some watercolor paper and my markers and went to town. My inspiration for this card was the lower blue paper which is from the Basic Grey Obscure pad (actually, both are). That pad has some really cool papers! The blue paper reminded me of the sea. And it went perfectly with the D'Vine Swirls embossing folder and the octopus, don't you think? I used the inverted scallop circle die to add some extra pizazz. I have still not mastered getting brads right with my Crop-a-Dile yet. t's a gamble every time! So one is right and one is wrong. Can you tell which is which?

TFL! Have a lovely week! Summer's almost over, can you believe it?

Recipe

Stamps: Stampin' Up! Silly Sealife, Wordsworth Howdy SO35-G

CS: White, black, Basic Grey Obscure 6 x 6 pad, Canson watercolor paper

Inks: Versafine Onyx Black

Markers: Bordering Blue, Taken with Teal, Tempting Turquoise, Really Rust

Other: Cuttlebug D'Vine Swirls and Spots and Dots, Spellbinders Nestabilities Large ClassicInverted Scalloped Circles and Standard Circle Large, jumbo brads, natural hemp cord, ticket corner punch, Crop-a-Dile, water brush, piercing tool, sponge mat

Friday, April 24, 2009

Sporty birthday


I've got SO many cards I need to make! This card is for my teenage nephew whose birthday is already past. Oops. Wish there were more stamping hours in my day!

I felt the need to simplify again. Mind, this isn't 'simple' in some people's eyes, but it is in mine. It's hard to go backwards once you're used to flinging the bling!

The base is one layer thick (excluding the inside) with a minimum of bling (for me). But the bling I did use works well enough, I think.

It's always hard trying to come up with a card for a teenage young man. Men's cards are difficult, in general, but a teenage version is the hardest. And thinking about it now I should've used the Nestabilities Labels One set (forgot I had it! Can you beLIEVE it?) rather than the scallop for the car image (which btw is from Stampin' Up! Classic Convertibles - retired). It would've been less foo-foo-y. Oh well, he'll never know. My 16 yo son loved it and thought my nephew would like it, so that's enough for me.

The base is Taken with Teal, but I couldn't get that color to look right in the photograph to save my life. It looks more like Tempting Turquoise, doesn't it? Some colors are just like that when you photograph them indoors. I used the Cuttlebug Traffic Jam embossing folder to add some visual interest.

I used 2 black jumbo eyelets that I think are by Making Memories. I wove black hemp through and around and pulled one end back through again, tying it on the inside.

I used the small and large oval punches for the birthday greeting, which I stamped in VersaMark ink and embossed with white ep. The sentiment is from the Stampin' Up! Amazing to Zany set.

The car scene is popped out with 3D-Dots as is the sentiment piece. I used black and Chocolate Chip cs for the sentiment piece.

When coloring the car I used the CTMH Breeze marker and Prismacolor pencils. I added highlights here and there with my Inkssentials opaque white pen. To finish it off I added Diamond Glaze (aka Crystal effects) to the windshield, side panel, hub caps and headlights. I had colored it before running the image through the Cuttlebug. I added the Diamond Glaze afterward.

Don't you just love my new watermark? I had it made by Dina Kowal. Here's her digi-sig site. She's very reasonable and ever so nice to work with. I got 4 watermarks for $11. Very reasonable, indeed!

Thanks for looking!

Recipe

Stamps: Stampin' Up! Classic Convertibles, Stampin' Up! Amazing to Zany

CS: Taken with Teal, black, white, Chocolate Chip

Ink: Versafine Onyx Black, VersaMark

Other: Cuttlebug Traffic Jam and Tiny Bubbles embossing folders, Nestabilities Classic Oval Large and Classic Oval Scallops Large, large and small oval punches, 3D-Dots, white embossing powder, Making Memories jumbo black eyelets, black hemp, Croc-a-dile (for making holes and setting eyelets), Diamond Glaze, CTMH Ocean marker, Prismacolor pencils, Inkssentials opaque white pen

Tuesday, March 31, 2009

ODBD - Love One Another - Wedding Blessings


Hurray! I finally figured out how to add a watermark image!!

I'm very excited to announce that I have the privilege of guest designing for Our Daily Bread Designs for the months of April and May!

I've never designed cards for a stamp company before and I'm feeling quite green! I hope I bring honor to God and to Kelley Holland, the owner of ODBD, as I represent Our Daily Bread Designs in my artwork.

Let me say a little about the stamps. They are made of high quality, deeply-etched rubber that is nicely trimmed and are mounted on Smart Cushion. And they're made right here in the United States! A rarity, these days! They come on an acrylic sheet and are easy to peel off, but cling strongly to your acrylic block. Very nice! They're a pleasure to stamp with! They're so nicely trimmed that I didn't even need my Stamp-a-ma-jig to line them up!

This first card uses the sweet image and one of the word sayings from one of the new April sets to be released tomorrow - April 1st, no foolin'! (lol Sorry, couldn't help myself.) The set is called Love One Another and has many lovely Scripture stamps that are very versatile for weddings, anniversaries, and just plain love stuff.

This card's base is Blush Blossom cs. I was going to go white, but the subtlety of the BB drew me in. It looks so lovely against the swirled vellum and the Martha Stewart Doily Lace punch design, not to mention, the romantic intertwined hearts.

I used the Cuttlebug Script embossing folder on just the front panels. You can see it peeking out from the bottom. The swirl vellum (Stampin' Up!) goes almost all the way down, but is broken by the lovely Doily Lace. I very gingerly dotted the BB cs with bits of Mono Multi glue to keep the vellum in place.

The oval scallop is actually a sandwich of cream cs and 2 pieces of swirl vellum. It works well. I wish I had used white cs instead, but the cream doesn't seem so out of place, really. I wanted the underside of the scallop to look finished, which is why I went with the sandwich.

To make the hearts sparkle I stamped in ColorBox Frost White (a pigment ink) and sprinkled it with White embossing powder. I heat set it and let it cool. Then I brushed the image with an invisible glue pen and sprinkled Snow White Mist glitter over it. After it dried I carefully brushed off the excess with a soft brush.

I added a small number of pearls to the organdy ribbon to oomph it up. The look goes beautifully with the vellum and cs, I think.


For the saying I stamped in ColorBox Frost White and heat embossed it with White embossing powder.


FYI, I highly recommend using an embossing pillow (usually filled with baby powder or some such) to prepare the area to be embossed. It removes or reduces the static cling of the ep and makes for a cleaner look. You just pat it gently all over on the area you want to heat emboss and then stamp.

For the inside I used white cs and swirl vellum. I put the vellum over the white on the side panels and just below the saying from Love One Another. I glued a row of pearls to some narrow organdy ribbon as an accent. The inside stamp is stamped in Blush Blossom ink.


You might have noticed a white dot on the back of the scallop in that last picture. T'is Velcro. I used my Crop-a-Dile to punch out a small circle of Velcro to use as a closure for the card. It's semi-reliable. I need a bigger circle for this card.

If you need to make any wedding cards or gifts, I highly recommend this set! Any June brides you need to stamp for?

Stamps: Our Daily Bread Designs "Love One Another"

CS: Blush Blossom, Swirl vellum, White, Cream

Inks: ColorBox Frost White, Blush Blossom

Other: Cuttlebug Script embossing folder, Nestabilities oval and scalloped oval, Martha Stewart Doily Lace punch, Pearls of various sizes, Thin organdy ribbon, 3D-Dots, Mono Multi glue, Glue pen, White embossing powder, Snow White Mist glitter

Thursday, September 11, 2008

Autumn Morning


Are you ready for Autumn to get here?? I sure am! To me, the quintessential Autumn stamp set is SU's Lovely Leaves. I was honestly shocked when Stampin' Up retired it. I couldn't believe they'd get rid of such a classic set so quickly. I mean good grief, they still have Lovely As a Tree!!! This set surely is as good, I say. I hope to bring it out to play with numerous times over the next couple of months. So I hope you like it, too. You can see samples of cards done using that set here and here. As you can see, a very versatile set.

To make this card I began by creating a black base. I used Pumpkin Pie as the card's main color. I stamped several leaves from Lovely Leaves in Basic Black and the leaf outline stamps from the set with Ruby Red. I ran it through the Cuttlebug (twice, due to size) using the Mesh embossing folder. Then I rubbed Vintage Photo distress ink all over it.

For the sentiment area I stamped the Wordsworth "O Good" stamp in Basic Black. After it thoroughly dried, I sponged and rubbed various inks (listed below) over it. (Clarification: I actually rubbed some of the ink pads themselves right on the cs - also, I forgot to mention that the sentiment cs piece was white cs. Sorry for the omission.) I adhered it to the black cs after I did the edge of the black with the Martha Stewart Embossed Zigzag punch.


To get it to fit right I made sure the sides of the black were right with the sentiment piece and made the length longer than I needed it to be. Then I used the punch. I positioned the sentiment piece on the black near the punched edge and marked on the top (above the sentiment) where to cut. Then I trimmed it and adhered the sentiment to it. I added antique brass eyelets using the Crop-a-Dile. Once I did all of that I used a straight pin and the Mat Pack cushion and added holes around the sentiment on the black.

I added the zigzag ribbon and then adhered the sentiment using Dimensionals to pop it up.

Inside the card I cut 2 pieces of Pumpkin Pie cs to fit each panel and paper-pierced the edges with the straight pin and did some fancy paper piercing in the corners. I stamped a leaf from Lovely Leaves in Pumpkin Pie ink on the panels. I accidentally got a bit of black ink smudged on one panel, so I sponged both with Basic Black a bit to blend in my mistake. You'd never know I goofed! ;)


I wanted to mention something that worked for me in trying to line up my holes neatly when paper piercing. I just tried this so it's a new idea to me. You all may have already figured it out:

To keep the lines straight (I have the Mat Pack template, but find it hard to work with until I get a proper piercing tool - on my list!) I used the edge of one of my Stamp-a-ma-jig sheets and held it in place while I paper pierced freehand along its edge. It worked very well, I must say. A good "get by" tip for those who've not bought the Mat Pack from SU or a proper piercing tool.

So...my first Autumn card of 2008. Hope you enjoy it. Thanks for looking!

Stamps: SU Lovely Leaves, "O Good" by Wordsworth

CS: Black, Pumpkin Pie, White

Inks: Basic Black, Ruby Red, Pumpkin Pie, Real Red, More Mustard, Summer Sun, Tim Holtz Vintage Photo distress ink

Other: Cuttlebug Mesh embossing folder, Martha Stewart Embossed Zigzag punch, Sponges, Antique brass eyelets, Crop-a-Dile (for eyelets), Straight pin, Mat pack cushion, Dimensionals, Zigzag ribbon

Monday, September 01, 2008

For You Floral


This will be known as my Hurricane Gustav card. I spent all day yesterday watching and listening to a Louisiana broadcast online of the coming hurricane while I was stamping (still watching). I had a hard time focusing on this card as my mother-in-law and brother-in-law are in Louisiana weathering the storm (they're doing fine, though). So please forgive its imperfections. My mind was quite distracted, but I needed to do something with myself. So I stamped, of course.

I began with a black cs base, but the Mellow Moss cs is where the card opens. I stamped the SU Hand Stitched background stamp in VersaMark ink on the Mellow Moss. After stamping the "For You" sentiment in Basic Black ink on Real Red, I ran it through the Cuttlebug using the Swiss Dots folder.

I punched the edges on the floral Anna Griffin paper and the black with the Martha Stewart Doily Lace punch and ran the floral paper through the Cuttlebug using the Traffic Jam folder. I was careful to line it up above the lacy edge. I used Dimensionals between the floral and the black and the red. Probably too many Dimensionals! lol

I used the Crop-a-Dile to punch the holes and set the eyelets. That was a bit tricky and they aren't lined up perfectly. I added the plaid ribbon and adhered the whole mess to the Mellow Moss cs.

For the girl, I stamped her in Basic Black ink on Vanilla cs. Using a water brush, I painted her dress with Ruby Red ink, going over it several times in some places to add depth. I used a white gel pen to whiten her collar, sash and sleeve edge. I used Mellow Moss and So Saffron inks to paint the grass. The flowers and butterflies are in So Saffron (marker). I used the Blush Blossom marker to paint her skin and Close to Cocoa to do the tiny bit of her hair.

I ran the girl piece through the Cuttlebug using a plain oval Nestie. Then I dry embossed the edge. I ran the black cs through using a scallop Nestie. I paper pierced the black scallop using a straight pin and the mat pack cushion after attaching the girl piece with Dimensionals (I find it easier to paper pierce the scallops that way).

Close-up of paper piercing:


Thanks for looking! Be safe if you're in this hurricane or are waiting it out elsewhere. God be with you!

Stamps: SU Hand Stitched, SU Summer By the Sea, CTMH Spunky Greetings

CS: Black, Mellow Moss, Real Red, Anna Griffin floral (AG 024), Vanilla

Inks: VersaMark, Basic Black, Ruby Red, Mellow Moss, So Saffron

Other: Cuttlebug Traffic Jam and Swiss Dots embossing folders, Martha Stewart "Doily Lace" punch, Oval plain and scallop Nestabilities, Crop-a-Dile, Black eyelets, Dimensionals, Water brush, Plaid ribbon, Straight pin, Mat pack cushion, Blush Blossom marker, Close to Cocoa marker, So Saffron marker, White gel pen

Saturday, August 30, 2008

Just For You Punchie Flower


Another square card! Can I get enough of these square cards? I think not! This one is 5" X 5".

This will be my "Wives and Daughters" card as that is what I watched while I was making it. ;)


Wives and Daughters

I found an amazingly-talented stamper named Jenn Biederman via FlickR recently who inspired me to make this card. She blogs here. She made this adorable owl card using some Cosmo Cricket paper which I happen to have. Well, I never thought much about that paper until I saw what she did with it! I liked the design she used as well, so I kind of incorporated that into my card also. Thanks for the inspiration, Jenn!

The base of the card is Chocolate Chip. I sponged Chocolate Chip and Basic Black inks along the edges before adding the black cs and the Cosmo Cricket paper (from the Jitterbug collection).

For the Cosmo Cricket paper I ran it through the Cuttlebug twice because of the size. I used the Tiny Bubbles embossing folder. Then I sponged Chocolate Chip and Basic Black inks around the edges to give it a more vintage look. I adhered it to the black and chocolate cs. Had I known I was going to use the ribbon I would've added it at this point. To the ribbon area I added a bit more ribbon and a silver eyelet. Let's just say that the Crop-a-Dile paid for itself at this point! I couldn't believe how easy it made this job (3 pieces of cardstock plus 3 layers of ribbon, and it went right through it as if it was butter). I was totally impressed.

I took 2 different solids from the Jitterbug collection and added them to black cs bases, making them approximately square. But first I sponged each with the Chocolate and black inks as I did elsewhere. I paper pierced holes in the corners of the red piece with a straight pin and the mat pack cushion (oh, the satisfaction that gives! lol). I used Dimensionals to pop both squares out and set them perpendicular to each other.

Now on to the flower. I got this idea after using the oval punches to add accents to this card. I thought it would make excellent flower petals. So I finally got around to making what I had envisioned. As often happens, what's in my head doesn't always come out exactly like I had envisioned it. But I usually like what I end up with. Such is the case here.

I punched the bigger ovals from the Cosmo Cricket paper and the smaller ovals from black cs. I glued them together and trimmed off one end of each to take away some of the bulk underneath (basically like I did to the accents on the above-linked card). I paper pierced the black area first, then the dp area. Then I sponged chocolate and black inks along the edges. I added the silver eyelets last using the Crop-a-Dile to set them. Thanks to the Crop-a-Dile, it took only about 2-5 seconds per petal to set them. You must get this product if you like using eyelets!!

I punched out the circle for the center using the red I used in the square and paper pierced it and stamped it in black with an old Stampin' Up! sentiment I got many years ago. I sponged the edges like I did on the rest of the card and used tall Dimensionals to place it up high enough to put the petals under. Then I cut some Dimensionals up and put them in different places on the petals to give them stability and adhered them next, tucking them under the center.

Close-up of paper piercing on petals:


For the stem I cut a strip from the green dp freehand, sponged it and then used cut-up Dimensionals to give it a popped out look.

For the leaves I used the small oval punch and punched out the leaves from the same green as the stem. Then I paper pierced them to resemble leaves by running a line of holes down the center and then running "veins" in 3 places out from the center. I then folded at the center to give it a leafy "look" and flattened it out a bit again and put a strip of mono adhesive along the back. Then I folded it again and adhered it. Not sure how long they will stay on, but they're holding for now.

Close-up of leaf:


You know, now that I think about it I should've done a LOT more paper piercing on this thing! I DO love it so!

I think I covered everything. If you have any questions, please ask. Thanks for looking!

Stamp: "JUST FOR YOU" by Stampin' Up!

CS: Chocolate Chip, Black, Cosmo Cricket Jitterbug Collection

Inks: Basic Black, Chocolate Chip

Other: Cuttlebug Tiny Bubbles embossing folder, Lg. oval punch, Sm. oval punch, 1&1/4" circle punch, Crop-a-Dile, Straight pin, Mat pack cushion, Silver eyelets, Zigzag ribbon, Sponges, Dimensionals