Hello, my stamping friends! Hope all is well with you! I ran across something I thought you'd like. How about some free Christmas printables??
Go get 'em!

Sunday, December 05, 2010

Sunday, October 24, 2010
Free digiscrapping kit from Shabby Princess
Forgive me for being neglectful of this blog, but life is too full right now for me to even be thinking about stamping. It's way down on my list of things to do. But I was cleaning out my inbox and discovered this little tidbit that I thought was worth sharing.
Check out The PLENTIFUL Collection over at Shabby Princess. It's FREE! How nice of them!
Check out The PLENTIFUL Collection over at Shabby Princess. It's FREE! How nice of them!
Friday, October 22, 2010
Getting dusty around here
Wow, has it really been a month and a half since my last post? I'm so sorry that I'm not actively stamping right now, nor even doing much at all that pertains to stamping. The most I've done is update some things on my website. I went through the mountain of links on my Great Tutorials page and that was almost more than I could stand. What a lot of links I've found! And there's no easy way to check them other than clicking on them.
I had found out that SCS had changed every link to every tutorial at some point recently (probably during the owner change or whatever), and every link I had from them was no longer working. Thanks SCS!!! So I had to go in and manually change
I had found out that SCS had changed every link to every tutorial at some point recently (probably during the owner change or whatever), and every link I had from them was no longer working. Thanks SCS!!! So I had to go in and manually change
Thursday, September 02, 2010
For You

I am still without my beloved Canon Rebel so please forgive the slightly gimpy picture. A good camera is priceless.
This card is for a friend whose birthday is coming up in a week or so. I'll admit that this image isn't really a birthday image, per se, but I think it can pass as one with the "card" and all. It can, can't it? I'll also admit that I already had this image printed out and decided to use it rather than print out something else.
I wanted to try using only (or mostly only) colors in the warm neutral Copics to see how it would turn out. I love it! And I also wanted to try that shiny black hair tutorial I posted recently. Pretty cool, I think, but a little harder than I expected since I tend to overdo, and under-doing is better in this case. My inspiration for this coloring job came from this artist's style. Maybe a little Tim Burton-ish. Unfortunately, the camera couldn't pick up the more subtle shading I did on the face and the envelope doesn't even look colored, but it is. Also, the flowers are redder than they look. *sigh* I miss my good camera.
Thanks for the comments on my last post. When I think of competitiveness in the card-making community, I think of how many of us feel the need to use the latest stuff or we think our cards aren't worthy of posting, or something like that. At least, that's my problem. This happens to me all the time: Just when I start collecting the latest Spellbinder dies I find out they're yesterday's news and all the cool stampers have moved on to the new sets...and they all seem to know what are going to be the most popular dies. The same with stamps and inks and embellishments. They must have a money tree in their back yard or they're being given free stuff. I don't know.
I know it's childish of me to struggle with this stuff, but I do. And I doubt I'm alone. It's the main reason I avoid going on too many blog hops. I just can't take how behind the times I am and I feel constantly tempted to buy more stuff to keep up. Yes, big confession. So I stay in my own little corner and try to be content with what I have. It's the best way for me to deal with it. My budget groans when I try to keep up, doesn't yours?
Please forgive me for ever feeding the spending frenzy by what I've posted here. Perhaps I should do more to encourage using what you have rather than point you to yet another thing to buy. These days I am far less "stuff-oriented" than I used to be. Maybe it's the memory of all that money I've (over) spent over the years on this hobby. It makes me afraid to step foot in a crafting store! I keep thinking of all the other stuff I already have. I should not be buying more.
Okay, back to the card. One thing I want to mention that I did differently is I distressed both the inside and outside edges of the blossom. You can use a scissors (hold scissors open with the sharp edge exposed - rub the scissors along the edge while holding the paper firmly or vice versa - whatever works for ya) or a thread cutter to achieve that look. Also, it's hard to tell from the pic, but the girl image is under the blossom die cut. I cut a hole in the center of the blossom and used foam tape snipped into tiny pieces around the "petals" of the flower to raise it up.
Hope you have an inexpensive, fun-filled evening! ;)
Stamps: Pure Innocence 004 digi stamp, All Year Cheer I word saying
CS: White, black, PTI Pure Poppy, Basic Grey Granola, Stampin' Up! Swirl vellum
Ink: Versafine Onyx Black, computer ink
Copics: W00, W1, W3, W5, W7, 110, R29
Other: Martha Stewart Doily Lace border punch, SU! spiral punch, Spellbinders Nestabilities Blossom die, Standard Circle Large die, Cuttlebug Script embossing folder, sewing machine, clear gems, red gingham ribbon, foam tape
Thursday, July 22, 2010
Color inspiration
If you want some help finding yummy color combos, look at this blog. I could just EAT it, yum!
Daisy Pink Cupcake
Daisy Pink Cupcake
Blogger disappearing nav bar tutorial
Those of us who use Blogger sometimes find the nav bar at the top of the screen to be kind of ugly. But it serves a purpose and we need it for easy access to our blogs. So if you want access to your nav bar, but don't want it mucking up your look, this tutorial tells you what to do. A friend of mine shared it on her blog. I tried it and I like it!
You can pick the nav bar color you like in your design section after adding the widget. Just make sure that you delete the code that made it go away in the first place. To do that, click on "Edit HTML". After bringing up your blog's template do "Ctrl F" on your keyboard. It makes the "find" feature come up on your browser. Just type in "nav" and it will direct you to that code. Remove it and save. Then add the widget or add the widget and then remove the code. You must do both. Then go to Page Elements and click on "Navbar". Change to your preferred color - I use transparent light - and save. You're done!
You can pick the nav bar color you like in your design section after adding the widget. Just make sure that you delete the code that made it go away in the first place. To do that, click on "Edit HTML". After bringing up your blog's template do "Ctrl F" on your keyboard. It makes the "find" feature come up on your browser. Just type in "nav" and it will direct you to that code. Remove it and save. Then add the widget or add the widget and then remove the code. You must do both. Then go to Page Elements and click on "Navbar". Change to your preferred color - I use transparent light - and save. You're done!
Tuesday, July 20, 2010
Monday, July 19, 2010
Lovely Friend

Hey all! No shiny black hair here yet, but a lovely octopus!
I started out by picking the paper and the octopus from SU Silly Sealife just seemed to fit well with it. It was all an excuse to color really! I looked through my digis and nothing spoke to me. So I went through my rubber stamps and settled on the octopus. You notice I made him a her? It just seemed right since I was making the card fairly feminine. Although, I imagine octopuses aren't very lovely in and of themselves, but God created them so unique that they have a beauty all their own. So there. ;)
Hope you have a lovely Monday, my stamping friends! I have mountains of laundry and dishes waiting for me!
Recipe
Stamps: Stampin' Up! Silly Sealife, Stampin' Up! Amazing to Zany
CS: CTMH Autumn Terracotta, black, Basic Grey Archaic designer paper, white
Inks: Memento Tuxedo Black, Versafine Onyx Black
Copic markers: E57, R02, W3, W5, YG63, YG91, YG93, YG95
Other: Nestabilities Standard Circle Large & Small, Large Classic Inverted Scalloped Circle, paper-piercing tool, sponge mat, large & small oval punches, pearl gems, cream satin ribbon, black gingham ribbon, sewing machine, foam tape, Inkssentials opaque white gel pen, homemade Bow Easy
Friday, July 16, 2010
Got shiny hair?
Donna made this fabulous card using this excellent video created by Lysa as a tutorial for making shiny black hair. Thanks for sharing this video with us, Donna! I'm definitely going to give it a try!
Tuesday, July 13, 2010
Just saying hello
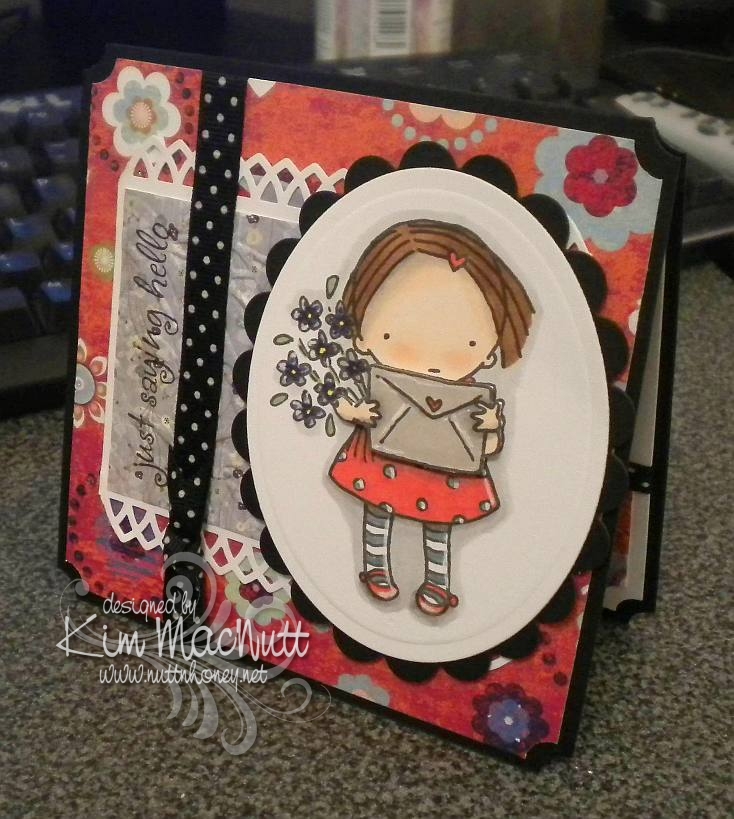
Yay! I actually created a card! I've put my stamping on the sidelines for awhile now. Real life has pushed it way down the list, but I just had to do some creating or I'd burst!
I actually made this card on Sunday, but my camera has a problem and needs fixing, so I had to borrow my daughter's camera. Unfortunately, it's not as crisp and clear as mine is in low light, which is all I had to work with. So forgive the not-so-great photo.
Nothing much new here. I picked the same old standbys: ticket corner punch, cuttlebugging some of the designer paper, favorite polka dot ribbon (which, of course, comes in tiny, expensive little spools!), digital image as center point.
As always, I had fun coloring the sweet little girl from the Pure Innocence collection. And she was what prompted me to choose the papers I did.
I used my new Martha Stewart Arch Lattice border punch and trimmed the ends to create a pointed edge.
The envelope and arms are popped out with foam tape. I wanted to show that better, but the camera wouldn't cooperate with me.
I highlighted here and there with an opaque white gel pen. I love how much that trick adds to the look.
I hope you enjoy this meager offering of mine. Have a lovely week!
Recipe
Stamps: Digital stamp Pure Innocence 004, saying from Hero Arts CL305 set Sending Happy Thoughts
CS: Black, Pocket Full of Posies by DCWV designer paper, Basic Grey Wisteria designer paper, white
Ink: Versafine Onyx Black, computer ink
Copics: Y15, R24, YG63, E25, E35, E00, E93, BV08, BV11, T1, E41, W1, W3, W5
SU Markers: Bordering Blue, Brocade Blue
Other: Cuttlebug Floral Screen embossing folder, Spellbinders Nestabilities Classic Oval Large, Classic Oval Scallop Large, ticket corner punch, Martha Stewart Arch Lattice border punch, Inkssentials opaque white gel pen, black polka dot ribbon, foam tape
Subscribe to:
Posts (Atom)