If you want some help finding yummy color combos, look at this blog. I could just EAT it, yum!
Daisy Pink Cupcake

Thursday, July 22, 2010

Blogger disappearing nav bar tutorial
Those of us who use Blogger sometimes find the nav bar at the top of the screen to be kind of ugly. But it serves a purpose and we need it for easy access to our blogs. So if you want access to your nav bar, but don't want it mucking up your look, this tutorial tells you what to do. A friend of mine shared it on her blog. I tried it and I like it!
You can pick the nav bar color you like in your design section after adding the widget. Just make sure that you delete the code that made it go away in the first place. To do that, click on "Edit HTML". After bringing up your blog's template do "Ctrl F" on your keyboard. It makes the "find" feature come up on your browser. Just type in "nav" and it will direct you to that code. Remove it and save. Then add the widget or add the widget and then remove the code. You must do both. Then go to Page Elements and click on "Navbar". Change to your preferred color - I use transparent light - and save. You're done!
You can pick the nav bar color you like in your design section after adding the widget. Just make sure that you delete the code that made it go away in the first place. To do that, click on "Edit HTML". After bringing up your blog's template do "Ctrl F" on your keyboard. It makes the "find" feature come up on your browser. Just type in "nav" and it will direct you to that code. Remove it and save. Then add the widget or add the widget and then remove the code. You must do both. Then go to Page Elements and click on "Navbar". Change to your preferred color - I use transparent light - and save. You're done!
Tuesday, July 20, 2010
Monday, July 19, 2010
Lovely Friend

Hey all! No shiny black hair here yet, but a lovely octopus!
I started out by picking the paper and the octopus from SU Silly Sealife just seemed to fit well with it. It was all an excuse to color really! I looked through my digis and nothing spoke to me. So I went through my rubber stamps and settled on the octopus. You notice I made him a her? It just seemed right since I was making the card fairly feminine. Although, I imagine octopuses aren't very lovely in and of themselves, but God created them so unique that they have a beauty all their own. So there. ;)
Hope you have a lovely Monday, my stamping friends! I have mountains of laundry and dishes waiting for me!
Recipe
Stamps: Stampin' Up! Silly Sealife, Stampin' Up! Amazing to Zany
CS: CTMH Autumn Terracotta, black, Basic Grey Archaic designer paper, white
Inks: Memento Tuxedo Black, Versafine Onyx Black
Copic markers: E57, R02, W3, W5, YG63, YG91, YG93, YG95
Other: Nestabilities Standard Circle Large & Small, Large Classic Inverted Scalloped Circle, paper-piercing tool, sponge mat, large & small oval punches, pearl gems, cream satin ribbon, black gingham ribbon, sewing machine, foam tape, Inkssentials opaque white gel pen, homemade Bow Easy
Friday, July 16, 2010
Got shiny hair?
Donna made this fabulous card using this excellent video created by Lysa as a tutorial for making shiny black hair. Thanks for sharing this video with us, Donna! I'm definitely going to give it a try!
Tuesday, July 13, 2010
Just saying hello
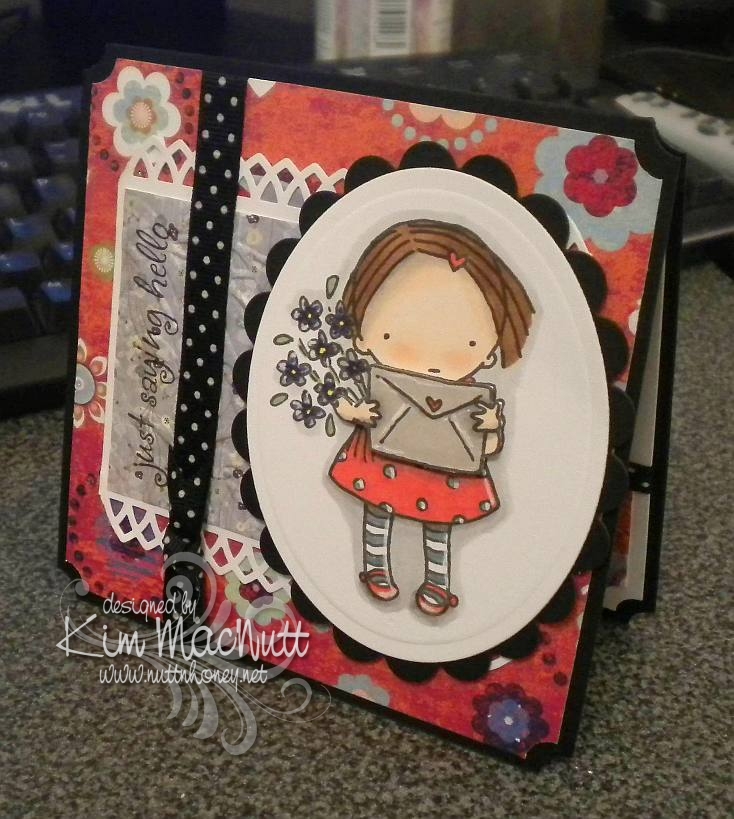
Yay! I actually created a card! I've put my stamping on the sidelines for awhile now. Real life has pushed it way down the list, but I just had to do some creating or I'd burst!
I actually made this card on Sunday, but my camera has a problem and needs fixing, so I had to borrow my daughter's camera. Unfortunately, it's not as crisp and clear as mine is in low light, which is all I had to work with. So forgive the not-so-great photo.
Nothing much new here. I picked the same old standbys: ticket corner punch, cuttlebugging some of the designer paper, favorite polka dot ribbon (which, of course, comes in tiny, expensive little spools!), digital image as center point.
As always, I had fun coloring the sweet little girl from the Pure Innocence collection. And she was what prompted me to choose the papers I did.
I used my new Martha Stewart Arch Lattice border punch and trimmed the ends to create a pointed edge.
The envelope and arms are popped out with foam tape. I wanted to show that better, but the camera wouldn't cooperate with me.
I highlighted here and there with an opaque white gel pen. I love how much that trick adds to the look.
I hope you enjoy this meager offering of mine. Have a lovely week!
Recipe
Stamps: Digital stamp Pure Innocence 004, saying from Hero Arts CL305 set Sending Happy Thoughts
CS: Black, Pocket Full of Posies by DCWV designer paper, Basic Grey Wisteria designer paper, white
Ink: Versafine Onyx Black, computer ink
Copics: Y15, R24, YG63, E25, E35, E00, E93, BV08, BV11, T1, E41, W1, W3, W5
SU Markers: Bordering Blue, Brocade Blue
Other: Cuttlebug Floral Screen embossing folder, Spellbinders Nestabilities Classic Oval Large, Classic Oval Scallop Large, ticket corner punch, Martha Stewart Arch Lattice border punch, Inkssentials opaque white gel pen, black polka dot ribbon, foam tape
Tuesday, May 25, 2010
Another great idea for Nestie storage
A FlickR member commented on one of my pics and I went to visit hers and saw that she stores her Nesties on those rings you can use for cardstock samplers. Pretty cool, I thought.
Check it out!
Check it out!
Wednesday, April 28, 2010
Dream

Hello! We are getting such beautiful weather lately! Sunny and cool and windy! Doesn't feel like NE Georgia in April a-tall! Is it unusually cool where you are?
This card was inspired by the artwork of Alina at simcards. She does these adorable circle flower thingies which inspired my distressed circle "flower" and she does an awesome job coloring her images and adding touches of white here and there. She also recently used the spiral punch, so that inspired me to pull mine out and use it.
The placement of the clear gems was inspired by sweet Donna at 3 Umbrellas. She does such whimsical things with gems and pearls!
I used the Forest Branches embossing folder on the main image. I'm iffy about that one, but I think it kinda works. Think "wind".
I used Stampin' Pastels (chalks) to color the sky and around the girl. So much softer and easier to apply than markers.
Well, I just realized that I can't give you my Copics color list because I put them away and didn't take note of which ones I had used! Oops! Sorry about that!
The main image was one of those I mentioned having colored a few days back. I hope to get another card made with another one I am happy with. I had a couple of duds that will likely end up in the trash, though!
Hope you have a lovely week! Thanks for coming by! Happy coloring!
Stamps: Pure Innocence 006 digi by Heather Ellis, word stamp from CTMH Geometric Thoughts
CS: PTI white, black, Basic Grey Recess (retired), Basic Grey Obscure (retired), and Basic Grey Lemonade 6X6' pads
Ink: Computer and Memento Tuxedo Black, various Copics
Other: Cuttlebug Forest Branches and Stylized Flowers embossing folders, spiral punch, Nestabilities Classic Oval Large, Classic Oval Scallops Large, paper piercing tool, circle punches, small and large oval punches, gems, Stampin' Pastels, kneaded eraser, 3D-Dots, black gingham ribbon, thin black grosgrain ribbon
Friday, April 23, 2010
Inspired by my littlest

After all the coloring I've done, I ended up making a card with an image I never set out to use on a card. Funny. My youngest wanted something to color with my Stampin' Pastels (chalks) as she had a blast the other day when I let her play with them. So I thought this big silhouette image from Stampin' Up! Inspired By Nature would be just perfect. Well, I stamped me one, too, and boy, was it fun to color!
I stamped it in VersaMark ink and let it dry for maybe 30 minutes or so. I find it's easier to color if the ink is drier. I began by laying on the main colors I wanted the flowers and leaves and stems to be. Then I kept adding little touches of other colors. Once I liked the way it looked and decided to make a card out of it, I added more touches of color to match the background papers (Basic Grey Recess 6x6 pad - retired) and finished it off by going over the edges of the images ever-so-slightly in black chalk. It ended up looking like a watercolor! I used an eye shadow applicator to apply the smaller touches of color, as it was more precise that way. But for the big washes of color I used mini pompoms and an alligator clip. That's just my preference. You might like to do it differently.
*Edited to add* After coloring, I used a kneaded eraser to remove the excess around the images. It comes right off.
After I finished coloring the image, I put it through the Cuttlebug using the Script embossing folder. Then I spritzed it with Stampin' Up! Basic Black ink using the Inkworx air art gun (which, I think, goes by a different name now).
The word stamp is a Dawn Houser image by Inkadinkado. I thought it had just the right feel for this image.
Stamps: SU Inspired By Nature, Inkadinkado 8361-L (Dawn Houser line)
CS: Black, PTI white, Basic Grey Recess
Inks: VersaMark, Memento Tuxedo Black
Other: Cuttlebug Script embossing folder, Stampin' Up! Scallop Trim border punch, Nestabilities Long Classic Rectangles Large, Long Classic Scalloped Rectangles Large, sewing machine, Inkworx air art gun, SU Basic Black marker, clear gems, black polka dot ribbon, foam mounting tape, Stampin' Pastels, eye shadow applicator, mini pompoms, alligator clip, kneaded eraser
Thursday, April 08, 2010
Eternal Summer even though it's still Spring
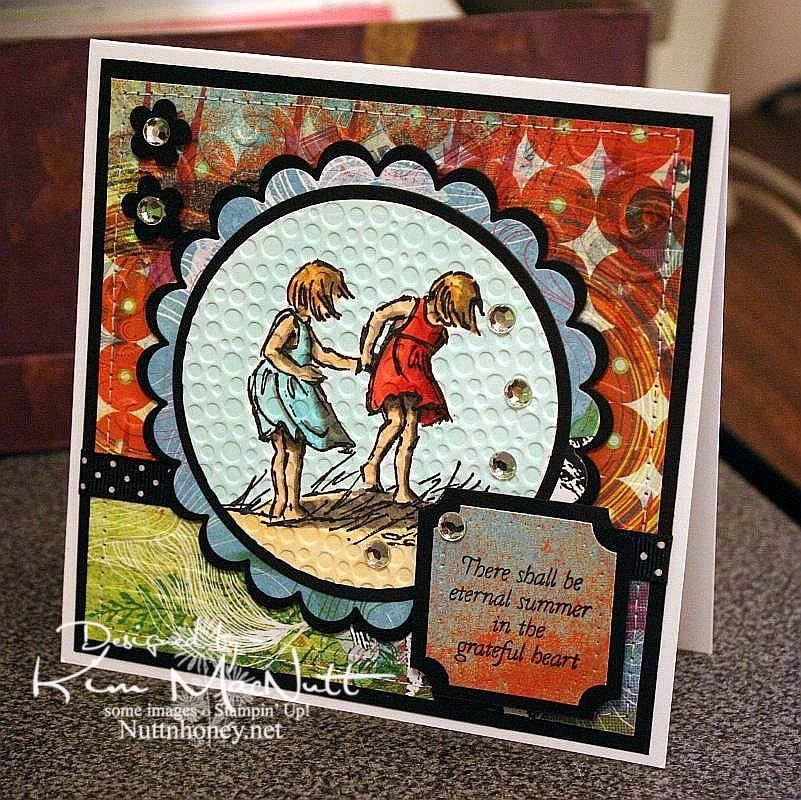
I know it's not Summer yet, but I thought this saying from Flourishes' Poppy Patch set went perfectly with this image from SU Seaside Sketches.
We had a lovely, rainy day that washed away all the pollen, praise the Lord! Oh, how gorgeous it was this afternoon! Cool, fresh and sunny. And green! No more yellow everything!
My allergies didn't get a break today, but I'm hoping tomorrow will be better. I really want to enjoy the beautiful weather while it lasts.
It's kind of hard to see, but I cuttlebugged the hooey out of this card. I used D'Vine Swirls on the top background to mimic waves, and used Distressed Stripes horizontally on the bottom to mimic the seashore. Then I used Tiny Bubbles on the main image. It mimics...bubbles. That one you probably can see.
The papers are all from the retired Basic Grey Obscure 6x6 pad. I love their vibrant, fresh colors. They really pop when contrasted with the black!
Thanks for looking. Hope your weekend is a beautiful one! My 13 yo is giving a tea party for her AHG scout friends on Saturday. I'm hanging out close by, but I'm letting her do nearly all the work. She loves it!
Stamps: SU Seaside Sketches, Flourishes Poppy Patch (saying)
CS: PTI white, black, Basic Grey Obscure designer papers
Inks: Versafine Onyx Black, Memento Tuxedo Black
Copics: W3, W5, W7, R24, R29, R30, BG10, BG11, BG13, YR00, YR20, Y21, E31, E33, E35
Other: Cuttlebug D'Vine Swirls, Distressed Stripes, and Tiny Bubbles embossing folders, Nestabilities Standard Circles Small, Standard Circles Large, Classic Scalloped Circles Small, Classic Scalloped Circles Large, Classic Squares Large, ticket corner punch, small flower punch, sewing machine, black polka dot ribbon, clear gems, 3D-Dots, foam mounting tape, SU paper piercing tool, sponge mat
Subscribe to:
Posts (Atom)